

Welcome to the delightful world of **Donut Cookies**! These charming treats beautifully marry the classic appeal of a soft, lightly sweetened cookie with the fun, vibrant aesthetics of a donut. Each bite offers a tender texture, enrobed in an easy-to-make, dreamy icing, and crowned with a playful scattering of colorful sprinkles. This old-fashioned recipe, crafted from basic pantry ingredients, promises to be a cherished favorite for the entire family.
Craving more whimsical and mouth-watering cookie ideas? Be sure to explore our celebrated 4-ingredient Circus Animal Sugar Cookies or indulge in the timeless comfort of our Soft Sugar Cookies. They’re all just as satisfying and fun to make as these Donut Cookies!

Discover the Magic of Homemade Donut Cookies
These Donut Cookies are more than just a sweet treat; they’re an experience! Their perfectly balanced sweetness, achieved through the delightful combination of the tender cookie dough and the smooth, delectable icing, is truly irresistible. The beauty of this recipe lies in its versatility. You can adorn them with traditional rainbow sprinkles to mimic classic donuts, or let your creativity soar by choosing sprinkles that match upcoming holidays, themed birthday parties, or any special occasion you’re celebrating. Imagine patriotic sprinkles for the Fourth of July or pastel hues for an Easter gathering!
The entire baking process is designed to be enjoyable for everyone. Adults will appreciate the straightforward steps and minimal fuss involved in whipping up a batch of dough. Meanwhile, kids will absolutely adore being involved in the fun parts – rolling out the dough, using cookie cutters to create those iconic donut shapes, and, of course, drenching them in icing and sprinkles! The final outcome is a guaranteed hit, ensuring smiles all around.
One of the most charming aspects of these cookies is how they gracefully puff up during baking, beautifully resembling miniature donuts. If all this talk of donuts has awakened a craving for the real deal, don’t worry, we’ve got you covered! Satisfy that deep-fried desire with our Air Fryer Chocolate Donuts (From Scratch) for a lighter option, or indulge in the rich, pillowy goodness of our Brioche Donuts with Vanilla Cream.

Essential Ingredients for Your Donut Cookie Creation
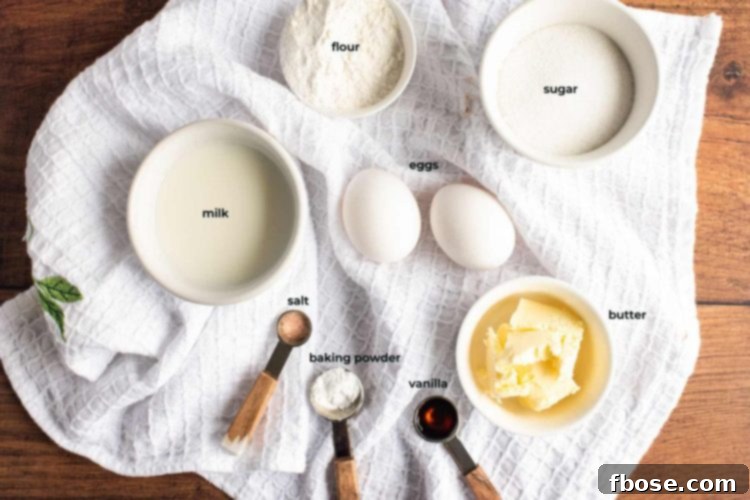
Crafting these fun and flavorful Donut Cookies is incredibly simple, relying primarily on everyday pantry staples. This means you’re likely just a few steps away from baking a batch of these sweet delights!
For the Irresistible Cookie Dough:
- All-Purpose Flour: The foundation of our cookies, providing structure and chewiness. Ensure it’s accurately measured for the best results.
- Salt: A crucial ingredient that balances the sweetness and enhances all the other flavors in the cookie.
- Baking Powder: Our secret to that lovely, slight puff that makes these cookies resemble mini donuts. It acts as a leavening agent, creating a tender crumb.
- Unsalted Butter: Using unsalted butter allows you to control the total salt content in your recipe. Make sure it’s at room temperature for optimal creaming with sugar, leading to a light and airy dough.
- Granulated Sugar: Provides sweetness and contributes to the cookie’s tender texture and golden-brown edges.
- Large Eggs: Act as a binding agent, add richness, and contribute to the cookie’s structure and moisture. Room temperature eggs emulsify better with the butter and sugar.
- Vanilla Extract: Essential for that classic, comforting cookie flavor. Don’t skimp on quality vanilla for the best taste.
- Whole Milk: Adds moisture and richness to the dough, contributing to its soft and tender consistency.
For the Quick and Dreamy Icing:
The icing is what truly transforms these into “donut” cookies, adding a layer of sweet glaze and a canvas for sprinkles.
- Powdered Sugar (Confectioners’ Sugar): The base for our smooth, quick-setting icing. Its fine texture dissolves easily, creating a silky glaze.
- Milk (or Heavy Cream): Used to achieve the perfect consistency for your icing. Start with a smaller amount and add more gradually to reach your desired thickness. Heavy cream will yield a richer, thicker glaze.
- Food Coloring (Optional): A few drops can transform your icing into any color, making these cookies even more festive and customizable for themes or holidays.
- Sprinkles: The iconic topping! From classic rainbow jimmies to seasonal shapes, sprinkles add both visual appeal and a delightful crunch.
While our simple glaze is fantastic, feel free to experiment with other toppings! You could opt for a crisp Easy Brown Sugar Frosting, the elegant sheen of royal icing, or even the creamy pink frosting we use on our beloved Soft Sugar Cookies for a different flavor profile.
How to Make Donut Cookies: A Step-by-Step Guide
Follow these simple instructions to create a batch of delightful Donut Cookies that are sure to impress!
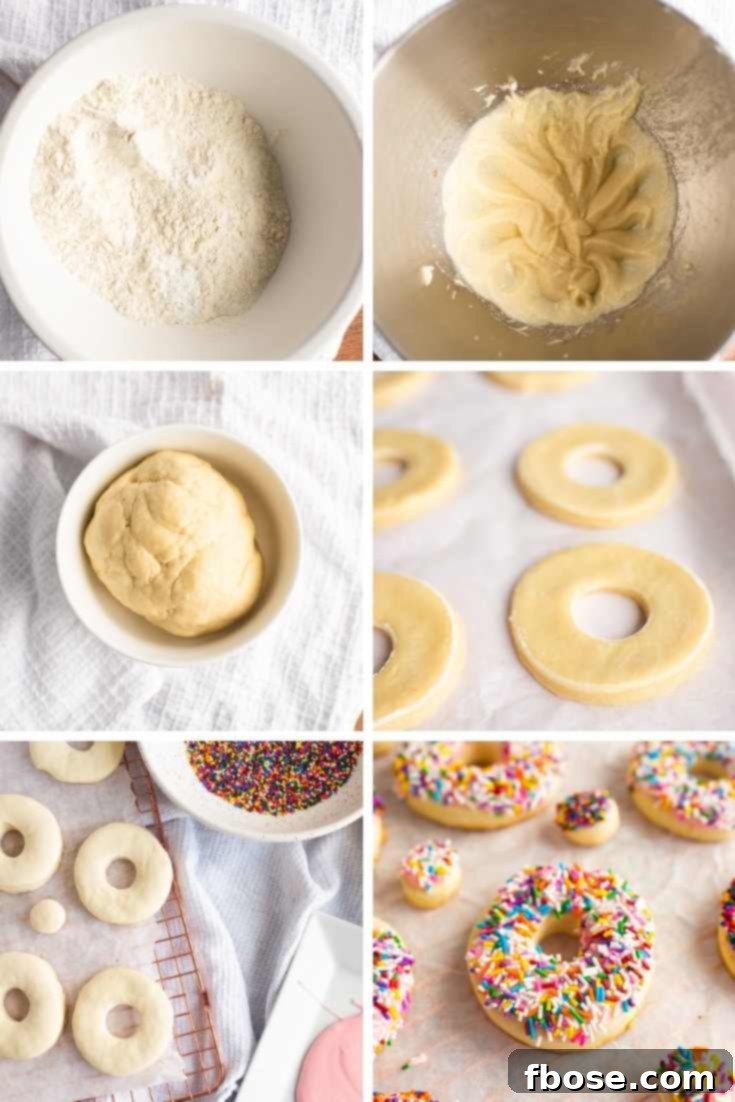
- Combine Dry Ingredients: In a medium-sized mixing bowl, thoroughly whisk together the all-purpose flour, baking powder, and salt. Set this mixture aside for later. This ensures the leavening agent and salt are evenly distributed.
- Cream Wet Ingredients: In the bowl of a stand mixer fitted with a paddle attachment, cream together the softened unsalted butter and granulated sugar until the mixture is light and fluffy. This step incorporates air, making your cookies tender. Next, add the eggs one at a time, beating well after each addition until fully incorporated. Scrape down the sides of the bowl as needed to ensure everything is well combined. Finally, stir in the vanilla extract.
- Form the Dough and Chill: Gradually add the dry ingredient mixture to the wet ingredients, alternating with the whole milk. Begin and end with the dry ingredients, mixing on low speed until just combined. Be careful not to overmix, as this can lead to tough cookies. The resulting dough should be soft, pliable, and slightly firm, but not sticky. Cover the dough tightly with plastic wrap and chill it in the refrigerator for at least one hour (or up to two hours) to firm up. This chilling step is crucial for preventing the cookies from spreading too much during baking and helps them hold their donut shape. While the dough chills, preheat your oven to 350°F (175°C) and line two baking sheets with parchment paper.
- Roll and Cut: Once the dough is properly chilled, remove it from the refrigerator. Lightly flour a clean work surface and your rolling pin. Roll the dough out evenly to a thickness of approximately 1/4 inch. Using a donut cutter (or two concentric round cookie cutters), cut out your donut shapes. Carefully transfer the donut cookies and their small inner holes onto the prepared baking sheets, leaving about 1-2 inches between each cookie to allow for slight spreading.
- Bake to Perfection: Bake the cookies for 10 to 12 minutes, or until the edges are lightly golden brown and the centers are set. Baking time may vary slightly depending on your oven. Once baked, allow the cookies to cool on the baking sheet for a few minutes before carefully transferring them to a wire rack to cool completely. It’s important for them to be entirely cool before icing.
- Ice and Decorate: While the cookies are cooling, prepare your icing. In a medium bowl, whisk together the powdered sugar and 2 tablespoons of milk (or heavy cream) until smooth. If the icing is too thick, add more milk, 1 teaspoon at a time, until you reach your desired drizzly but coatable consistency. If you desire colored icing, stir in 2-4 drops of food coloring until evenly distributed. Once the cookies are completely cool, dip the tops into the icing, allowing any excess to drip off. Immediately after icing each cookie, gently place it on a cooling rack and generously top with your favorite sprinkles before the icing sets. Let the icing set for about 15-30 minutes before serving or storing.
Expert Tips for Perfect Donut Cookies
Achieving bakery-quality donut cookies is easier than you think with these helpful tips:
- Don’t Overmix the Dough: Once the flour is added, mix only until the ingredients are just combined. Overmixing develops the gluten in the flour, resulting in tough, chewy cookies rather than the desired soft texture.
- Chill Time is Crucial: Do not skip the chilling step! Cold dough is much easier to handle, and more importantly, it prevents the cookies from spreading excessively in the oven, ensuring they maintain their beautiful donut shape.
- Proper Rolling Thickness: Aim for a uniform 1/4 inch thickness when rolling out the dough. This ensures even baking and consistent texture across all your cookies. Too thin, and they might become crispy; too thick, and they may not cook through.
- Flour Your Tools: Lightly dust your work surface, rolling pin, and donut cutter with flour to prevent the dough from sticking. This makes the cutting process much smoother.
- Cool Completely Before Icing: Resist the urge to ice warm cookies! Warm cookies will melt the icing, leading to a messy and less appealing finish. Ensure they are fully cooled on a wire rack before you begin decorating.
- Adjust Icing Consistency: The perfect icing consistency is key for a smooth, even coat. If your icing is too thick, add milk a teaspoon at a time until it’s pourable but still opaque. If it’s too thin, gradually whisk in more powdered sugar.
- Sprinkle Immediately: For best adhesion, add sprinkles to your cookies as soon as they are iced. The wet icing acts as a “glue,” ensuring your colorful decorations stay put.
- Reuse Dough Scraps: Gather any dough scraps, gently re-roll them, and cut out more cookies. Avoid overworking the dough too much, which can make it tough.

Customizing Your Donut Cookies: Flavors and Fun!
One of the most exciting aspects of these Donut Cookies is how easily they can be customized to suit any taste or occasion. Get ready to unleash your inner cookie artist!
- Sprinkle Spectacle: Beyond classic rainbow sprinkles, the possibilities are endless! Think seasonal mixes for holidays (red and green for Christmas, pastels for Easter), themed sprinkles for parties (superhero shapes, unicorn horns), or elegant metallic sprinkles for a sophisticated touch. You can even choose specific color palettes to match event decor.
- Icing Innovations: While vanilla is a timeless choice, consider infusing your icing with other flavors. A drop of almond extract offers a subtle nutty note, lemon zest and a hint of lemon juice will add a bright tang, or a touch of espresso powder can create a delightful coffee-flavored glaze. Melted chocolate or cocoa powder can turn your glaze into a rich chocolate topping.
- Food Coloring Creativity: Don’t limit yourself to one color! You can divide your icing and color it in multiple hues for a vibrant assortment. Try creating an ombré effect by using different shades of the same color or swirling two colors together for a marbled look.
- Beyond the Donut Shape: This versatile cookie dough is perfect for any cut-out cookie! Swap your donut cutter for hearts for Valentine’s Day, stars for patriotic celebrations, or festive shapes like trees or gingerbread men for winter holidays.
- Dough Add-ins: For an extra layer of flavor and texture, consider folding in mini chocolate chips, finely chopped nuts, or a dash of citrus zest (lemon, orange, or lime) into the cookie dough before chilling.
Storing Your Delicious Donut Cookies
To keep your Donut Cookies fresh and delicious, proper storage is key.
- Room Temperature Storage: Store these cookies in an airtight container at room temperature for up to 5 days. To prevent them from sticking together, especially if the icing is still slightly tacky, I highly recommend placing a piece of wax paper or parchment paper between each layer of cookies.
- Freezing Baked Cookies: If you’ve baked and iced more cookies than you can eat, they freeze beautifully! Place the decorated cookies in a single layer on a baking sheet and freeze until solid (about 1-2 hours). Once frozen, transfer them to an airtight freezer-safe container, again using parchment paper between layers. They can be frozen for up to 2-3 months. Thaw at room temperature before serving.
- Freezing Unbaked Dough: You can also prepare the cookie dough in advance and freeze it. Wrap the disk of dough tightly in plastic wrap, then place it in a freezer-safe bag. It can be frozen for up to 3 months. When ready to bake, thaw the dough in the refrigerator overnight, then proceed with rolling, cutting, and baking as usual.
Frequently Asked Questions (FAQ) About Donut Cookies
How can I make these cookies sweeter?
If you prefer a sweeter cookie base, you can increase the amount of granulated sugar in the cookie dough recipe to a full cup. However, keep in mind that the generous layer of icing significantly contributes to the overall sweetness of these cookies, so taste as you go!
Can I use this recipe for other cut-out cookies?
Absolutely! This versatile cookie dough is exceptionally well-suited for cut-out cookies. You can confidently swap out the donut cutter for any other cookie cutter shapes you desire – stars, hearts, squares, or even intricate seasonal designs. Just remember that smaller or more detailed shapes might require slightly less baking time, so keep an eye on them.
Do I have to chill the dough?
Yes, chilling the dough is a crucial step that should not be skipped! The chilling process allows the butter to firm up, which helps prevent the cookies from spreading too much in the oven. It also makes the dough much easier to handle and cut, ensuring your donut cookies maintain their distinct shape and have a perfectly tender texture.
Can I use different types of milk for the dough or icing?
For the cookie dough, whole milk provides the best richness and moisture for a tender cookie. While other milks like 2% or skim can be used, they might slightly alter the texture. For the icing, you can use any type of milk (dairy or non-dairy like almond or oat milk) or even heavy cream for a richer, thicker glaze. The key is to adjust the quantity slowly to achieve the desired consistency.
How do I prevent my cookies from spreading too much?
Several factors contribute to cookie spreading. Ensure your butter is at room temperature but not melted, chill the dough thoroughly as recommended, and avoid overmixing the dough. Also, make sure your oven temperature is accurate; an oven that’s too cool can cause cookies to spread before they set.

More Delectable Cookie Recipes to Explore
These Donut Cookies are a fantastic and fun treat perfect for parties, potlucks, or simply brightening your day. If you loved making these, you’ll definitely want to explore more delicious options from our extensive Cookie Recipes collection!
- Soft Champagne Sugar Cookies – Indulge in these incredibly soft and fluffy cookies, elegantly topped with a silky, luxurious champagne buttercream frosting. Perfect for celebrations!
- The Best Ever Monster Cookies – A truly epic cookie experience, these chewy delights are generously loaded with M&M’s, Reese’s Pieces, chocolate chips, wholesome oatmeal, shredded coconut, crunchy toffee bits, and a sprinkle of fun!
- Birthday Cake Pudding Cookies – A joyous and tasty alternative to a traditional birthday cake, offering all the festive flavors in a delightful cookie form.
- Bakery Style Chocolate Chip Cookies – Master the art of the perfect chocolate chip cookie with this recipe for big, thick, and wonderfully chewy cookies, made even better with a blend of both milk and semisweet chocolate chips.
- Jurassic Park Dinosaur Cookies – These delicious and themed cookies are ideal for dinosaur-themed birthday parties or for enjoying a cozy movie night at home with classic films.
Let’s Connect and Bake Together!
We truly hope you enjoy creating and savoring these delightful Donut Cookies! Your feedback is incredibly valuable to us. If you’ve tried this recipe, please take a moment to let us know how you liked it in the comments section below and leave a star review. We love hearing from you!
Don’t forget to tag us – @sugarandsoulco – on Instagram and Pinterest with your beautiful photos, or even better, join our Sugar & Soul Show-offs Community and share them there, where you can also participate in our fun recipe challenges!
Donut Cookies Recipe
These Donut Cookies are soft, lightly sweetened cookies that are covered in easy-to-make icing and then topped with fun colorful sprinkles!

Author: Rebecca Hubbell
Course: Dessert
Cuisine: American
Prep Time: 20 minutes
Cook Time: 12 minutes
Chill Time: 1 hour
Total Time: 1 hour 32 minutes
Servings: 12 cookies
Print Recipe |
Pin Recipe |
Rate This Recipe
Ingredients
Cookies
- 2¾ cup all-purpose flour (link)
- ¼ teaspoon salt
- 3 teaspoons baking powder (link)
- 4 tablespoons unsalted butter (link)
- ⅔ cup sugar
- 2 large eggs (link)
- 1 teaspoon vanilla extract (link)
- ½ cup whole milk
Icing
- 1 cup powdered sugar (link)
- 2-3 tablespoons milk or heavy cream
- 2-4 drops food coloring (optional)
- Sprinkles
Instructions
- In a medium mixing bowl, whisk together the flour, baking powder, and salt. Set aside.
- In a stand mixer fitted with a paddle attachment, cream together the butter and sugar. Add the eggs one at a time, beating between each addition. Add vanilla and mix until combined.
- Add the dry ingredients to the wet ingredients in three parts, alternating with milk. The dough should be soft but not sticky.
- Cover the dough and chill in the refrigerator for one hour.
- Preheat oven to 350°F (175°C) and line a baking sheet with parchment paper; set aside.
- Remove the dough from the refrigerator and roll out on a lightly floured surface to ¼-inch thick. Using a lightly floured donut cutter, cut out shapes (donuts and holes) from the dough and place them on the prepared baking sheet.
- Bake for 10 to 12 minutes until lightly brown around the bottoms. Allow them to cool on the cookie sheet for a few minutes before transferring to a wire rack to cool completely.
- While the cookies are cooling, whisk together the icing ingredients until smooth. Add the milk 1 tablespoon at a time until the desired consistency is reached. Add red food coloring if you like.
- Once cookies have cooled, dip them in the glaze and then directly into the sprinkles. Place on a cooling rack to set.
Notes
- Sugar can be increased to 1 cup if you want a sweeter dough, but the icing adds quite a bit of sweetness.
Nutrition
Calories: 239kcal | Carbohydrates: 44g | Protein: 4g | Fat: 5g | Saturated Fat: 3g | Trans Fat: 1g | Cholesterol: 39mg | Sodium: 66mg | Potassium: 157mg | Fiber: 1g | Sugar: 21g | Vitamin A: 179IU | Vitamin C: 1mg | Calcium: 65mg | Iron: 2mg
Did You Make This Recipe?
Don’t forget to share it with me on Instagram @sugarandsoulco and follow on Tiktok @sugarandsoulco and Pinterest @sugarandsoulco for more!
Pin Recipe
Share Recipe