
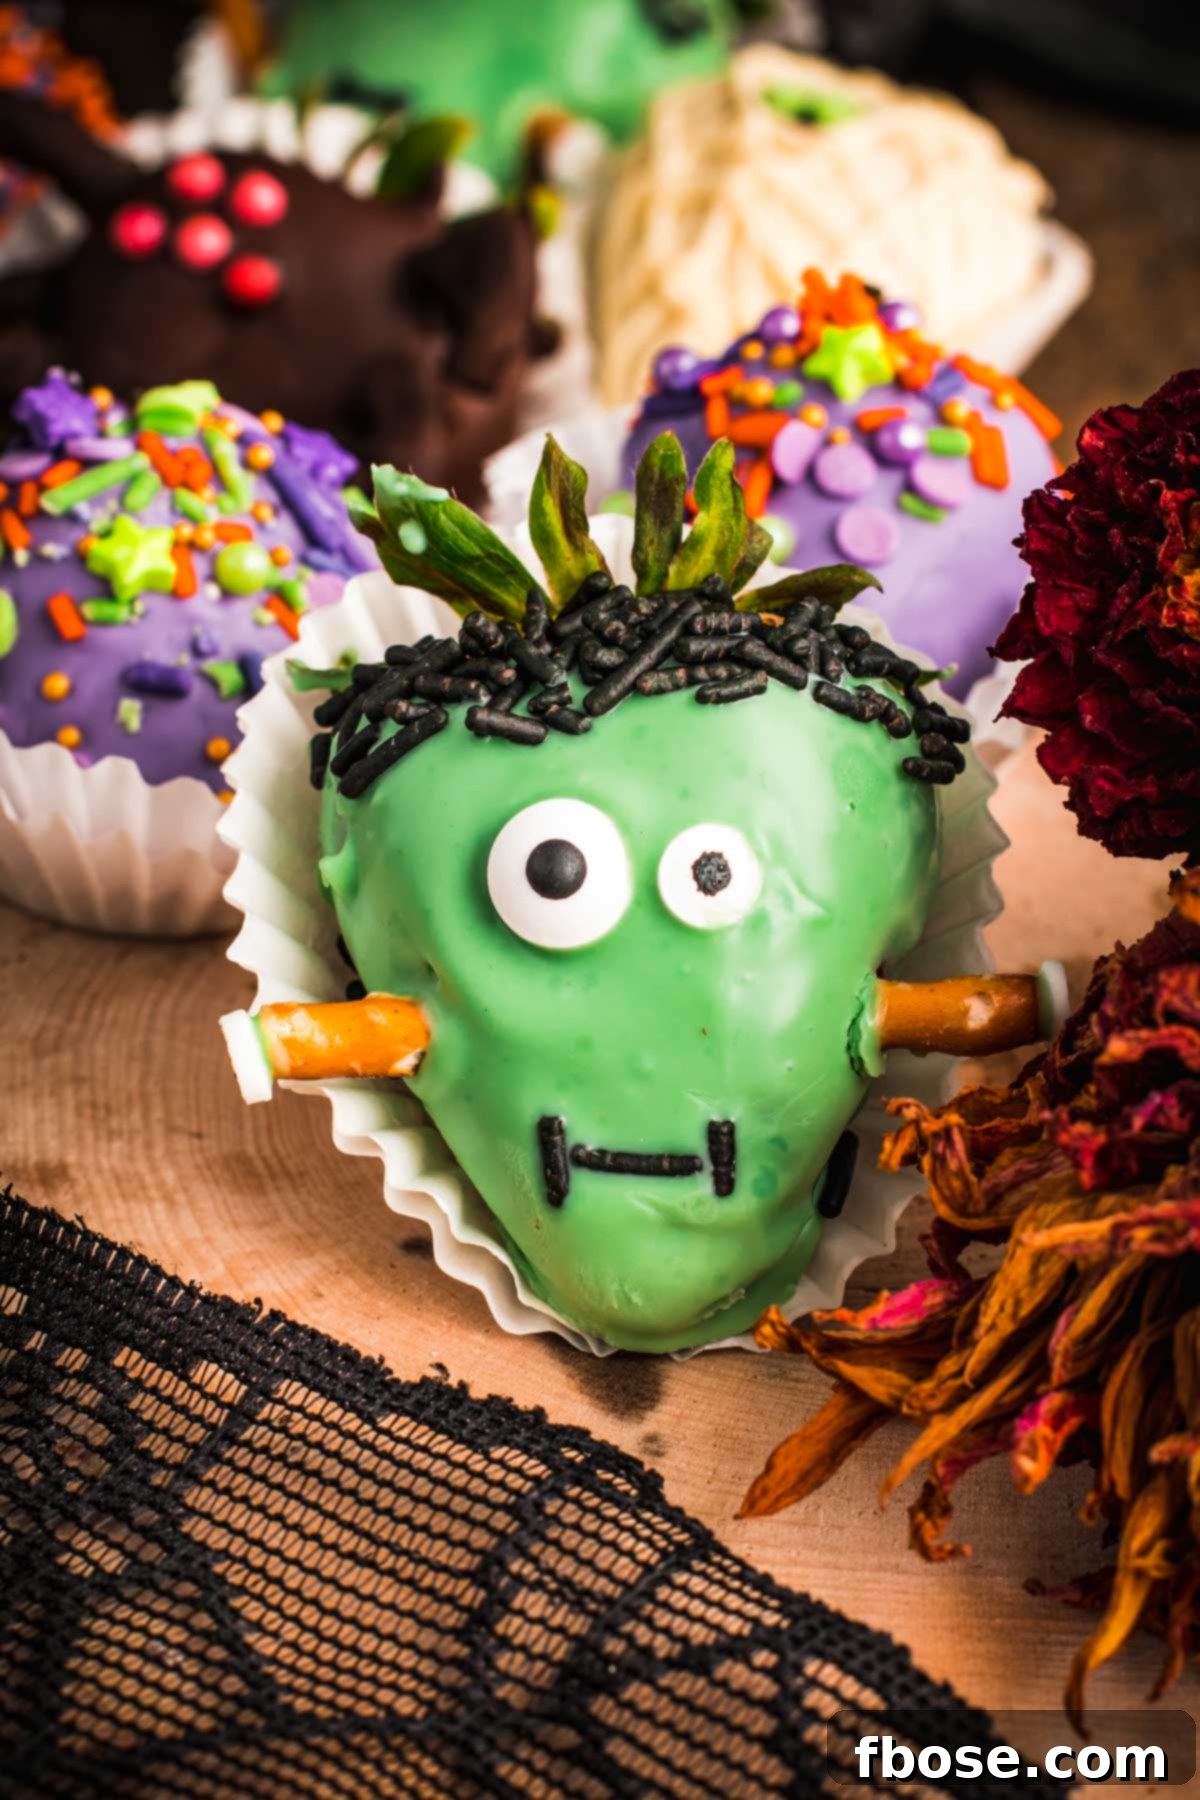
Halloween Chocolate Covered Strawberries are a delightful and festive treat that brings families together in the spirit of the spooky season. Combining juicy, fresh berries with rich, melted chocolate and an array of edible decorations, these confections are not only visually appealing but also incredibly delicious. Perfect for parties, trick-or-treat gatherings, or simply a fun family activity, this easy-to-make dessert is guaranteed to be a crowd-pleaser and disappear faster than ghosts on Halloween night!
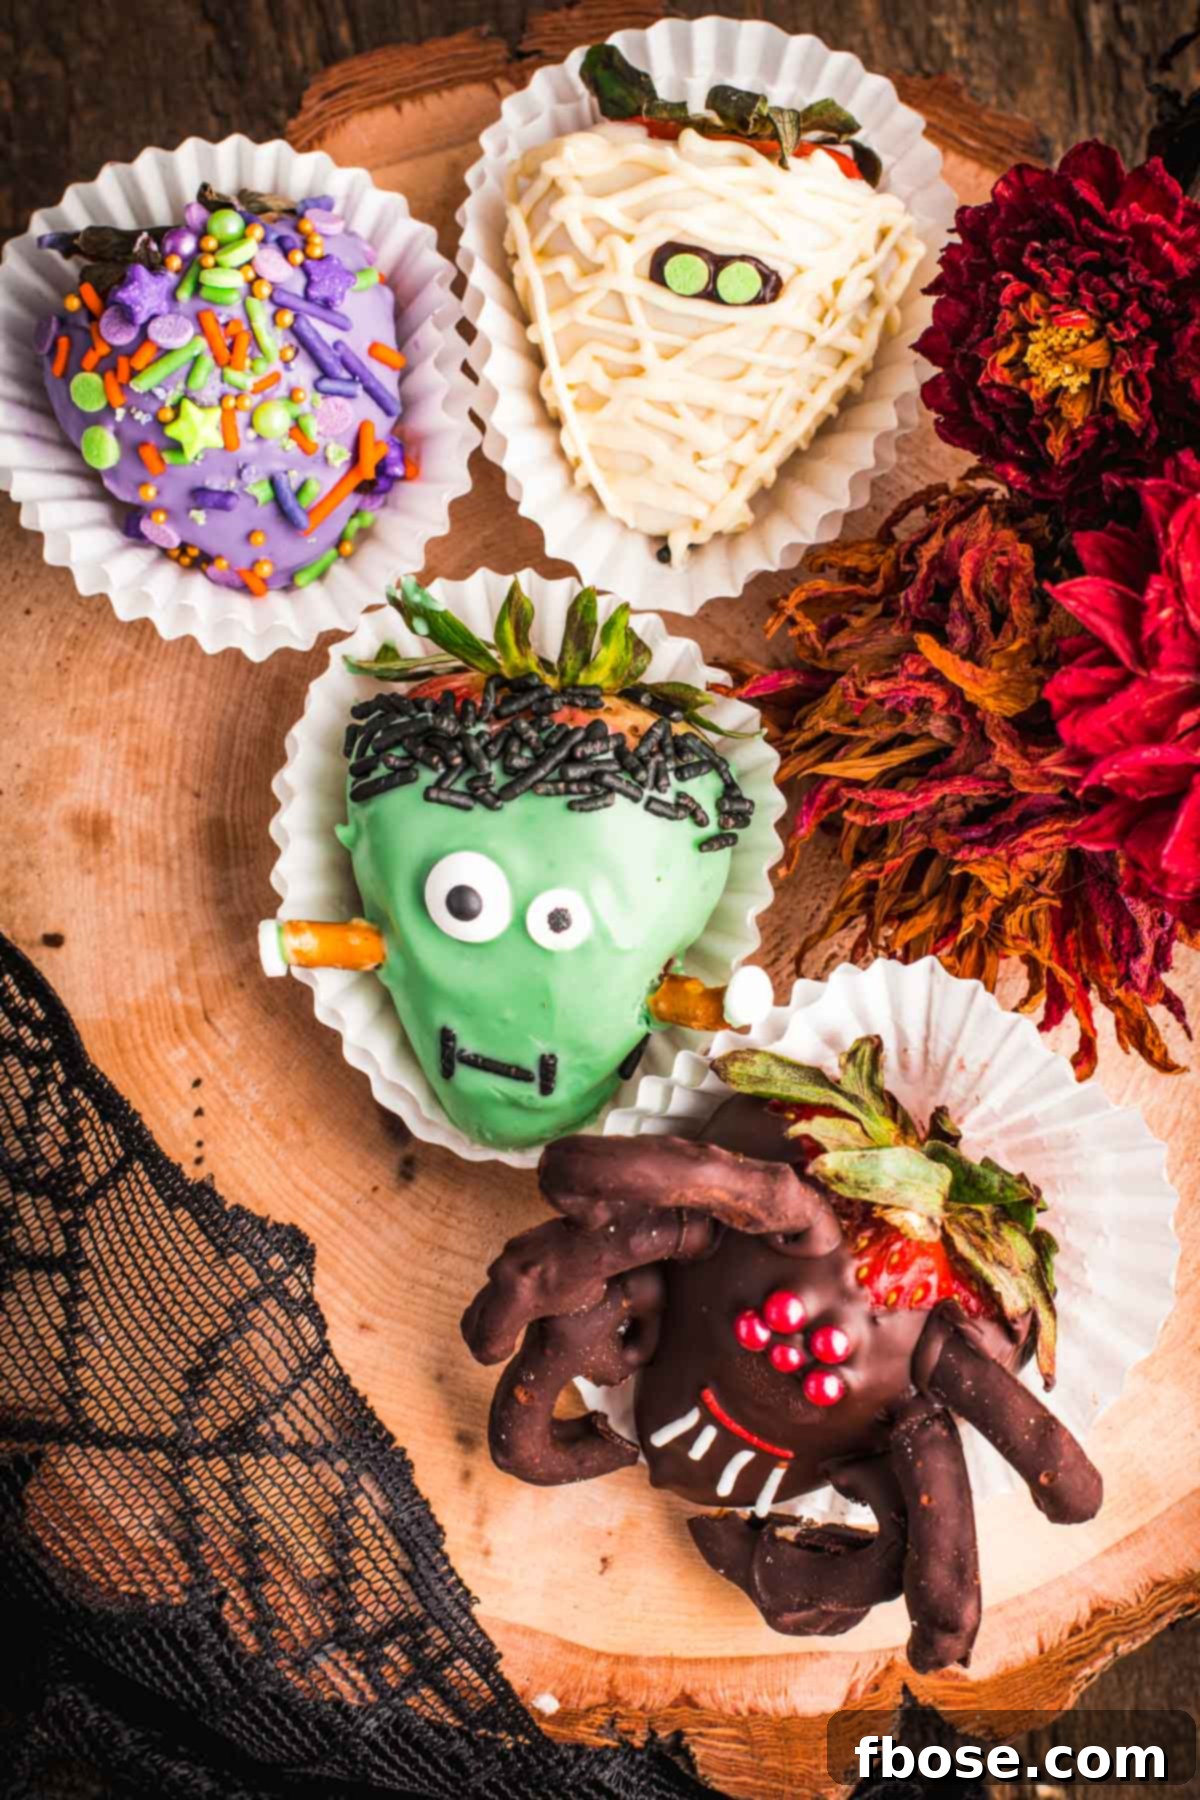
Unleash Your Creativity with Spooky Chocolate-Covered Strawberries for Halloween
Transform your Halloween celebrations into a truly memorable event with these enchanting Chocolate-Covered Strawberries. Far from being reserved solely for Valentine’s Day, these versatile treats embrace the spooky season with open arms, offering a perfect blend of sweet, fruity goodness and festive fun. Imagine biting into a succulent strawberry, enveloped in a smooth layer of chocolate, adorned with playful, eerie decorations – it’s an experience that delights both the eyes and the palate.
The beauty of Halloween chocolate-covered strawberries lies in their adaptability. With a little creativity, some food coloring, and a selection of edible decorations, you can easily turn ordinary strawberries into an extraordinary Halloween spectacle. Whether you’re aiming for cute, creepy, or kooky, the possibilities are endless. Plus, who can resist the timeless appeal of chocolate-covered strawberries? They are universally loved, making them the ideal dessert for any Halloween gathering, promising smiles and satisfied cravings from guests of all ages.
Get ready to impress your friends and family with a homemade treat that tastes as amazing as it looks. These spooky delights are not just desserts; they are edible art pieces that add a unique touch to your Halloween decor and treat table. From the vibrant green of a Frankenstein monster to the intricate webs of a chocolate spider, each strawberry tells a mini-story of Halloween magic.
Pin This Recipe For Later
Rebecca’s Recipe Review: A Deep Dive into Spooky Sweetness
When it comes to crafting the perfect Halloween treat, these chocolate-covered strawberries truly hit the mark. Here’s my honest review of what makes them so special:
Taste: Each bite offers a sensational explosion of flavors. The natural sweetness and subtle tang of the fresh, juicy strawberry perfectly complement the rich, smooth embrace of the melted chocolate. Depending on the costume your berry wears, you might encounter an exciting crunch from candy eyes, a salty counterpoint from mini pretzels, or an extra burst of sugary delight from various sprinkles. This interplay of fresh fruit, decadent chocolate, and fun edible adornments creates a harmonious and unforgettable taste experience that’s both refreshing and indulgent.
Texture: Prepare for a delightful journey for your senses! The initial bite gives way to the tender, juicy flesh of the strawberry, followed by the velvety smoothness of the chocolate coating. But the excitement doesn’t stop there. The addition of edible decorations introduces a fantastic textural contrast – the satisfying crunch of pretzels for spider legs, the subtle grit of sprinkles, or the firm chewiness of candy eyes. Every aspect contributes to an exciting and dynamic texture profile that keeps you coming back for more.
Ease: 7/10. While the concept is simple, the decorating process can be a bit intricate and requires a steady hand and some patience. Melting the chocolate and dipping the strawberries is straightforward, but transforming them into recognizable Halloween characters like mummies or Frankensteins adds a layer of artistic challenge. However, with a bit of practice and attention to detail, anyone can achieve impressive results.
Pros: These berries are more than just a dessert; they’re a showstopper. They make an incredibly impressive Halloween treat that instantly captures attention and conversation. Everyone, from children to adults, absolutely adores them, making them a surefire hit at any party. They combine the healthiness of fruit with the indulgence of chocolate, offering a balanced treat that feels special without being overly heavy. Plus, the process of decorating them can be a wonderful, engaging activity for the whole family.
Cons: As mentioned, the decorating can be quite tricky and sometimes a bit tedious, especially if you’re aiming for perfection or making a large batch. It requires precision and can be time-consuming, particularly for the more elaborate designs. Also, chocolate-covered strawberries are best enjoyed fresh, as refrigeration can sometimes lead to condensation, affecting their appearance and texture slightly.
Would I Make This Again? Absolutely, yes! Despite the decorating challenge, the joy and excitement these bring to my kids make every effort worthwhile. And honestly, who doesn’t love chocolate-covered strawberries? They’re a classic for a reason, and adding a spooky twist just makes them even better for the Halloween season.
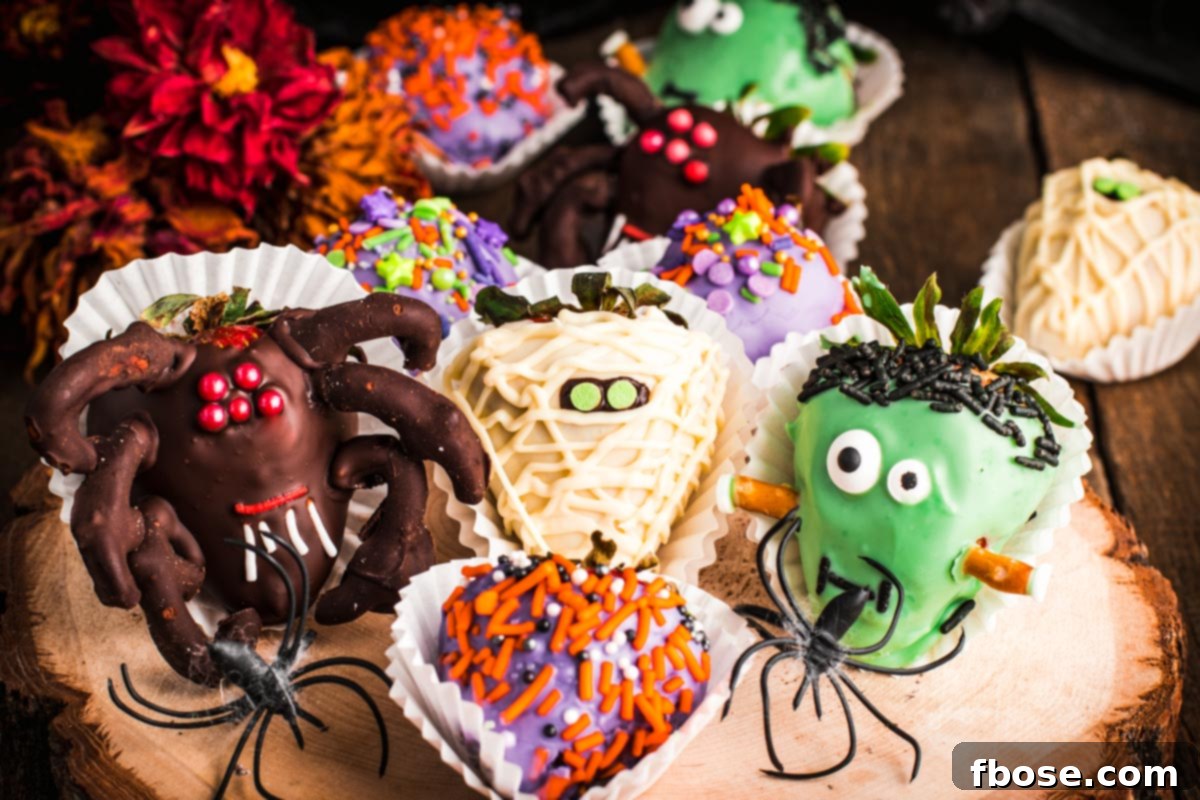
Essential Ingredients for Spooktacular Chocolate-Covered Halloween Strawberries
Creating these festive Halloween treats requires a combination of quality ingredients for both the base and the decorations. Choosing fresh, ripe strawberries and good melting chocolate is key to the best results. Here’s a comprehensive list of what you’ll need to bring your spooky berry visions to life:
- Large Strawberries: The fresher and juicier, the better! Ensure they are firm and free of blemishes.
- Belgian Dark Chocolate: For its rich flavor and excellent melting properties. You’ll need this for the spider decorations and mummy eyes.
- Belgian White Chocolate: The canvas for your colorful creations, perfect for Frankenstein, sprinkle, and mummy bases.
- Green Gel Food Coloring: Specifically oil-based candy coloring for tinting white chocolate into a vibrant Frankenstein green.
- Purple Gel Food Coloring: Another oil-based candy coloring for transforming white chocolate into a magical purple for sprinkle-covered berries.
- Mini Pretzels: Crucial for crafting the creepy-crawly legs of your spider strawberries.
- Pretzel Sticks: For Frankenstein’s iconic neck bolts.
- Candy Eyes: An absolute must for bringing all your spooky characters to life with expressive gazes.
- Red Pearl Sprinkles: To give your chocolate spiders a touch of eerie red eyes.
- Red Jimmies Sprinkles: For the spider’s menacing mouth.
- White Jimmies Sprinkles: Perfect for adding tiny, sharp teeth to your chocolate spiders.
- Black Jimmies Sprinkles: Essential for Frankenstein’s hair and mouth details.
- Halloween Colored Sprinkles: A festive mix to add a burst of color and holiday cheer to your purple-dipped strawberries.
- Round Green Sprinkles: Used as the distinct eyes for your mummy strawberries.
Having all your ingredients prepped and ready before you start will make the decorating process much smoother and more enjoyable!
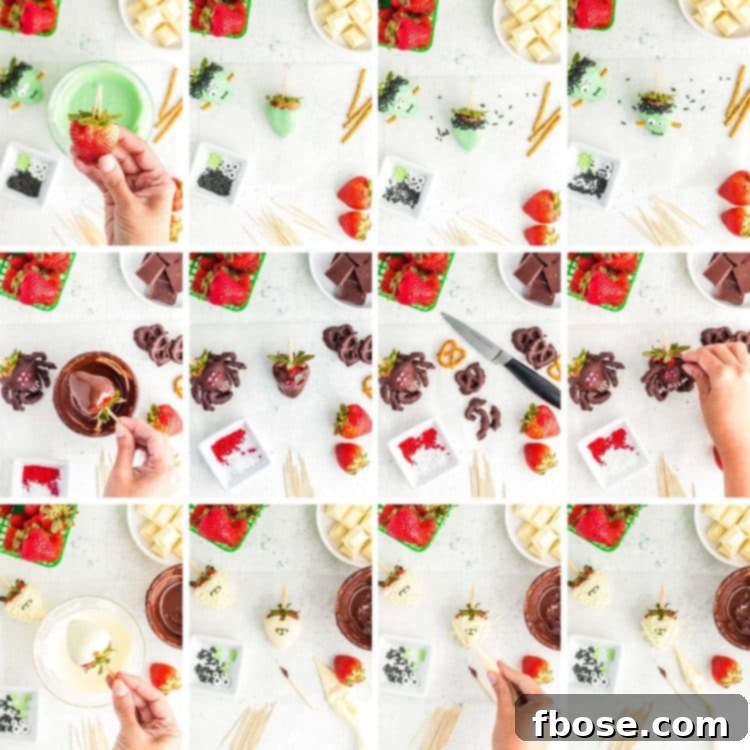
Step-by-Step Guide: Crafting Your Spooky Halloween Chocolate-Covered Strawberries
Creating these festive treats is a fun and engaging process. Before you begin, ensure you have a baking sheet lined with waxed paper or parchment paper ready – this will be your workspace for drying the chocolate. Always start by thoroughly washing your strawberries and drying them completely with paper towels. Any moisture on the berries can cause the chocolate to seize or not adhere properly, so this step is crucial. Allow them to air dry on paper towels at room temperature for a little while to ensure they are perfectly dry. Once your berries are prepped, it’s time to transform them into spooky masterpieces!
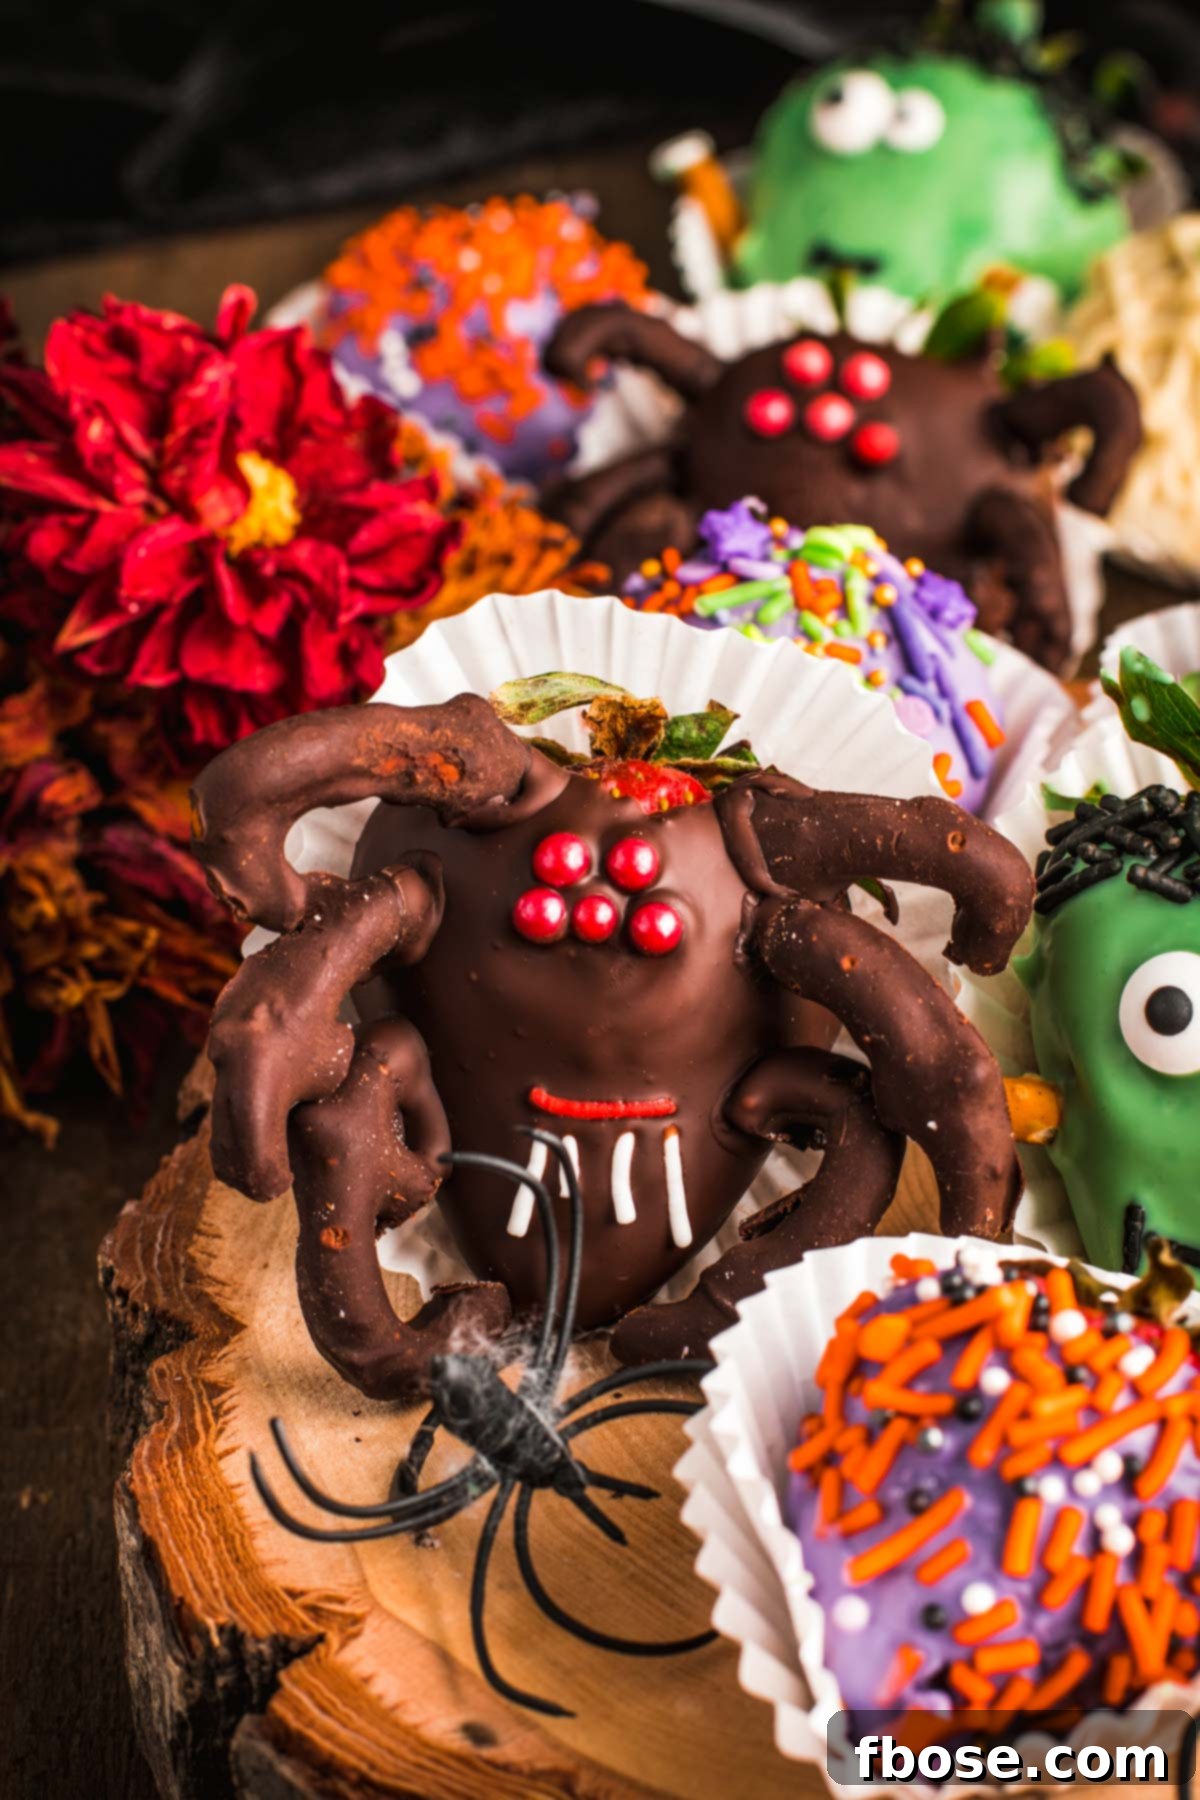
Spider Strawberries:
- Melt the Dark Chocolate: Place your dark chocolate in a microwave-safe bowl. Melt it in short intervals (e.g., 20-30 seconds), stirring well after each interval, until the chocolate is completely smooth and liquid. Be careful not to overheat it. Set aside a small amount of this melted dark chocolate for later use with the Mummy Strawberries.
- Dip Mini Pretzels: Take your mini pretzels, one at a time, and dip them partially into the melted dark chocolate. Allow any excess chocolate to drip back into the bowl before placing them gently onto your prepared waxed paper-lined baking sheet. These will form the spider legs.
- Prepare and Dip Strawberry: Insert two toothpicks into the top (stem end) of a large strawberry. Use the toothpicks to hold and dip the strawberry into the melted dark chocolate, ensuring an even coating. Let any excess chocolate drip off. Carefully transfer the chocolate-covered strawberry onto the waxed baking sheet.
- Decorate the Face: Immediately, while the chocolate is still wet, add five red pearl sprinkles to the top half of the strawberry for the spider’s eyes. Below the eyes, place one red Jimmie sprinkle for the mouth, and then two small white Jimmie sprinkles on either side of the mouth to create tiny, spooky fangs.
- Chill to Set: Transfer the baking sheet with the dipped strawberry and pretzels to the refrigerator for about 10 minutes, or to the freezer for 5 minutes. This quick chill will help the chocolate set firmly and quickly, making the next step easier.
- Prepare Pretzel Legs: Once chilled, remove the strawberries and pretzels. Take each chocolate-dipped mini pretzel and carefully cut it in half lengthwise. Discard the small, inner piece of pretzel from the center of each half. This process creates the distinct, segmented look of spider legs. You’ll need six of these pretzel halves for each spider strawberry.
- Attach Legs: Using a clean toothpick, apply a tiny dab of the melted dark chocolate (you can re-melt a small amount if it has hardened) onto one end of a pretzel leg. Gently press this onto the side of the strawberry, holding it in place for a few seconds until it securely attaches. Repeat this for all six legs, arranging three on each side of the strawberry to form a creepy spider.
- Repeat: Continue this process to create as many terrifyingly tasty Halloween Spider Strawberries as you desire.
Frankenstein Strawberries:
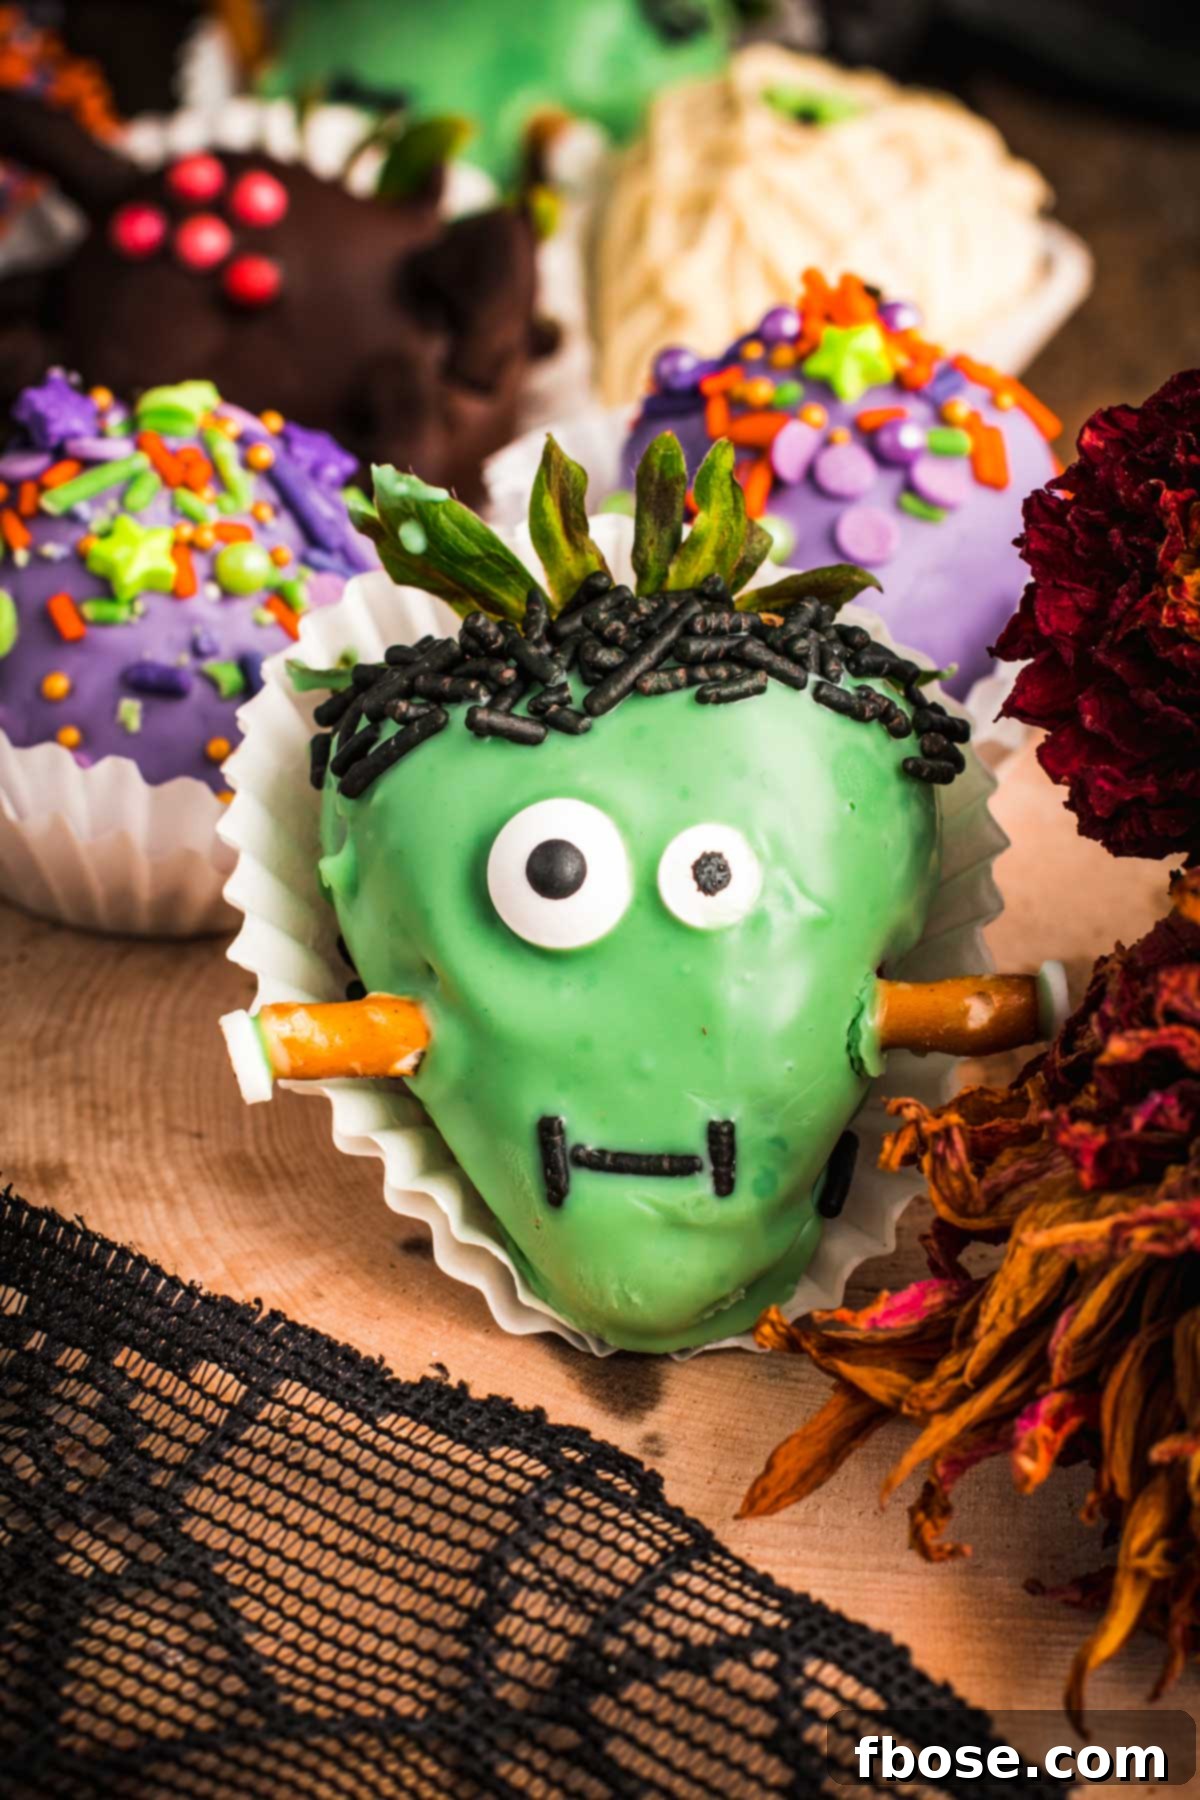
- Melt and Color White Chocolate: Melt half a cup of white chocolate in a microwave-safe bowl using short intervals and stirring between each until smooth. Once melted, add a few drops of green oil-based candy coloring and stir thoroughly until the chocolate is uniformly green.
- Dip Strawberry: Insert two toothpicks into the top of a strawberry. Dip the berry into the green melted chocolate, allowing any excess to drip back into the bowl. Place the green-covered strawberry onto your waxed baking sheet.
- Add Face Details: While the green chocolate is still soft, immediately apply black sprinkles across the top for Frankenstein’s hair. Below this, place two candy eyes, and then add more black sprinkles to form a jagged, stitched-up mouth.
- Add Neck Bolts: As the chocolate begins to set but is still pliable, break a pretzel stick in half. Carefully insert one half into each side of the strawberry, positioning them to resemble Frankenstein’s neck bolts. For an extra touch, you can use a small white circular sprinkle with a tiny drop of melted chocolate on its edge to create a metallic bolt head. Allow to fully set.
- Repeat: Continue crafting these monstrously delightful Frankenstein Chocolate Covered Strawberries until you have enough for your spooky spread.
Halloween Sprinkles Strawberries:
- Melt White Chocolate: In a microwave-safe bowl, melt half a cup of white chocolate using short intervals and stirring until completely smooth.
- Color Chocolate Purple: Stir a few drops of purple oil-based candy coloring into the melted white chocolate until the color is evenly distributed and vibrant.
- Dip and Decorate: Insert two toothpicks into the top of a strawberry and dip it into the purple melted chocolate, letting any excess drip away. Place the berry on the waxed baking sheet. Immediately, while the chocolate is still wet, liberally sprinkle it with your assortment of Halloween-colored sprinkles. The sprinkles will adhere best to the freshly dipped chocolate.
- Repeat: Create as many dazzling Halloween Sprinkle Strawberries as your heart desires, ensuring a colorful and festive addition to your treats.
Mummy Strawberries:
- Melt White Chocolate: Melt half a cup of white chocolate in a microwave-safe bowl, following the same short-interval method, until it’s perfectly smooth.
- Prepare Piping Bag: Spoon about a tablespoon of the melted white chocolate into a piping bag (or a Ziploc bag with a tiny corner snipped off). This will be used for the “bandages.”
- Dip Strawberries: Insert two toothpicks into the top of a strawberry. Dip it into the remaining white melted chocolate, allowing excess to drip. Place it on the waxed baking sheet. Repeat this with a second strawberry.
- Chill to Set: Transfer these white-dipped strawberries to the fridge for 10 minutes or the freezer for 5 minutes to allow the chocolate to harden. This step is essential before adding the mummy details.
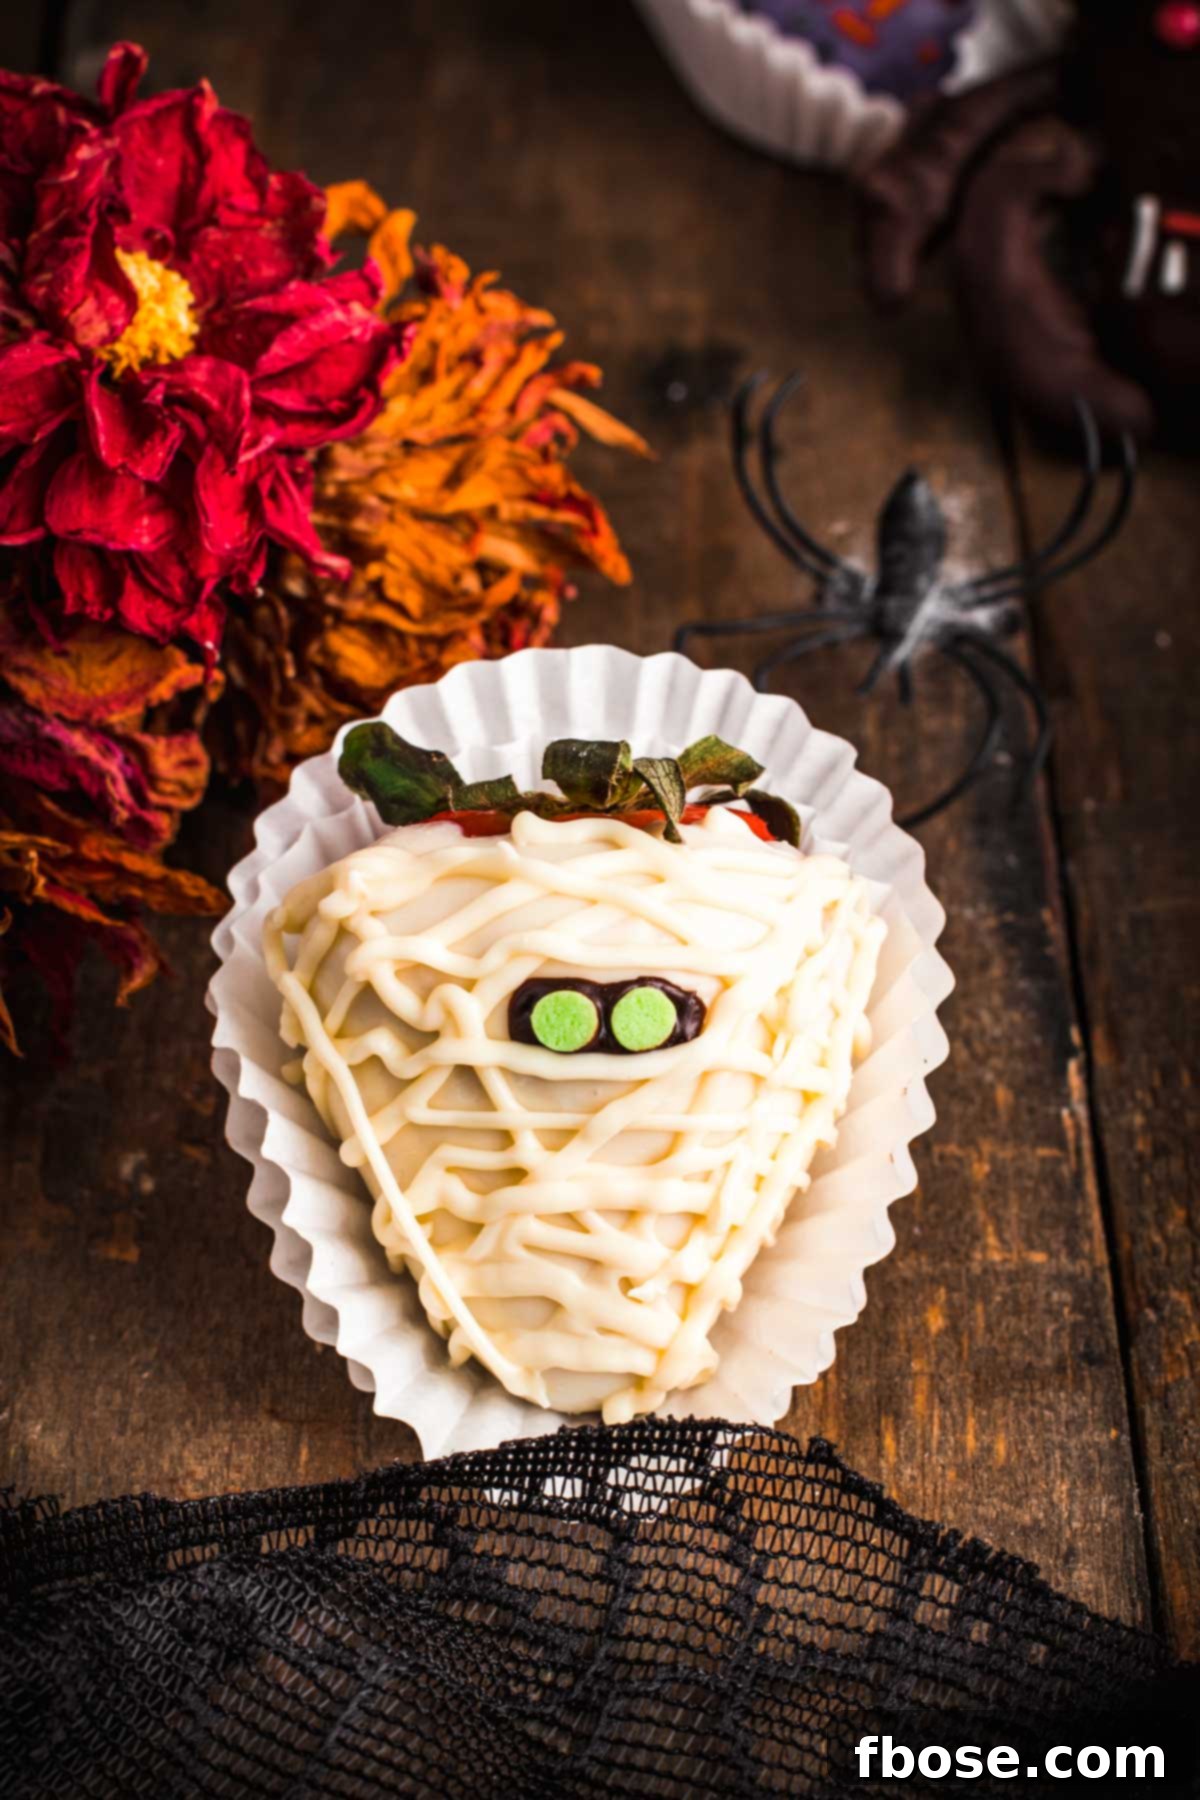
- Add Eyes and Bandages: Once chilled, remove the berries. Using a toothpick, take a small amount of the reserved dark melted chocolate (from the spider strawberries) and spread it in a small rectangular shape on the upper third of each white-dipped strawberry. This dark patch will serve as the base for the eyes.
- Final Touches: Place two small round green sprinkles onto the dark chocolate rectangle for each mummy’s eyes. Then, using your piping bag with white chocolate, pipe thin lines randomly across the strawberry, creating the appearance of bandages wrapping around the mummy. These lines don’t need to be perfect; unevenness adds to the charm!
- Repeat: Continue this process to bring your spooky Mummy Chocolate Covered Strawberries to life, adding a classic Halloween touch to your dessert spread.
Rebecca’s Expert Tips for Perfect Halloween Chocolate Covered Strawberries
Achieving picture-perfect and delicious chocolate-covered strawberries for Halloween is easier with a few insider tricks. Here are my top tips to ensure your spooky treats turn out flawlessly:
- Bone Dry Berries are Non-Negotiable: This is arguably the most critical step! For the chocolate to adhere smoothly and prevent seizing, your strawberries must be absolutely, completely dry. After washing them thoroughly, pat each berry dry with paper towels. Then, arrange them on a paper-towel-lined surface at room temperature and allow them to air dry for at least 30 minutes, or even an hour, to ensure every last bit of moisture has evaporated. Moisture is the enemy of perfectly coated chocolate!
- Choose Quality Chocolate: The type of chocolate you use significantly impacts both the taste and the ease of dipping. Opt for a good quality chocolate specifically designed for melting, such as Belgian dark chocolate or high-quality chocolate chips. These chocolates melt smoothly and set nicely. While I recommend Belgian dark and white chocolate for their superior flavor and texture, you can also use candy melts for vibrant colors and easy melting. If using standard chocolate chips, adding a tiny bit of coconut oil (about ½ teaspoon per cup of chocolate) or a dash of vanilla extract can help achieve a smoother, more fluid consistency for dipping. Avoid waxy or overly sweet chocolates that don’t melt well.
- Oil-Based Food Coloring for Vivid Hues: When coloring your white chocolate green for Frankenstein or purple for sprinkle berries, it is essential to use oil-based candy coloring. Unlike water-based food colorings, which can cause melted chocolate to seize and become lumpy, oil-based colors blend seamlessly into chocolate, maintaining its smooth, luscious consistency. A little goes a long way, so start with a few drops and add more gradually to achieve your desired shade.
- The Toothpick Dipping Method: For the cleanest and most efficient dipping, I highly recommend sticking two toothpicks into the top (stem end) of each strawberry. This provides a stable handle, allowing you to fully submerge the berry without getting chocolate on your fingers. It also helps you rotate the strawberry for an even coat and lets excess chocolate drip off cleanly before placing it on the baking sheet.
- Precision Drizzling with a Piping Bag: When creating the delicate “bandages” for your Mummy Strawberries, or any other fine line details, a piping bag works best. The controlled flow allows for neat and consistent lines. If you don’t have a professional piping bag on hand, a small Ziploc bag with a tiny corner snipped off (start with a very small snip, you can always make it bigger) makes an excellent improvised piping bag in a pinch. Just fill the corner with melted chocolate, twist the top to secure, and apply gentle pressure.
Beyond the Basics: More Spooky Halloween Strawberry Decoration Ideas
Once you’ve mastered the Mummy, Frankenstein, and Spider strawberries, you might find yourself craving even more creative ways to celebrate Halloween with these delightful treats. The versatility of chocolate-covered strawberries means you can turn them into almost any spooky character or motif. Here are even more fantastic ideas to inspire your next batch of Halloween berries:
- Charming Ghosts! For a classic spooky effect, dip your dry strawberries entirely in melted white chocolate. Once set, use a fine-tipped piping bag filled with melted dark chocolate (or a black food marker) to draw on two simple eyes and a small, o-shaped mouth, giving them a ghostly, ethereal appearance. Arrange them upright on a tray for an extra haunting effect.
- Creepy Skulls! Begin by coating your strawberries in a smooth layer of melted white chocolate. Once this has fully dried and hardened, take a piping bag with a very fine tip (or a toothpick) and melted dark chocolate. Carefully draw on the intricate details of a skull face: eye sockets, a nose cavity, and vertical lines for teeth on the lower portion of the berry. The contrast between the white chocolate base and the dark chocolate details will create a striking and artistic skull effect.
- Vibrant Pumpkins! Dip your strawberries into melted orange-colored chocolate (use white chocolate with orange oil-based food coloring or orange candy melts). While the orange chocolate is still wet, gently drizzle thin lines of additional orange chocolate vertically down the berry to mimic the ridges of a pumpkin. Once slightly set, use melted dark chocolate (or a black food marker) to draw on fun jack-o’-lantern faces with triangular eyes and a jagged smile.
- Elegant Vampires! For a sophisticatedly spooky look, melt white chocolate and tint it with purple oil-based food coloring. Dip your strawberries to coat them completely in this rich purple chocolate. Once dried, use melted dark chocolate to create a small “hairline” at the top and two small dots for eyes. Then, use melted white chocolate to pipe two tiny, sharp fangs peeking out from the bottom. These dark and mysterious berries are sure to be a hit.
- Fluttering Bats! First, dip your completely dry strawberries into melted dark chocolate, ensuring a smooth, even coat. While these are setting, break mini pretzels in half and dip the pretzel halves into the same melted dark chocolate. These will be your bat wings. Once the dipped strawberries are slightly firm, attach one chocolate-covered pretzel wing to each side of the berry, angled upwards. Affix two small candy eyes to the front of the strawberry. For a final touch, use a tiny amount of melted white chocolate to draw on two small, pointed fangs. These bat strawberries are adorable and perfectly eerie.
Optimal Storage for Homemade Halloween Chocolate Covered Strawberries
To enjoy these delectable Halloween treats at their absolute best, it’s highly recommended to consume them on the same day they are made. Freshly dipped and decorated, the chocolate is smooth and firm, and the strawberries are at their peak juiciness and flavor. This ensures the best texture and appearance for your spooky creations.
However, if you find yourself needing to prepare them in advance or have leftovers, proper storage can extend their freshness slightly. The main challenge with refrigerating chocolate-covered strawberries is that they tend to “sweat” due to condensation, which can affect the chocolate’s glossy finish and potentially make it slightly tacky. To minimize this, place the completed berries in an airtight container lined with paper towels (to absorb any moisture). Store the container in the refrigerator, uncovered, for up to one day. This method helps to maintain their quality for a short period, but remember, the freshest are always the best!
Discover More Spooky Halloween Recipes:
- Witch’s Brew Punch – A magical concoction that makes a huge batch of family-friendly party punch, perfect for any Halloween gathering!
- Easy Halloween Dirt Cups – A fun and spooky treat layered with cookie crumbs and pudding, absolutely perfect for October festivities!
- Goosebumps Halloween Punch – The famous 4-Ingredient, 5-Star Punch that readers absolutely adore for its simplicity and deliciousness!
- Halloween Cookies & Cream Cookie Bars – Indulgent cookie bars generously loaded with crunchy Oreo pieces and festive Halloween M&Ms!
- Easy Halloween Monster Cookies – Thick, chewy cookies bursting with edible fun, featuring colorful candies and playful textures!
Did You Create This Spooky Recipe?
If you’ve tried this delightful Halloween recipe, please leave a review in the comments below – I absolutely love hearing your feedback! Don’t forget to tag me – @sugarandsoulco – on Instagram and Pinterest with your fantastic photos, or join our Sugar & Soul Show-offs Community on Facebook and share your creations there!
Halloween Chocolate Covered Strawberries
Equipment
-
20 Toothpicks
-
1 small bowls
-
Baking Sheet
-
Parchment paper
-
3 spoons
-
Piping bag
Ingredients
Spider Strawberries
- ¾ cup Belgian dark chocolate
- 6 mini pretzels
- 10 large strawberries
- 10 red pearl sprinkles
- 2 red jimmies sprinkles
- 8 white jimmies sprinkles
Frankenstein Strawberries
- ½ cup Belgian white chocolate
- green gel food coloring
- 1 tablespoon black jimmie sprinkles
- 4 candy eyes
- 2 pretzel sticks
Halloween Sprinkles Strawberries
- ½ cup Belgian white chocolate
- purple gel food coloring
- 2 tablespoons Halloween colored sprinkles
Mummy Strawberries
- ½ cup Belgian white chocolate
- 4 round green sprinkles
Instructions
-
Line a baking sheet with waxed paper and set aside.
-
Start by washing and thoroughly drying the strawberries and letting them drain on paper towels.10 large strawberries
Spider Strawberries
-
Melt a ¾ cup of dark Belgian chocolate in a microwave-safe bowl at 20-second intervals, stirring between each one until just melted and smooth. (Reserve a small amount of the dark chocolate for the Mummy Strawberry)¾ cup Belgian dark chocolate
-
Dip 6 mini pretzels (1 at a time) in the dark chocolate allow the excess chocolate to drip back into the bowl and then place on the baking sheet.6 mini pretzels
-
Insert 2 toothpicks into the top of a strawberry. Dip the strawberry in the dark chocolate and allow any excess chocolate to drip back into the bowl. Place the strawberry on the lined baking sheet. Add 5 red pearl sprinkles for the eyes, then add a red Jimmie sprinkle for the mouth and white Jimmie sprinkles for teeth. Place the sheet in the fridge for 10 minutes or the freezer for 5 minutes. This will allow it to set quickly for the next step.10 large strawberries, 10 red pearl sprinkles, 2 red jimmies sprinkles, 8 white jimmies sprinkles
-
Remove the chilled strawberry and pretzels from the refrigerator. Cut the pretzel in half lengthwise to make 2 legs, remove the small piece of pretzel in the center of each pretzel leg and discard. Repeat with remaining pretzels to create the rest of the legs. We found that only three legs securely fit on each side of the strawberry, but you could try to fit four.
-
Using a toothpick spread a small amount of dark melted chocolate on a pretzel “leg” and attach it to the strawberry. Hold it to secure and continue with the remaining “legs”. Allow them to fully set before enjoying.
Frankenstein Strawberries
-
Melt a ½ cup of white chocolate in a microwave-safe bowl at 20-second intervals, stirring between each one until just melted and smooth. Add a few drops of green candy color and stir until the color is evenly distributed throughout the chocolate.½ cup Belgian white chocolate, green gel food coloring
-
Insert 2 toothpicks into the top of a strawberry. Dip the strawberry in the green chocolate and allow any excess chocolate to drip back into the bowl. Then place the strawberry on the prepared baking sheet.
-
Immediately add black sprinkles for the hair, two candy eyes, and more black sprinkles to create his mouth.1 tablespoon black jimmie sprinkles, 4 candy eyes
-
When the chocolate is almost set, cut a pretzel stick in half and insert each half as a bolt on both sides of his neck. You can add a small white circular sprinkle with a drop of melted chocolate to the edge of the bolt if you would like. Allow them to fully set before enjoying.2 pretzel sticks
Halloween Sprinkles Strawberries
-
Melt a ½ cup of white chocolate in a microwave-safe bowl at 20-second intervals, stirring between each one just until smooth.½ cup Belgian white chocolate
-
Add in a few drops of purple candy color and stir until the chocolate is evenly covered.purple gel food coloring
-
Insert 2 toothpicks into the top of a strawberry. Dip the strawberry in the purple melted chocolate, and allow any excess chocolate to drip back into the bowl. Then place the strawberry on the lined baking sheet. Sprinkle with an assortment of Halloween-colored sprinkles. Allow them to fully set before enjoying.2 tablespoons Halloween colored sprinkles
Mummy Strawberries
-
Melt a ½ cup of white chocolate in a microwave-safe bowl at 20-second intervals, stirring between each one until just melted.½ cup Belgian white chocolate
-
Take a tablespoon of the melted white chocolate and insert it into a piping bag.
-
Insert 2 toothpicks into the top of a strawberry. Dip the strawberry in the white melted chocolate, and allow any excess chocolate to drip back into the bowl. Then place the strawberry on the lined baking sheet. Repeat with a second strawberry. Place the sheet in the fridge for 10 minutes or the freezer for 5 minutes. This will allow it to set quickly for the next step.10 large strawberries
-
Remove the chilled strawberry from the refrigerator. Using a toothpick spread the dark chocolate (reserved from the spider strawberry above) in a small rectangle on the upper third of the strawberry.
-
Place two small green circular sprinkles over the dark chocolate as eyes for each strawberry. Using the chocolate in the piping bag to pipe the “bandages” randomly over the strawberry. Allow them to fully set before enjoying.4 round green sprinkles
Notes
- You can substitute candy melts for chocolate if you prefer; they are often easier to work with for vibrant colors.
- Adjust the amount of chocolate you melt based on how many strawberries you plan to decorate. You can always melt more if needed.
- Always use gel or oil-based candy coloring when coloring chocolate. Water-based food coloring will cause the chocolate to seize and become unusable.
- These chocolate-covered strawberries are best enjoyed the day they are made. If refrigerated, they tend to “sweat” (develop condensation). To mitigate this, store them in a container lined with paper towels, uncovered, in the fridge for up to one day.
- For simplicity, feel free to use standard candy eyes for both the mummy and spider strawberries if finding specific red pearl or green sprinkles is challenging.
- Brown jimmies sprinkles can be used for Frankenstein’s hair instead of black jimmies if you prefer a slightly softer look.
Nutrition
Calories: 216kcal |
Carbohydrates: 24g |
Protein: 2g |
Fat: 14g |
Saturated Fat: 9g |
Polyunsaturated Fat: 0.4g |
Monounsaturated Fat: 4g |
Cholesterol: 4mg |
Sodium: 30mg |
Potassium: 75mg |
Fiber: 2g |
Sugar: 20g |
Vitamin A: 7IU |
Vitamin C: 7mg |
Calcium: 41mg |
Iron: 0.1mg
Did You Make This Recipe?
Don’t forget to share it with me on Instagram @sugarandsoulco and follow on Tiktok @sugarandsoulco and Pinterest @sugarandsoulco for more delicious inspiration!
Pin Recipe
Share Recipe