

Welcome to the ultimate guide for creating irresistible **Oreo Peanut Butter Balls**! This delightful, no-bake dessert offers an incredibly easy-to-make filling, crafted from just three simple ingredients, before being perfectly dipped into rich, melted dark chocolate. In just about 30 minutes of active prep time, you can whip up a batch of these fun, bite-sized truffles that are guaranteed to become a new favorite in your household.
If you’re looking to explore more delightful variations of these simple treats, don’t miss our Easy Peppermint Oreo Balls Recipe. It offers a refreshing minty twist on the classic, taking the same minimal effort for an equally impressive result.

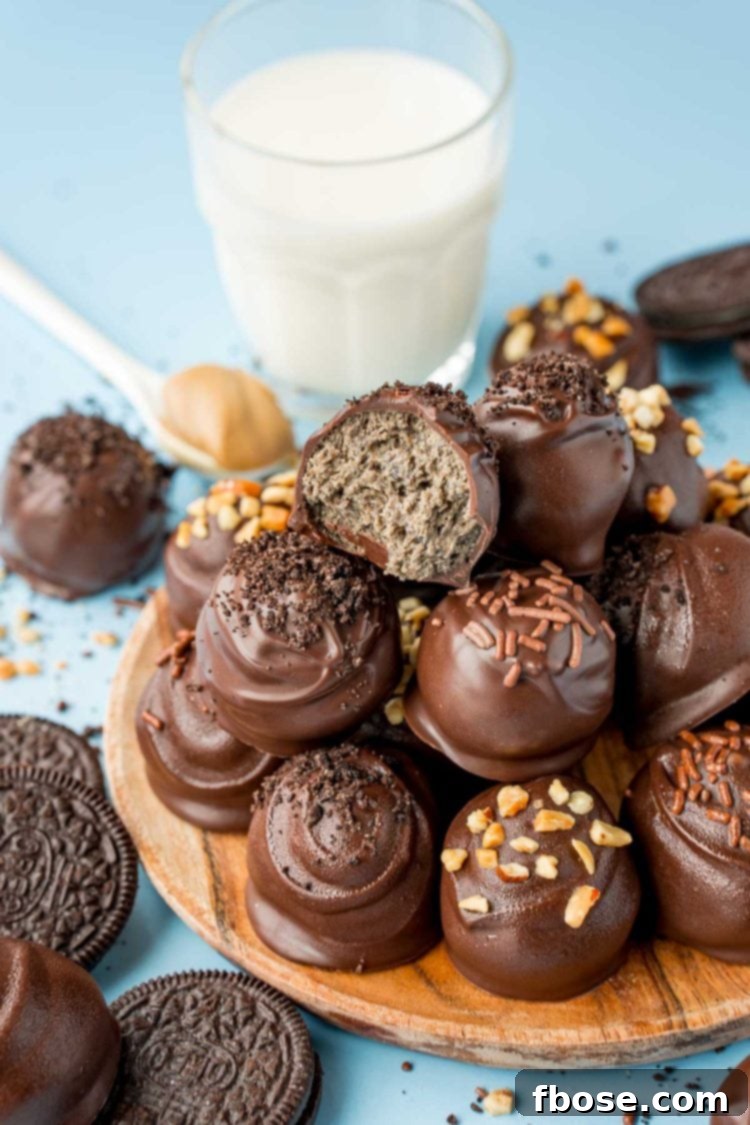
These **Peanut Butter Oreo Truffles** are more than just a dessert; they’re a celebration of contrasting textures and harmonious flavors. The creamy, sweet, and slightly salty peanut butter filling, generously studded with crunchy Oreo crumbs, is enveloped in a smooth, decadent layer of dark chocolate. To elevate their charm, you can adorn these homemade truffles with a variety of toppings like finely crushed peanuts, vibrant sprinkles, or extra Oreo crumbs. Each tiny sphere promises a burst of flavor, making it a perfect hand-held treat you’ll crave repeatedly.
Why You’ll Fall in Love with Every Bite of These Oreo Peanut Butter Balls
The magic of these **Oreo Peanut Butter Balls** lies in their perfectly balanced profile. Here’s what makes them an absolute standout:
- Exquisite Taste: Prepare your taste buds for an unforgettable experience. Each bite-sized truffle delivers an ideal balance of sweet and a subtle hint of saltiness. The rich, sweetened creamy peanut butter blends seamlessly with the distinct chocolatey flavor and texture of Oreo crumbs, creating a filling that is both comforting and exciting.
- Dynamic Texture: Texturally, these truffles are a dream come true. The filling itself provides a delightful combination of creaminess from the peanut butter and a satisfying crunch from the finely crushed Oreo bits. This luxurious mixture is then generously dipped in melted dark chocolate, which hardens to form a crisp, outer shell. The contrast between the firm chocolate exterior and the soft, slightly chewy interior makes for a truly captivating dessert experience.

Perfect for Any Occasion: When to Enjoy These Peanut Butter Oreo Truffles
These versatile **bite-sized dessert balls** are suitable for a wide array of occasions, bringing joy and deliciousness wherever they go:
- Festive Holidays: Truffles are a perennial favorite during the holiday season. Their elegant appearance and rich flavor make them a staple for Christmas parties and family gatherings. I often start my holiday baking early, preparing a batch of these **Oreo Peanut Butter Truffles** to share at Thanksgiving, setting a delightful tone for the festive period.
- Thoughtful Gifting: Imagine the delight of receiving a homemade treat! These **Peanut Butter Oreo Balls** make for exceptional edible gifts. Simply place a few into decorative cellophane bags, tie them off with a beautiful ribbon, and present them to friends, family, or co-workers. They are an appreciated gesture that everyone will undoubtedly adore.
- Crowd-Pleasing Potlucks: Planning to feed a large group? This recipe yields just over three dozen bite-sized treats, making them an ideal option for potlucks, office parties, or any event where you need to cater to a crowd. Their individual portion size makes them easy to serve and enjoy.
- Everyday Indulgence: Don’t wait for a special occasion! Sometimes, you just need a quick, satisfying treat. These truffles are perfect for an afternoon pick-me-up, a sweet ending to a meal, or a delightful snack anytime you crave something decadent.

Essential Tips for Crafting Perfect Peanut Butter Oreo Truffles
Achieving perfectly uniform and delicious **Oreo Peanut Butter Truffles** is easy with these helpful tips:
- Consistent Portion Sizing: For professional-looking truffles that are all roughly the same size, a medium cookie scoop is your best friend. This ensures even baking (if it were a baked good) and consistent dipping, making the entire process smoother and the end result more appealing.
- Freezing for Easier Dipping: This step is crucial! After portioning, placing the scooped-out truffle mixture into the freezer for at least 30 minutes allows them to firm up significantly. This firmness prevents the balls from disintegrating or becoming too soft when dipped into the warm melted chocolate, ensuring a smooth, even coating.
- The Advantage of a Spiral Dipping Tool: While not strictly necessary, a specialized spiral dipping tool can greatly simplify the process of coating your truffles. It allows excess chocolate to drip off easily, preventing puddles and ensuring a cleaner finish. If you don’t have one, a regular fork or even a toothpick can also get the job done with a little patience.
- Managing Soft Filling: Sometimes, especially in a warm kitchen, the truffle filling can become too soft during the dipping process. No worries! Simply return the baking sheet with the softened balls to the freezer. If you’re working with multiple sheets, grab the other chilled sheet from the freezer and continue dipping. This rotation keeps your truffles firm and easy to handle.
- Explore White Chocolate Variations: For a delightful change of pace or to create a visually appealing contrast, consider using melted white chocolate instead of dark chocolate for dipping. You can even drizzle both dark and white chocolate for a marbled effect!
- Custom Toppings: Beyond crushed peanuts and sprinkles, consider other fun toppings. A sprinkle of sea salt can enhance the sweet-salty balance, finely chopped nuts (almonds, pecans), or even a dash of cinnamon can add unique flavor dimensions.
Frequently Asked Questions About Oreo Peanut Butter Truffles
Do I Need To Store These Truffles In The Refrigerator?
While the ingredients themselves don’t strictly require these **Oreo Peanut Butter Balls** to be refrigerated, it is highly recommended. The creamy peanut butter filling has a tendency to soften at room temperature. If left out for too long, this can cause the chocolate shell to crack, compromising both the appearance and texture. Therefore, for optimal freshness and structural integrity, storing your truffles in an airtight container in the refrigerator is always the best practice. They’ll maintain their firm texture and glossy chocolate coating.
Am I Supposed To Use Just The Cookie Part Of The Oreos?
Absolutely not! This recipe is designed to utilize the entire Oreo cookie, cream filling and all. There’s no need for the extra step of separating the wafers from the cream. Simply transfer the whole cookies directly from the package into your food processor for crumbling. This ensures maximum flavor and convenience.
What If I Don’t Have A Food Processor To Pulse The Cookies?
No food processor? No problem! There are several easy alternatives to achieve those fine Oreo crumbs:
- **Blender Method:** Many blenders have a “pulse” function that works similarly to a food processor. Add your Oreos to the blender and pulse until they reach a fine crumb consistency.
- **Manual Method (Ziploc Bag & Rolling Pin):** This classic method is incredibly effective. Place a portion of the whole Oreo cookies into a sturdy gallon-sized Ziploc bag. Seal the bag, removing as much air as possible. Then, use a rolling pin to roll over the cookies, applying firm pressure, until they break down into fine crumbs. Repeat this process until all your cookies are finely crushed.
Step-by-Step Guide to Making Your Oreo Peanut Butter Balls
Making these decadent truffles is surprisingly straightforward. Here’s a brief overview of the process before we dive into the detailed recipe card:
- **Crumble the Oreos:** The first step involves transforming whole Oreo cookies into fine crumbs. A food processor makes this quick and easy, but alternatives like a blender or a Ziploc bag with a rolling pin work just as well.
- **Prepare the Filling:** In a large mixing bowl, combine the fine Oreo crumbs with creamy peanut butter and powdered sugar. Beat these three simple ingredients together until a smooth, well-combined truffle mixture forms. This is the heart of your **Peanut Butter Oreo Balls**.
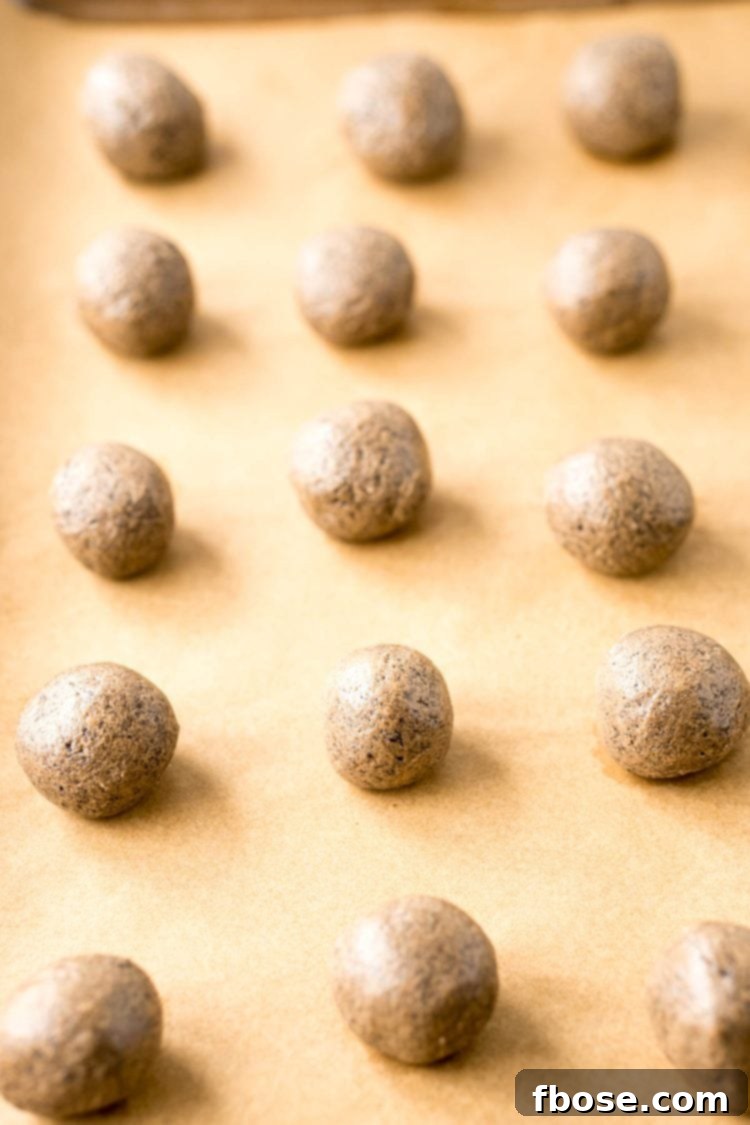
- **Chill for Perfection:** Use a cookie scoop to portion out the mixture onto parchment-lined baking sheets. Freeze these portions for about 30 minutes. This chilling step is vital as it firms up the balls, making them much easier to handle and dip.
- **Melt the Chocolate:** While the balls are chilling, prepare your chocolate coating. Gently melt your dark chocolate melting wafers, typically in a microwave at short intervals, until smooth and glossy.
- **Dip and Decorate:** Once the truffles are firm and the chocolate is melted, it’s dipping time! Roll each ball in the melted chocolate until fully coated, allowing any excess to drip off. Place them back on parchment paper to set. This is also the perfect moment to add any desired toppings before the chocolate hardens.
These **Peanut Butter Oreo Cookie Balls** are a testament to how versatile and delicious Oreos can be when integrated into any dessert! If you’re as big an Oreo fan as we are, you’ll definitely want to check out more **Oreo-filled dessert recipes** from our collection:
- 2-Ingredient Oreo Popsicles – Beat the heat with these incredibly simple and refreshing frozen delights!
- Oreo Cupcakes – Indulge in cupcakes that are loaded with Oreo goodness from the very bottom to their delectable tops!
- No Bake Oreo Cheesecake – Craving cheesecake but short on time? Prep this wonderfully easy dessert in just 30 minutes, no oven required!
- Marshmallow Oreo Treats – Discover these chewy, gooey, and utterly satisfying treats, made with only 3 ingredients for maximum simplicity and flavor!
- Easy Oreo Pudding Cookies – Experience unbelievably soft and tender cookies that can be made in under 25 minutes, perfect for a quick sweet fix!
Let’s Connect! Share Your Creations!
We love seeing your culinary adventures! If you’ve tried this delightful **Oreo Peanut Butter Balls recipe**, please share your thoughts and leave a review in the comments section below. Your feedback means the world to us!
Don’t forget to tag us – @sugarandsoulco – on Instagram and Pinterest with your photos of these delicious truffles, or join our Sugar & Soul Show-offs Community on Facebook to share your creations and participate in our fun recipe challenges!

Oreo Peanut Butter Balls
Course: Dessert
Cuisine: American
Chill Time: 1 hour
Total Time: 1 hour 30 minutes
Pin Recipe
Rate This Recipe
Share on Facebook
Oreo Peanut Butter Balls have an easy 3-ingredient filling that’s formed into fun bite sizes before being dipped into melted dark chocolate! Prep a batch in only 30 minutes!
Ingredients
- 33 Oreo Cookies (about 3 cups crumbs)
- 2 cups creamy peanut butter (recommendation link)
- 1½ cups powdered sugar (recommendation link)
- 20 ounces dark chocolate melting wafers
Instructions
- Add the Oreos to a food processor and pulse until fine crumbs form.
- Transfer the Oreo crumbs to a large mixing bowl with the peanut butter and beat to combine. Add in the powdered sugar and mix at low speed until sugar is just incorporated, then increase speed to thoroughly combine.
- Use a medium cookie scoop to portion out the mixture onto two parchment-lined baking sheets and freeze for 30 minutes.
- Near the end of the 30 minutes, add half of your dark chocolate melting wafers to a wide-mouthed glass or deep bowl and microwave at 30-second intervals, stirring in between, until fully melted and smooth.
- Remove one of the pans from the freezer. Roll the portions between your palms to create perfectly round balls and drop them one at a time into the melted chocolate. Use a spoon to coat the top and a spiral dipping tool or a fork to carefully remove them. Allow any excess chocolate to drip off before placing them back on a fresh parchment-lined baking sheet. If the balls become too soft while dipping, simply switch that pan out for the one waiting in the freezer and continue the dipping process. Rotate as needed until all balls are dipped.
Notes
- These truffles do not strictly require refrigeration due to their ingredients. However, the peanut butter mixture can soften and potentially crack the chocolate shell if left at room temperature for extended periods. For best results and to maintain texture, storing them in an airtight container in the refrigerator is recommended.
- Remember to use whole Oreos (cookie and cream filling) for this recipe, not just the cookie wafers.
Nutrition
Carbohydrates: 26 g |
Protein: 4 g |
Fat: 13 g |
Saturated Fat: 6 g |
Polyunsaturated Fat: 2 g |
Monounsaturated Fat: 4 g |
Trans Fat: 0.01 g |
Sodium: 103 mg |
Potassium: 101 mg |
Fiber: 1 g |
Sugar: 21 g |
Vitamin A: 0.2 IU |
Calcium: 9 mg |
Iron: 1 mg
Did You Make This Recipe?
Don’t forget to share your creations with us on Instagram @sugarandsoulco and follow us on Tiktok @sugarandsoulco and Pinterest @sugarandsoulco for more delicious recipes and inspiration!
Pin Recipe
Share Recipe