

These Peppermint Oreo Balls offer a delightful, minty twist on the beloved classic, making them the quintessential treat for the festive holiday season. These incredibly decadent and easy-to-make dessert bites are crafted from a simple yet irresistible base of crushed Oreos, softened cream cheese, a hint of salt, and a generous splash of vibrant peppermint extract. Each perfectly portioned ball is then generously dipped in rich, dark chocolate, creating an exquisite harmony of flavors and textures. Prepare to be showered with recipe requests, as these irresistible Peppermint Oreo Truffles are guaranteed to be a hit at any gathering!

As the holiday season draws near, kitchens around the world fill with the comforting aromas of festive baking. But what if you could capture that enchanting Christmas spirit with a dessert that requires no oven, minimal effort, and delivers maximum flavor? Enter Peppermint Oreo Truffles – a truly magical creation bursting with one of the season’s most cherished flavors: invigorating peppermint. This signature taste promises to infuse your home with the joyful essence of Christmas, ready to be shared and savored with your dearest loved ones.
Not only are these rich and indulgent dessert bites incredibly delicious, but they also provide a welcome respite from a busy oven during the holiday rush. This highly anticipated no-bake treat frees up your valuable oven space for other festive dishes, making your holiday preparations smoother and more enjoyable. And the best part? These remarkable Peppermint Oreo Balls can be ready to delight in just about an hour and a half, yielding two dozen perfectly sized, bite-sized desserts. That’s an ample supply to pass along as thoughtful, edible gifts, spreading instant Christmas happiness to friends, family, neighbors, and colleagues alike.

Why Peppermint Oreo Balls Are Your Next Holiday Favorite
Beyond their undeniable festive charm, Peppermint Oreo Balls offer a myriad of reasons to become your go-to holiday dessert. Their no-bake nature is a game-changer, especially during a time when oven space is precious. Imagine creating a stunning dessert without heating your kitchen or meticulously monitoring baking times. This recipe offers pure convenience without compromising on flavor or presentation.
The speed with which these truffles come together is another huge advantage. In less than two hours, you can go from pantry staples to a platter of elegant, delicious treats. This makes them ideal for last-minute holiday parties, impromptu gift-giving, or simply satisfying a sudden sweet craving. The recipe is also incredibly forgiving, perfect for both seasoned bakers and novice confectioners.
Furthermore, the combination of classic chocolate Oreos, tangy cream cheese, and refreshing peppermint, all encased in a luscious chocolate shell, creates a flavor profile that is both nostalgic and exciting. Each bite delivers a harmonious balance of creamy, crunchy, sweet, and minty notes that truly embodies the holiday spirit. They are also perfectly portable and hold up well, making them excellent candidates for holiday cookie exchanges or thoughtful homemade gifts that friends and family will cherish.
Essential Peppermint Oreo Ball Ingredients
Crafting the perfect Peppermint Oreo Ball filling is a simple art, relying on just a few key ingredients that come together beautifully. The core of this delectable treat is formed by crushed Oreos, salt, softened cream cheese, and aromatic peppermint extract. These elements blend seamlessly to create a rich, dense, and wonderfully minty center. For the exquisite chocolate coating that gives these truffles their professional finish, we opt for high-quality melting wafers – a choice that simplifies the dipping process and ensures a smooth, glossy result. It truly doesn’t get any easier or more delicious than this!

Detailed Ingredient Breakdown:
- Oreos (14 ounce package, approximately 36 regular Oreos): The foundation of our truffles! Regular chocolate Oreos provide the perfect base, but you can explore seasonal peppermint-flavored Oreos for an even bolder minty punch (adjusting peppermint extract accordingly). Ensure you use the entire cookie, including the cream filling, for optimal flavor and texture.
- Cream Cheese (8 ounces, softened): Full-fat cream cheese is highly recommended for the best flavor and texture. Make sure it’s fully softened at room temperature. This is crucial for achieving a smooth, well-combined truffle mixture without any lumps. Cold cream cheese will result in a crumbly, unworkable dough.
- Peppermint Extract (1 teaspoon): This is where the magic minty flavor comes from. Start with one teaspoon, and if you prefer a stronger mint presence, you can add a tiny bit more, a quarter teaspoon at a time. Be cautious not to overdo it, as peppermint extract can become overpowering quickly.
- Salt (¼ teaspoon): A small but mighty ingredient! Salt doesn’t just make things salty; it enhances and balances the sweetness of the Oreos and chocolate, bringing out the best in all the flavors. Don’t skip it!
- Chocolate Melting Wafers (10 ounces): These are ideal for dipping because they melt smoothly and set quickly with a beautiful, shiny finish. Dark chocolate provides a lovely contrast to the sweet mint filling, but semi-sweet or even milk chocolate wafers can also be used based on your preference.
- Crushed Peppermint Pieces (for garnish): Whether you use crushed candy canes, peppermint candies, or even festive sprinkles, these add a delightful crunch, an extra burst of mint, and a beautiful festive appearance.
How To Make Peppermint Oreo Truffles: A Step-by-Step Guide
Making these Peppermint Oreo Truffles is a straightforward and enjoyable process. Follow these simple steps to create your perfect holiday treats:
Preparation is Key
- Prepare Your Workspace: Begin by lining a baking sheet with parchment paper or waxed paper. This prevents the truffles from sticking and makes cleanup a breeze. Having this ready before you start mixing will ensure a smooth process.
Crafting the Truffle Base
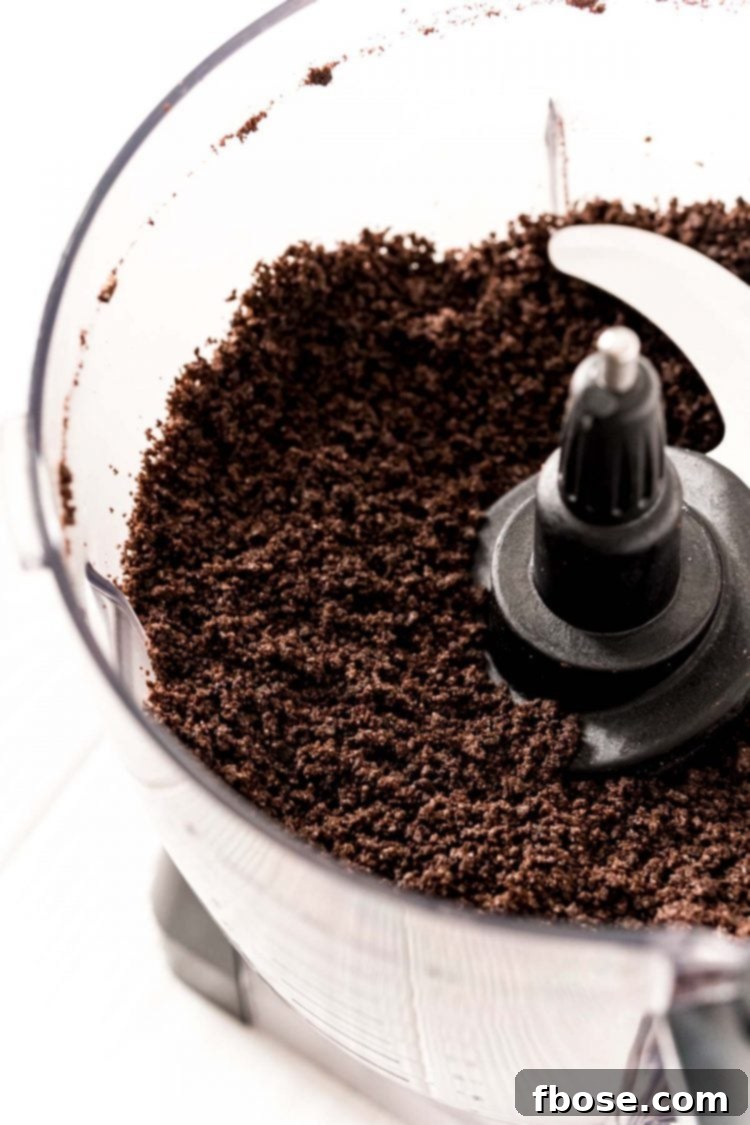
- Crush the Oreos: Place the entire package of Oreos (cookies and cream filling) into a food processor. Pulse the Oreos until they are transformed into fine, uniform crumbs. The consistency should resemble wet sand, with no large chunks remaining. If you don’t have a food processor, you can place the Oreos in a large, sturdy Ziploc bag and crush them with a rolling pin or mallet until finely ground.
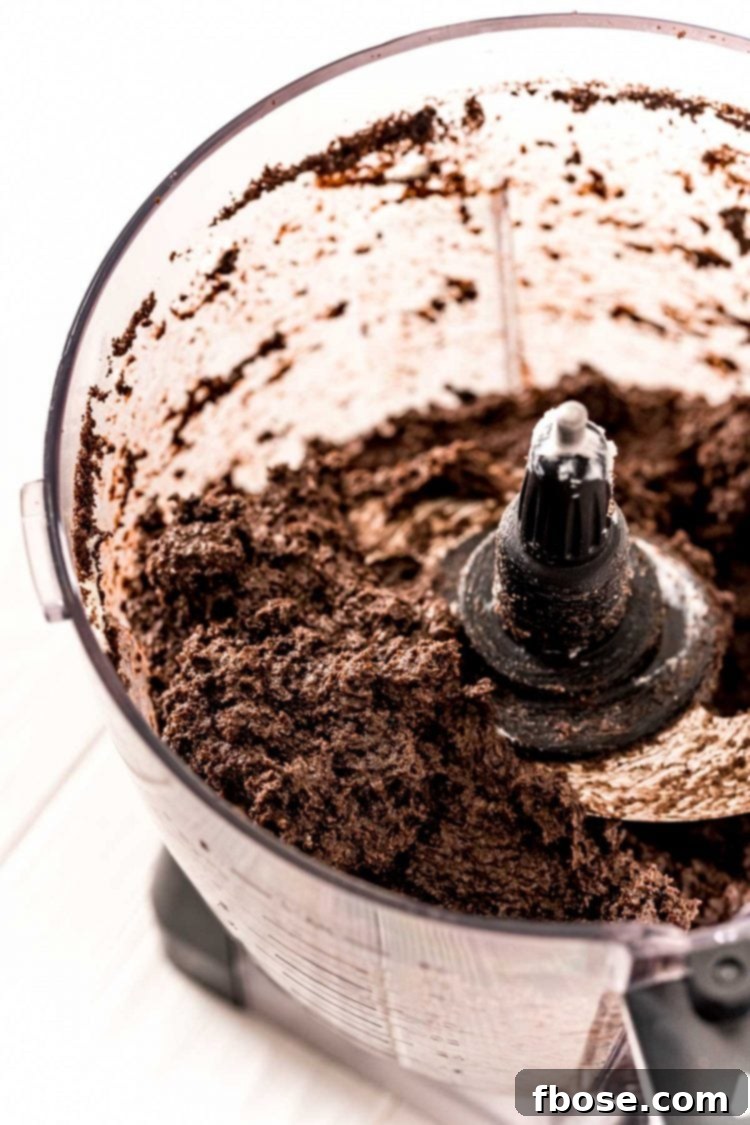
- Combine the Filling Ingredients: Add the softened cream cheese, peppermint extract, and salt directly into the food processor with the crushed Oreos. Pulse the mixture together until all ingredients are thoroughly combined and a thick, sticky dough forms. It’s important that the cream cheese is truly softened to achieve a smooth, homogeneous mixture. Scrape down the sides of the food processor as needed to ensure everything is incorporated. The resulting mixture should be dense and pliable.
Forming and Chilling the Truffles
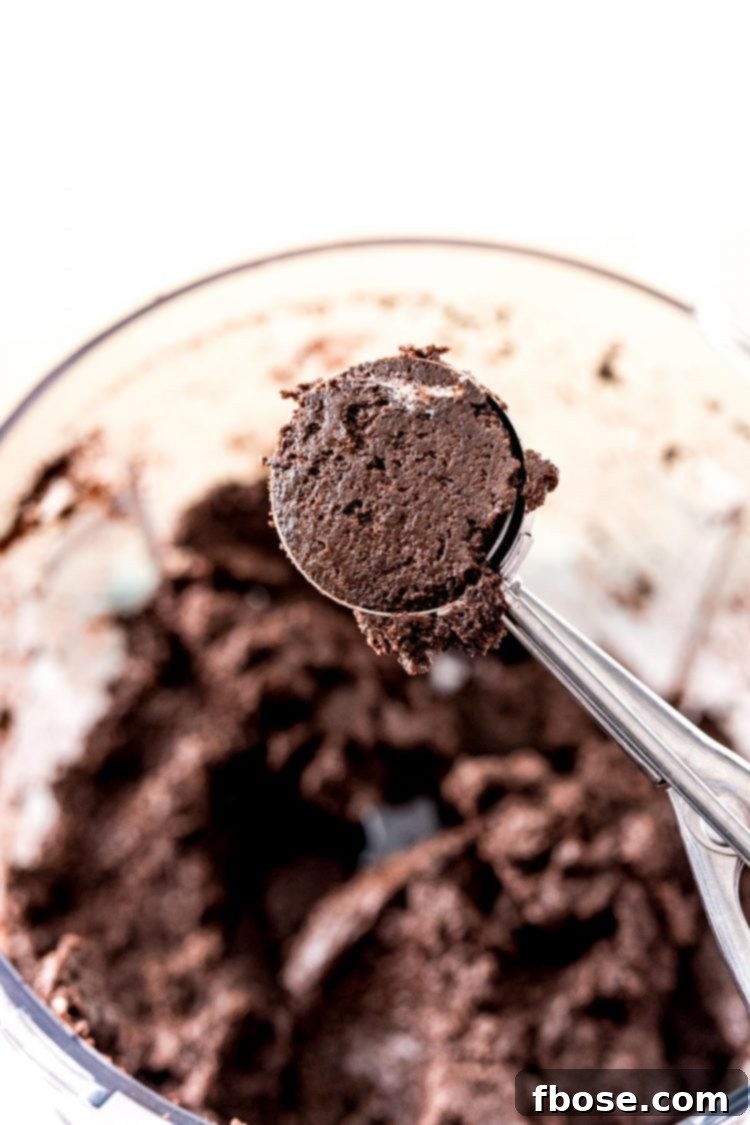
- Roll the Truffle Balls: Using a medium cookie scoop (about 1 tablespoon in size) will help you portion out the mixture evenly, ensuring all your truffles are consistently sized. Scoop out the mixture, then use your hands to roll it into smooth, uniform 1-inch balls. Place these balls onto the prepared baking sheet, leaving a small space between each one.
- Chill for Firmness: Once all the balls are formed and on the baking sheet, transfer them to the refrigerator. Chill them for at least 15 to 30 minutes. This chilling step is essential as it firms up the balls, preventing them from falling apart or losing their shape when dipped into the warm melted chocolate.
Dipping and Finishing
- Melt the Chocolate: While the truffle balls are chilling, prepare your chocolate coating. Place the chocolate melting wafers in a small, microwave-safe bowl. Microwave them at 30-second intervals, stirring thoroughly after each interval, until the chocolate is completely melted and smooth. Be careful not to overheat the chocolate, as this can cause it to seize or burn. A double boiler method can also be used for more controlled melting.
- Dip the Truffles: Once the balls are sufficiently chilled and firm, it’s time to dip! Using a dipping tool, a fork, or even a toothpick, carefully submerge each truffle ball into the bowl of melted chocolate. Ensure it’s fully coated. Lift the ball out and gently tap the tool against the rim of the bowl to allow any excess chocolate to drip off, ensuring a thin, even coating.

- Decorate Quickly: Immediately after dipping each truffle, place it back onto the prepared parchment-lined pan. Work quickly to sprinkle your chosen topping – about 1/3 cup of crushed candy canes or festive sprinkles – over the top of the wet chocolate. The chocolate will begin to set fairly rapidly, so speed is key to ensure the toppings adhere properly.

- Final Set: Allow the dipped truffles to set completely at room temperature or back in the refrigerator for a faster set. Once the chocolate is firm, your Peppermint Oreo Truffles are ready to be enjoyed or packaged for gifting!
Recipe Substitutions and Creative Variations
While the classic Peppermint Oreo Ball recipe is perfection, there’s always room for personalization! Here are some ideas to adapt this recipe to your taste or what you have on hand:
- Chocolate Alternatives:
- Almond Bark or White Chocolate: If dark chocolate isn’t your preference, almond bark (vanilla flavored confectionery coating) or white chocolate melting wafers are excellent alternatives. They melt smoothly and provide a different flavor profile.
- Chocolate Chips: If using regular chocolate chips (milk, semi-sweet, or dark), you may need to add 1 teaspoon of coconut oil or vegetable shortening for every cup of chips. This thins out the melted chocolate to a perfect dipping consistency, ensuring a smooth, even coat without being too thick.
- Different Chocolate Flavors: Experiment with flavored chocolates like mint chocolate chips (reducing peppermint extract), or even a combination of white and dark chocolate for a marbled effect.
- Oreo Varieties:
- Peppermint Flavored Oreos: If you’re making these during the holiday season, you might be lucky enough to find seasonal peppermint-flavored Oreos. If you opt for these, you can either significantly reduce the amount of peppermint extract or omit it entirely, depending on your desired mint intensity. Always taste the mixture before adding extra extract.
- Other Oreo Flavors: Don’t limit yourself to just classic Oreos! Golden Oreos could create a delightful vanilla-mint truffle, or experiment with other seasonal flavors if they complement peppermint (e.g., gingerbread Oreos for a spiced mint twist).
- Extracts & Flavorings: While peppermint is central, you can try other extracts for different occasions. A hint of almond extract, a touch of orange zest, or even a swirl of espresso powder can dramatically change the flavor profile for a unique truffle. Just remember to use extracts sparingly, especially stronger ones.
- Topping Ideas Galore: Beyond crushed candy canes and sprinkles, consider these fun toppings:
- Mini Chocolate Chips: For an extra chocolatey crunch.
- White Chocolate Drizzle: Melt white chocolate and drizzle it over the set dark chocolate truffles for an elegant contrast.
- Cocoa Powder: For a sophisticated, less sweet option, dust some unsweetened cocoa powder over the truffles.
- Chopped Nuts: Finely chopped pecans or walnuts can add a nutty texture.
- Sea Salt Flakes: A sprinkle of flaky sea salt on dark chocolate enhances the flavor profile beautifully.
How To Store Your Peppermint Oreo Balls
Proper storage is essential to maintain the freshness and deliciousness of your Peppermint Oreo Balls, especially due to the cream cheese content. Here’s how to keep them at their best:
- Refrigerator Storage: Store these delightful truffles in an airtight container in the refrigerator for up to 2 weeks. The cool temperature helps maintain their firm texture and prevents the cream cheese from spoiling. Layer them between sheets of parchment paper if stacking to prevent sticking.
- Freezing for Longer Enjoyment: For extended storage, these truffles freeze beautifully. Place them in a single layer on a baking sheet to freeze solid, then transfer them to a freezer-safe bag or airtight container. Squeeze out as much excess air as possible from the bag to prevent freezer burn. They can be frozen for up to 3 months. When ready to enjoy, simply thaw them in the refrigerator for a few hours.
- Room Temperature Warning: Due to the cream cheese, Peppermint Oreo Balls should not be kept at room temperature for more than a couple of hours. This makes them perfect for serving at parties but remember to refrigerate any leftovers promptly. Always keep them chilled until just before serving.
Need Them Fast? Speed Up the Setting Process!
Sometimes, time is of the essence, and you need those delicious Peppermint Oreo Balls ready to go as quickly as possible. Don’t worry, there are easy ways to expedite the setting process:
- Quick Chill: To speed up the initial firming of the truffle mixture before dipping, place the rolled balls in the freezer for 5-10 minutes instead of the refrigerator. This rapid chilling will get them firm enough for dipping much faster.
- Post-Dip Set: After dipping the truffles in chocolate and adding toppings, place them back into the refrigerator or freezer. In the refrigerator, they’ll be firm in about 15-20 minutes. In the freezer, they can set in as little as 5-10 minutes. This quick set is particularly useful if you’re in a time crunch for a party or unexpected guests.
- Prep Ahead: If you know you’ll be short on time, consider making the Oreo and cream cheese mixture a day or two in advance. Store the un-rolled mixture in an airtight container in the refrigerator. When you’re ready, simply roll the balls, chill briefly, dip, and decorate.
- Efficient Dipping: Set up your dipping station efficiently. Have your melted chocolate ready, your chilled balls nearby, and your toppings laid out. Working swiftly between dipping and decorating ensures the chocolate doesn’t set before you can add your festive garnishes.

Now that the vibrant and joyful spirit of Christmas is overflowing in your kitchen with these incredible Peppermint Oreo Balls, there’s just one delightful thing left to do! Continue your culinary journey through the festive season by exploring more of our tempting holiday recipes. Keep whipping up delicious treats that bring warmth and cheer to every celebration!
- Peppermint Brownie Cookies – Elevate a simple brownie mix into gourmet cookies, exquisitely dipped in creamy Andes mints for a double dose of minty chocolate bliss!
- Peanut Butter Balls – A timeless and incredibly popular no-bake treat featuring a rich, creamy peanut butter center, often coated in chocolate for a perfect classic combination!
- Cookie Dough Truffles – Another fantastic, shareable option, these edible cookie dough truffles are ideal for filling those festive holiday cookie tins and spreading joy!
- Easy Peanut Butter Blossoms – Experience the delightful embrace of a rich chocolate candy nestled within a soft, sugar-coated peanut butter cookie – a holiday baking essential!
- Santa Hat Brownies – The ultimate festive Christmas treat, these brownies are not only adorable but also incredibly fun to make with kids, guaranteeing smiles and deliciousness!

Peppermint Oreo Balls
Pin It For Later
Click the button above to save this delicious recipe to your board!
Let’s Connect and Share!
If you’ve tried this delightful Peppermint Oreo Ball recipe, we would absolutely love to hear from you! Please share your thoughts and let us know how much you enjoyed it by leaving a comment and a review below. Your feedback truly brightens our day!
Don’t forget to tag us – @sugarandsoulco – on Instagram and Pinterest with your beautiful photos of these festive treats. You can also join our vibrant Sugar & Soul Show-offs Community on Facebook and share them there, where you can also participate in our exciting recipe challenges! We can’t wait to see your creations!

Peppermint Oreo Balls
Ingredients
- 14 ounce package Oreos 36 regular Oreos
- 8 ounces cream cheese softened
- 1 teaspoon peppermint extract
- ¼ teaspoon salt
- 10 ounces chocolate melting wafers
- Crushed peppermint pieces
Instructions
-
Add the Oreos to a food processor and pulse until a fine crumb forms.
-
Add in the cream cheese, peppermint extract, and salt, then pulse until fully combined. The mixture will be thick and sticky.
-
Use a medium cookie scoop to portion out the mixture and roll into balls with your hands. Place the balls on a parchment-lined cookie sheet and chill them in the refrigerator for 15 to 30 minutes.
-
Melt the melting wafers in a small bowl at 30-second intervals, stirring between each one, until fully melted.
-
Use a spoon and fork to dip and coat the balls, then transfer back to the parchment paper to set completely.
-
Top with sprinkles or crushed peppermint pieces before the chocolate sets.
Notes
- You can place these in the refrigerator or freezer to set faster if needed, about 5 to 10 minutes for each round.
- To freeze, add them to a freezer bag and squeeze out any excess air and freeze for up to 3 months.
- These can be stored in an airtight container in the refrigerator for up to 2 weeks.
Nutrition
Did You Make This Recipe?
Don’t forget to share it with me on Instagram @sugarandsoulco and follow on Tiktok @sugarandsoulco and Pinterest @sugarandsoulco for more!
Pin Recipe
Share Recipe