

Easy Melted Snowman Cookies: A Whimsical Winter Treat for All Ages
Step into a world of winter wonder with these adorable Melted Snowman Cookies! These charming treats feature soft, homemade cookies adorned with a delightful 3-ingredient royal icing, transformed into playful melting snowmen using simple, fun garnishes. Perfectly designed for joyous holiday gatherings, cozy snowy afternoons, or engaging classroom parties, these cookies promise smiles and a touch of magic. With just about 30 minutes of active prep time, you can bring these festive creations to life, making them an ideal project for bakers of all skill levels.
For those seeking more delightful and delicious winter treats, explore our collection! You might love these Snowball Cookies, elegantly rolled in powdered sugar, or perhaps embark on a unique culinary adventure with this How to Make Snow Cream recipe, which ingeniously uses actual snow to create a sweet, homemade ice cream sensation.

Melted Snowman Cookies are undeniably one of winter’s most endearing treats, guaranteed to capture the hearts of children and adults alike! Imagine the sheer delight and excitement on your kids’ and their friends’ faces as you present them with these delicious and undeniably fun cookies. These aren’t just desserts; they’re edible works of art that evoke the joyful spirit of the season.
To truly elevate the experience and earn some serious “brownie points,” invite your little helpers to join in the decorating fun! After you’ve baked the perfectly round cookie bases, frosted them with the smooth “melted snow” royal icing, and popped on the fluffy marshmallow heads, simply lay out the candy garnishes. Watch as their imaginations soar, transforming simple sweets into unique, personality-filled snowmen. It’s an activity that’s as memorable as it is delicious!
Whether you choose to involve little hands in the creative process or prefer to craft these charming treats yourself, Melted Snowman Cookies are perfect for a multitude of occasions. They shine at classroom parties, add a whimsical touch to holiday gatherings, or provide a wonderfully fun activity for a cozy, snowy day at home. Their versatility and irresistible charm make them a go-to recipe for festive baking.

Why Melted Snowman Cookies Are a Holiday Must-Make
These Melted Snowman Cookies aren’t just visually appealing; they offer a fantastic blend of ease, fun, and deliciousness that makes them a staple for the winter season. The simple sugar cookie base provides a perfect canvas, while the royal icing creates that signature “melted” look effortlessly. This recipe is designed to be accessible, meaning even beginner bakers can achieve impressive results. It’s a wonderful way to introduce children to the joys of baking and decorating, fostering creativity and precious family memories. Plus, who can resist a dessert that’s as charming as it is tasty?
Melted Snowman Cookies Ingredients: Simple Pantry Staples
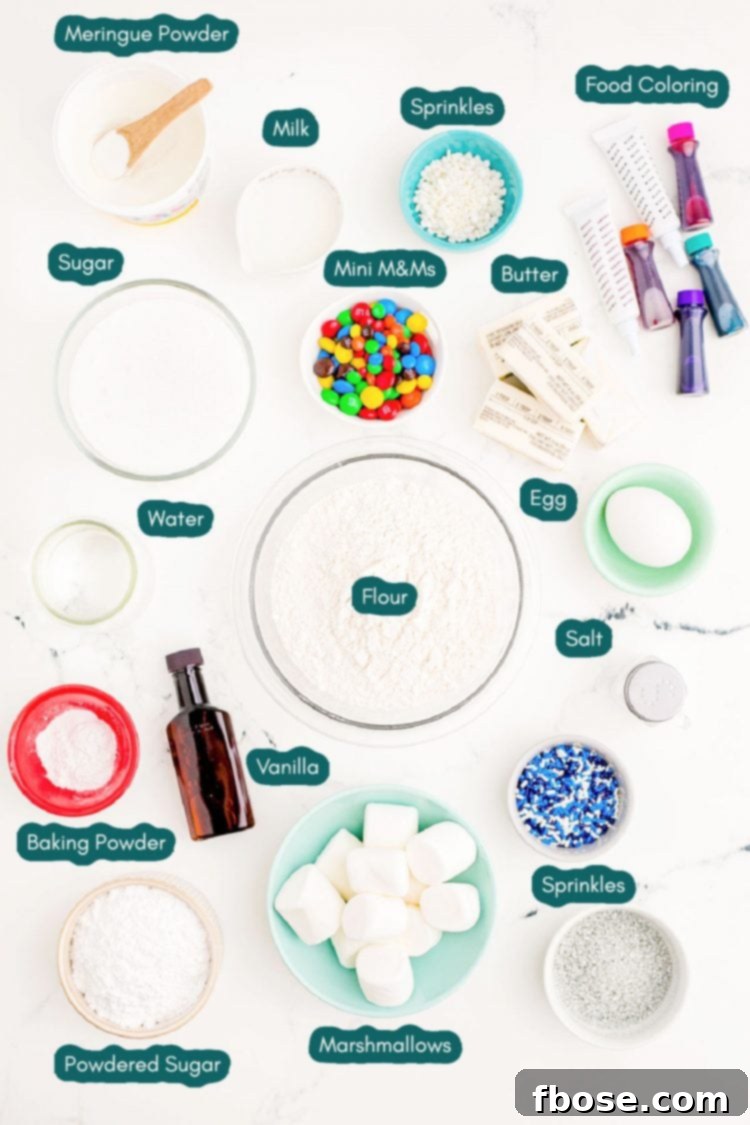
Despite their elaborate appearance, this Melted Snowman Cookies recipe is surprisingly easy to create. The secret lies in using readily available pantry staples for the cookies, a simple three-ingredient royal icing, and an array of colorful candies for decoration. You’ll be amazed at how quickly these impressive cookies come together, giving the impression of hours spent in the kitchen when, in reality, they’re quite efficient to prepare.
For the Homemade Cookie Base
To craft the perfect foundation for your melted snowmen, you’ll start with a classic sugar cookie dough. These ingredients are likely already in your kitchen, ensuring a fresh, flavorful, and sturdy cookie base that holds up beautifully to icing and decorations.
- Salted Butter: Provides richness and a hint of salt to balance the sweetness. Ensure it’s softened to cream easily with the sugar.
- Granulated Sugar: For that classic sweet cookie flavor and tender texture.
- Large Egg: Acts as a binder, adding structure and richness to the dough.
- Whole Milk: Contributes to the tender texture and helps achieve the right dough consistency.
- Vanilla Extract: Essential for a warm, inviting aroma and flavor. Consider a clear vanilla extract if you want to ensure no tinting of the cookie base.
- All-Purpose Flour: The primary structural component of the cookie. Start with 2 cups and add more if needed to reach a pliable, non-sticky dough.
- Baking Powder: Provides a slight lift, giving the cookies a soft chewiness without excessive spreading.
- Salt: Enhances all the other flavors, preventing the cookies from tasting bland.
Once the dough is prepared, it will require a crucial chilling period in the refrigerator. This step is vital for preventing the cookies from spreading too much during baking, ensuring they retain their perfect round shape for the melted snowman effect.
For the Signature Royal Icing (“Melted Snow”)
The star of the show for that iconic “melted” look is our simple yet effective royal icing. This quick-drying icing sets beautifully, creating a smooth, white canvas for your snowman decorations.
- Powdered Sugar (Confectioners’ Sugar): Forms the base of the icing, providing sweetness and a smooth texture. Sifting is recommended for a lump-free result.
- Meringue Powder: This key ingredient gives royal icing its characteristic hard, crisp finish when dry, and helps stabilize it for piping.
- Warm Water: Used to achieve the ideal consistency for the icing – thick enough to hold its shape but fluid enough to spread and create a natural “puddle” effect.
Fun & Festive Garnishes
The final layer of creativity comes with the garnishes, transforming simple cookies into delightful snowmen. This is where the real fun begins, especially if you have little helpers!
- Marshmallows: Mini or regular-sized marshmallows are perfect for the snowman’s head. One marshmallow per cookie creates an instant whimsical touch.
- Gel Food Coloring: You’ll need orange for the classic carrot nose and black for expressive eyes and stick arms. Gel colors provide vibrant hues without significantly altering icing consistency.
- Sprinkles: A dash of festive sprinkles adds sparkle and extra charm to the finished cookies.
- M&M Minis: These colorful mini candies are ideal for the snowman’s buttons, adding a pop of color and a touch of chocolatey goodness.
- Pull and Peel Twizzlers: Easily separated into thin strands, these licorice pieces make perfect, vibrant scarves for your snowmen, adding a playful detail.
Crafting Your Melted Snowman Cookies: Step-by-Step Guide
Making these charming melted snowman cookies involves two main stages: baking the perfect cookie base and then preparing and applying the royal icing and decorations. Follow these detailed steps for a smooth and enjoyable baking experience.
Baking the Perfect Cookie Base
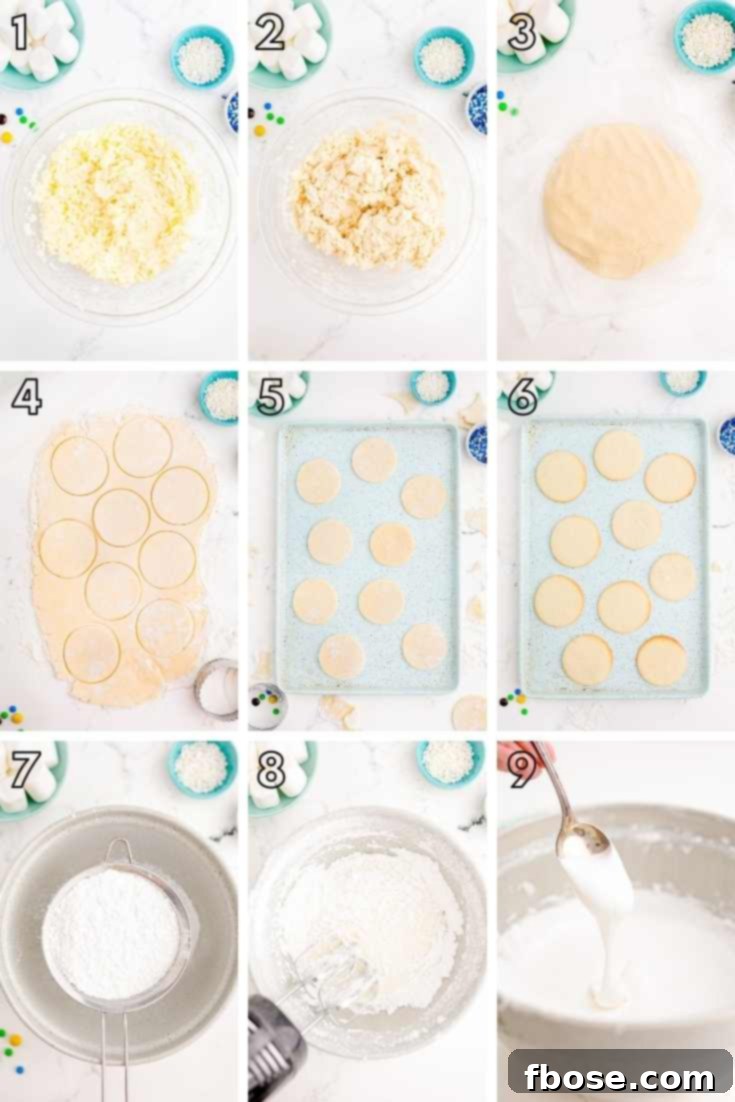
- Prepare the Dough: In a large mixing bowl, combine the softened salted butter, granulated sugar, large egg, whole milk, and vanilla extract. Beat these wet ingredients together until they are light and creamy. Next, gradually add the all-purpose flour (starting with 2 cups), baking powder, and salt. Continue beating until all ingredients are well blended and a soft dough forms. If the dough feels excessively sticky, incorporate an additional ¼ to ½ cup of flour, a little at a time, until it reaches a manageable consistency that’s not too stiff.
- Chill the Dough: Divide the cookie dough into two equal-sized disks. Wrap each disk tightly in plastic wrap and place them in the refrigerator to chill for at least 1 hour. This chilling process is essential for firming up the dough, which prevents the cookies from spreading too much during baking and helps them hold their shape.
- Bring to Room Temperature: Once chilled, remove the cookie dough disks from the refrigerator and allow them to sit at room temperature for about 15-20 minutes. This will soften the dough slightly, making it easier to roll out without cracking.
- Preheat Oven & Roll Dough: While the dough is softening, preheat your oven to 375°F (190°C). Lightly flour a clean surface (such as a countertop or large cutting board) and your rolling pin. Roll out one disk of dough evenly to approximately ¼ inch thick.
- Cut Out Cookies: Using a 2½-inch round cookie cutter (lightly floured to prevent sticking), cut out as many cookie shapes as possible from the rolled dough. Gather the scraps, gently re-roll them, and cut out more cookies until all dough is used.
- Bake the Cookies: Carefully place the cut-out cookies about 1 inch apart on ungreased baking sheets. Bake for 7 to 10 minutes, or until the edges just begin to turn a light golden brown. Keep a close eye on them, as they can cook quickly after the 5-minute mark. Overbaking can lead to dry, crumbly cookies.
- Cool Completely: As soon as they are baked, transfer the hot cookies from the baking sheets to wire cooling racks. Allow them to cool completely before you even think about frosting them. Warm cookies will melt the royal icing, ruining your melted snowman effect.
Preparing the Royal Icing
- Prepare the Icing: In a large mixing bowl, sift together the powdered sugar and meringue powder. Sifting ensures a smooth, lump-free icing. Add 5 tablespoons of warm water to the mixture. Using a stand mixer fitted with a whisk attachment (or an electric hand-held mixer), beat the mixture at high power for a full 10 minutes. This extended beating time is crucial for developing the proper consistency and incorporating air, which helps the icing set correctly.
- Check Consistency: The desired consistency for your “melted snow” icing is thick yet loose enough to flow slightly and slide around on the cookie, creating a natural puddle. If your icing is too thick and barely moves, add more warm water, a teaspoon at a time, beating after each addition until the desired flow is achieved. Conversely, if it’s too thin and runs off the cookies quickly, continue beating for a few more minutes; royal icing tends to thicken as it’s beaten longer. Adjusting the consistency might take a little trial and error, but don’t worry – there will be plenty of cookies to perfect your technique!
Assembling & Decorating Your Melted Snowman Cookies
Now for the most creative and fun part: bringing your adorable melted snowmen to life! The assembly steps are quite straightforward, but a little attention to detail will ensure your cookies are truly show-stopping. You might find a pair of food tweezers helpful for placing the smaller candies with precision.
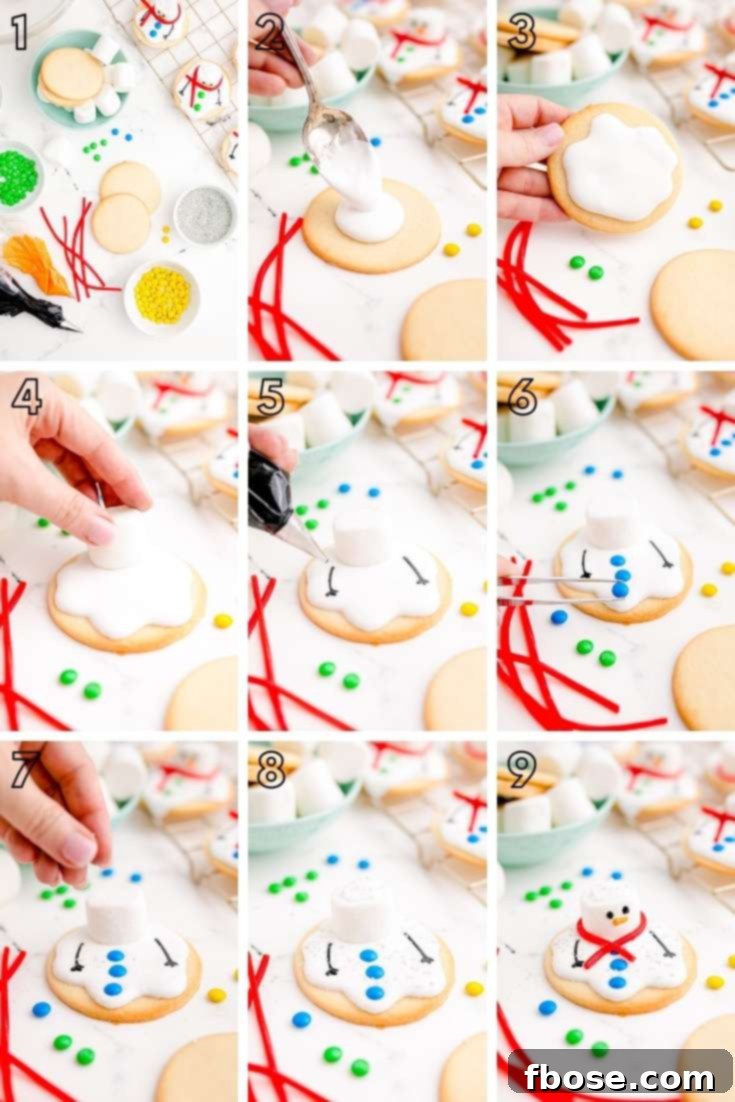
- Apply the “Melted Snow” Icing: Take a cooled cookie and drop a generous dollop of the prepared royal icing onto the middle. Gently spread the icing outwards towards the edges of the cookie. Don’t worry about making it perfectly smooth; the beauty of a “melted” snowman is its imperfect, flowing appearance. You can make the puddle as neat or as whimsical as you like!
- Add the Marshmallow Head: While the icing is still wet, carefully place one marshmallow near the top edge of each cookie. This will serve as the snowman’s head, settling into the “melted snow” icing.
- Decorate the Face and Arms:
- For Eyes and Arms: Take a small portion of your white royal icing and mix in a few drops of black gel food coloring until you achieve a dark black hue. Transfer this black icing to a piping bag with a small round tip (or a Ziploc bag with a tiny corner snipped off). Pipe two small dots for the eyes and two wavy lines for the stick arms onto the white icing puddle.
- For the Carrot Nose: Similarly, mix a small amount of white icing with orange gel food coloring. Pipe a tiny carrot shape (a small triangle or cone) just below the eyes for the snowman’s nose.
- Add Buttons, Scarf & Sprinkles:
- Buttons: While the black and orange details are still wet (or shortly after), carefully place two or three mini M&Ms onto the white icing puddle below the marshmallow head to create the snowman’s buttons.
- Scarf: Take a Pull and Peel Twizzler and gently separate a few strands. Wrap one strand around the base of the marshmallow head, creating a colorful and playful scarf.
- Sprinkles: For a final festive touch, sprinkle a few fun, colorful sprinkles around the melted puddle, adding extra sparkle and personality.
- Allow Icing to Dry: Let your decorated Melted Snowman Cookies sit undisturbed at room temperature for at least 2 hours. This allows the royal icing to fully dry and harden, preventing smudges and ensuring your beautiful decorations are set. If you need them to firm up faster, you can refrigerate them briefly, though room temperature drying is ideal for the best texture.
Tips for Perfect Melted Snowman Cookies Every Time
- Precision in Dough Chilling: Do not skip the chilling step for the cookie dough. This is crucial for preventing your cookies from spreading excessively in the oven, ensuring they maintain a nice, round shape, which is essential for the melted snowman aesthetic.
- Room Temperature Ingredients: Ensure your butter and egg are at room temperature. This allows them to cream together more effectively with the sugar, resulting in a smoother dough and a more tender cookie.
- Flour Measurement Matters: When measuring flour, spoon it into your measuring cup and then level it off with a straight edge. Scooping directly from the bag can compact the flour, leading to too much flour and a dry, crumbly dough.
- Icing Consistency is Key: The consistency of your royal icing is paramount. You want it thick enough to hold its shape around the marshmallow but fluid enough to create a natural “puddle” effect. Adjust with small amounts of water or by beating longer until it flows just right. It should slowly spread to fill the cookie but not run over the edges quickly.
- Patience with Drying: Allow ample time for the royal icing to dry completely. This prevents smudging and ensures a firm, smooth surface for your snowman’s features. Humidity can affect drying time, so be patient.
- Get Creative with Faces: Don’t feel limited to classic black eyes and an orange nose! Experiment with different facial expressions. Use mini chocolate chips or edible black pearls for eyes, or even tiny pieces of candy corn for noses.
- Custom Scarf Colors: If you can’t find Pull and Peel Twizzlers, use thin strips of fruit leather or even colored icing piped as a scarf for a personalized touch.
- Decorate Together: These cookies are a fantastic activity for kids. Prepare the cookie bases and icing, then let them unleash their creativity with the garnishes. It’s a wonderful way to bond and create lasting memories.
Serving and Gifting Your Festive Treats
These Melted Snowman Cookies are not just delicious; they are also incredibly versatile for various winter occasions. Serve them on a beautiful platter at your next holiday party, where they are sure to be a conversation starter and a hit with guests of all ages. Pair them with a warm mug of hot chocolate or spiced cider for the ultimate cozy winter snack. They also make fantastic edible gifts! Package them in clear cellophane bags tied with festive ribbons, or arrange them in a decorative tin for a homemade present that shows you care. Imagine the joy of receiving a box of these whimsical snowmen from a friend or neighbor during the festive season. They’re perfect for school bake sales, office potlucks, or simply as a special treat for your family.

Melted Snowman Cookies FAQs
How To Store Melted Snowman Cookies
Once your charming melted snowman cookies are completely dry and the royal icing has set, they can be stored in an airtight container at room temperature for up to a week. For longer preservation, you can also freeze them for up to 3 months. When freezing, place them in a single layer on a baking sheet to firm up, then transfer to an airtight container with parchment paper between layers to prevent sticking.
Can I Save The Leftover Royal Icing?
Absolutely! Don’t let any precious royal icing go to waste. Unused royal icing can be stored in an airtight container in the refrigerator for up to 2 weeks. If you plan to use it further down the line, it can even be frozen for up to 2 months. Just be sure to bring it back to room temperature and give it a good stir or re-beat before using, as some separation might occur.
How Can I Add A Bit More Flavoring To The Royal Icing?
While the meringue powder gives the icing a subtle flavor, you can definitely enhance it! Consider adding a teaspoon of vanilla extract, almond extract, or even peppermint extract to the royal icing for an extra burst of flavor. Just be mindful that if you use a non-clear vanilla extract, it might slightly tint the white coloring of your frosting. For pure white icing, stick to clear extracts.
Can I Add Food Coloring To The Icing (Beyond Snowman Features)?
Yes, you certainly can! If you want to create a colorful “melted puddle” or other vibrant decorations, you can add food coloring to your royal icing. For the best and most intense colors without thinning the icing too much, we highly recommend using gel food coloring. A little goes a long way with gel colors, allowing you to achieve bright hues with minimal additions.
Explore More Delightful Winter & Holiday Desserts!
Just as much as adults adore a sweet ending, kids are even more thrilled by desserts, especially when they come in such cute and exciting forms! Expand your baking repertoire with these other fantastic dessert recipes that are sure to make your kids’ eyes light up with joy!
- Chocolate Hershey Kiss Cookies – Indulge in chewy, homemade chocolate cookies, rolled in festive sprinkles and crowned with a classic Hershey’s kiss.
- Movie Night Marshmallow Treats – These buttery marshmallow treats are a kid-favorite, packed with crunchy popcorn, salty peanuts, and decadent chocolate for a perfect movie snack.
- M&M’s Cookie Cake – A giant, celebratory cookie adorned with colorful M&M’s and topped with rich chocolate frosting, making it a fun and festive treat for the entire family.
- Chocolate Peanut Butter Cupcakes – Bite into these delightful cupcakes, starting with a simple boxed cake mix but featuring a delightful surprise filling of Reese’s Pieces.
- Circus Animal Sugar Cookies – An incredibly easy recipe using refrigerated cookie dough, enhanced with crushed circus animal cookies, white chocolate chips, and vibrant rainbow nonpareils.
Let’s Connect and Share Your Creations!
If you’ve tried this delightful Melted Snowman Cookies recipe, we’d absolutely love to hear from you! Please let us know how much you enjoyed it by leaving a comment and a review below. Your feedback is truly cherished and helps our sweet community grow!
Don’t forget to tag us – @sugarandsoulco – on Instagram and Pinterest with your fantastic photos! You can also join our Sugar & Soul Show-offs Community on Facebook and share your creations there, where you can also participate in our fun recipe challenges!

Melted Snowman Cookies
Author: Rebecca Hubbell
Course: Dessert
Cuisine: American
Prep Time: 30 minutes
Cook Time: 10 minutes
Chill/Cooling Time: 3 hours 30 minutes
Total Time: 4 hours 10 minutes
Servings: 30 cookies
Pin Recipe
These Melted Snowman Cookies are homemade cookies that get covered in a 3-ingredient royal icing, and garnishes to dress them up as snowmen! Prep these fun cookies in just 30 minutes!
Equipment
- Electric hand mixer or stand mixer
- Large bowl
- Spatula
- Small spoon
- Rolling Pin
- Round cookie cutter (2.5-inch)
- Baking sheets
- Wire cooling racks
- Piping bag (or Ziploc bag)
Ingredients
Cookies
- ½ cup salted butter
- 1 cup granulated sugar
- 1 large egg
- 2 to 3 Tablespoons whole milk
- 1½ teaspoons vanilla extract
- 2-2½ cups flour (see step 2 in instructions)
- 2 teaspoon baking powder
- ¼ teaspoon salt
Royal Icing
- 4 cups powdered sugar
- 3 Tablespoons meringue powder
- 7 Tablespoons warm water (to start)
Garnish
- 30 marshmallows (1 for each cookie)
- Gel coloring (black and orange)
- Sprinkles
- M&M minis
- Pull and Peel twizzlers
Instructions
Cookies
- In a medium bowl, beat together the butter, sugar, egg, milk, and vanilla. Then add the flour (start with 2 cups), baking powder, and salt. Beat this until well blended. If the dough is still really sticky you may mix in another ¼ to ½ cup of flour.
- Divide the cookie dough into 2 equal-sized disks. Wrap these and chill them in the refrigerator for 1 hour. When you remove the dough from the fridge, allow it to sit at room temperature until soft enough to roll easily.
- Preheat the oven to 375°F (190°C).
- On a lightly floured surface, roll out the dough to ¼ inch thick.
- Use a 2½-inch, lightly floured round cookie cutter to cut out as many cookies as you are able to.
- Place cookies 1-inch apart on ungreased baking sheets.
- Bake for 7 to 10 minutes or until the edges are just golden. They can cook quickly so watch carefully after the 5-minute mark.
- Transfer the cookies to cooling racks to cool completely before frosting them.
Icing & Assembly
- In a large mixing bowl, sift together the powdered sugar and meringue powder. Add 5 tablespoons of warm water. Use a stand mixer with a whisk attachment (or an electric hand-held mixer) to beat at high power for 10 minutes.
- When you are ready to ice/make the melted snow, drop a dollop of icing onto the middle of the cookie and carefully spread it out towards the edges. You can make this as perfect or messy as you’d like – after all – it’s a MELTED snowman cookie.
- Place one marshmallow on each cookie to represent the head of the snowman.
- Add black gel food coloring to some of the icing and pipe on arms and eyes. Do the same with orange food coloring to make icing for the carrot nose. Then drop on some mini M&Ms for buttons, licorice for the scarf, and some sprinkles for fun!
- The royal icing will take about 2 hours to dry at room temperature. If you need the icing to firm up more quickly, you can refrigerate them.
Notes
- Check the consistency of the icing. You want to get a thick consistency of icing that still has the ability to move and slide on the cookie a bit. Add more water if the icing is too thick and is so stiff that it will barely move. If it is too thin, beat longer, as it thickens the longer you beat it.
- Some icing might slowly run off the side, that’s okay for a “melted” look. But if it quickly runs off, your icing may be too thin. Either way, just use a little trial and error to get the look you want. There will be plenty to experiment with!
- How To Store: Finished cookies can be stored for up to a week at room temperature when stored in an airtight container. You can also freeze them for up to 3 months.
- Can I Save The Leftover Icing? Absolutely! You can store unused icing in the fridge for up to 2 weeks or even in the freezer for up to 2 months.
- How Can I Add A Bit More Flavoring To The Royal Icing? You can add in some vanilla extract, almond extract, or even peppermint extract a teaspoon at a time. Just keep in mind if you don’t grab a clear vanilla extract it will tint the coloring of the frosting.
- Can I Add Food Coloring To The Icing? Yes, you can, but I’d recommend using gel food coloring to get a more intense color without using as much.
Nutrition
Calories: 179kcal | Carbohydrates: 36g | Protein: 1g | Fat: 3g | Saturated Fat: 2g | Polyunsaturated Fat: 1g | Monounsaturated Fat: 1g | Trans Fat: 1g | Cholesterol: 14mg | Sodium: 56mg | Potassium: 43mg | Fiber: 1g | Sugar: 26g | Vitamin A: 108IU | Vitamin C: 1mg | Calcium: 17mg | Iron: 1mg
Did You Make This Recipe?
Don’t forget to share it with me on Instagram @sugarandsoulco and follow on Tiktok @sugarandsoulco and Pinterest @sugarandsoulco for more!
Share Recipe