

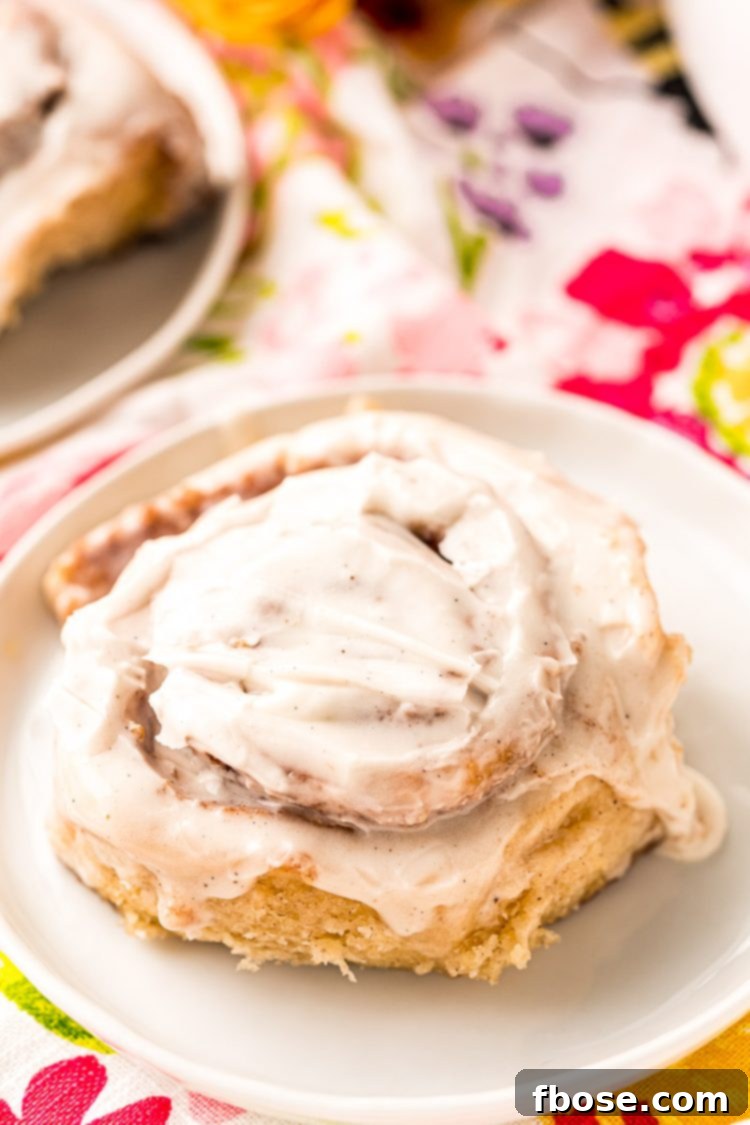
Welcome to the world of delectable treats where convenience meets classic comfort! This Easy Cinnamon Rolls recipe is a game-changer, designed for anyone who craves the warm, comforting aroma and taste of freshly baked cinnamon buns but doesn’t have hours to spare for yeast proofing. Forget the long waits; these incredible rolls are made without yeast and require no rising time, meaning you can have them ready to enjoy in less than an hour! Imagine soft, fluffy dough enveloping luscious swirls of rich brown sugar, fragrant cinnamon, and melted butter, all crowned with a thick, creamy vanilla icing. This recipe isn’t just easy; it’s an experience of pure bliss that transforms your kitchen into a bakery in minutes.
There’s nothing quite like the irresistible allure of homemade cinnamon rolls, and this no-yeast version truly stands out. It sacrifices absolutely nothing in terms of flavor or texture, delivering a moist, tender crumb that melts in your mouth. The secret lies in a perfectly balanced filling, a generous blend of granulated and brown sugar, softened butter, and a generous dash of aromatic cinnamon. Each bite offers a harmonious symphony of sweet and spicy notes, making these cinnamon buns a delightful treat for any time of day. And let’s not forget the grand finale: a luscious, creamy vanilla icing that cascades over the warm rolls, adding an extra layer of decadence that is simply divine.
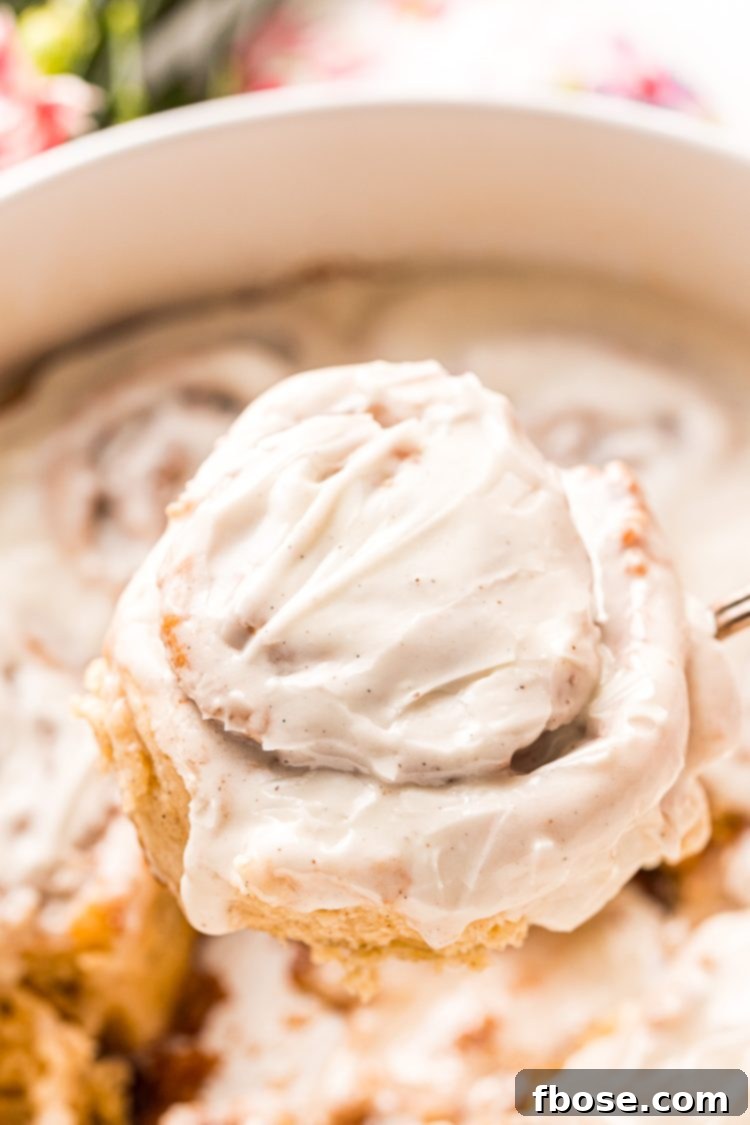
The true beauty of these Quick Cinnamon Rolls lies in their remarkable speed and simplicity. Traditional cinnamon roll recipes often involve multiple proofing stages, which can take several hours, turning baking into an all-day affair. This recipe eliminates all that waiting, making it possible to whip up a batch on a whim. Whether you’re preparing for an impromptu brunch with friends, looking for a comforting morning treat, or simply want to indulge your sweet tooth without the extensive commitment, these 1-Hour Cinnamon Rolls are your perfect solution. Their fast preparation means you can spend more time savoring the moment and less time in the kitchen.
This recipe is an absolute lifesaver for the brunch table, transforming an ordinary meal into an extraordinary culinary experience. Imagine serving these warm, fragrant rolls alongside your favorite coffee or tea. They are perfect for those lazy Sunday mornings when you’d rather curl up with a good book or enjoy a leisurely chat than be bogged down by complex cooking processes. After all, isn’t that what weekends are truly for? For an equally delightful addition to your brunch spread, consider trying these irresistible Pecan Sticky Buns, offering a nutty, caramelized twist on a classic favorite.
Key Components: What Makes These Cinnamon Rolls So Delicious?
Every outstanding recipe is built upon a foundation of quality ingredients and well-defined components. For these incredibly Easy Cinnamon Rolls, there are three essential elements that come together to create a masterpiece:
- The Dough: This is the canvas for our cinnamon rolls, crafted from common pantry staples. You’ll need all-purpose flour for structure, granulated sugar for sweetness, baking powder to give them that delightful lift (without yeast!), milk and butter for richness and tenderness, an egg yolk for moisture and binding, and a touch of salt and vanilla extract to balance and enhance the flavors. A hint of cinnamon is also incorporated into the dough itself, ensuring a delightful aroma and taste throughout.
- The Filling: The heart of any cinnamon roll, our filling is a simple yet profoundly flavorful mixture. It consists of a blend of rich brown sugar and bright granulated sugar, combined with generous amounts of ground cinnamon and melted butter. When baked, this mixture caramelizes into a gooey, aromatic layer that defines the essence of a perfect cinnamon roll.
- The Icing: The crowning glory of these sweet treats. Our thick and creamy icing is effortlessly made with just three ingredients: powdered sugar for its smooth texture, vanilla extract for classic flavor, and a splash of heavy cream to achieve that irresistible, pourable consistency. It’s the perfect counterpoint to the warm, spicy rolls. See? Easy peasy, just as promised!
Step-by-Step Guide: Crafting Your Easy Cinnamon Rolls
Creating these delightful 1-Hour Cinnamon Rolls is a straightforward and enjoyable process. Follow these simple steps for perfectly baked, irresistibly soft cinnamon buns:
- **Prepare the Dry Ingredients for the Dough:** In a large mixing bowl, or the bowl of your stand mixer, combine the all-purpose flour, baking powder, kosher salt, granulated sugar, and a teaspoon of ground cinnamon. Whisk these dry ingredients together thoroughly to ensure they are well combined and evenly distributed. This step is crucial for an even rise and consistent flavor in your dough.
- **Incorporate the Wet Ingredients (Except Butter):** To the dry mixture, add the room temperature whole milk, vanilla extract, and the large egg yolk. Mix these ingredients together on a low speed using your stand mixer (or by hand with a spatula) just until they are combined. Be careful not to overmix at this stage; we’re just bringing the components together before adding the fat.
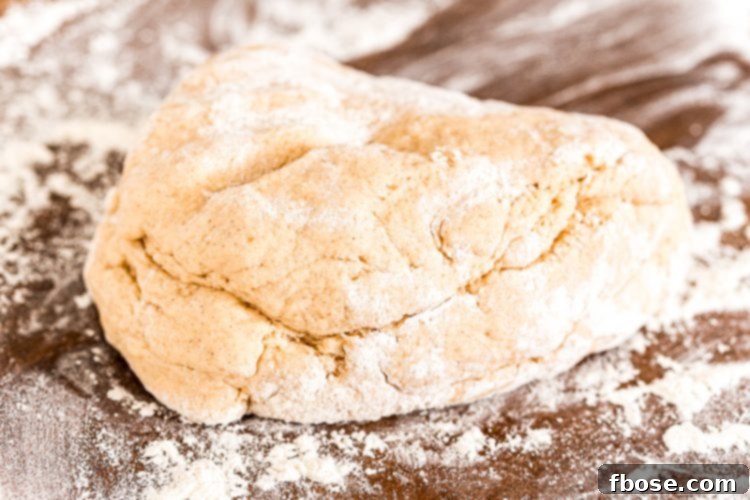
- **Add Melted Butter and Mix Dough:** With the mixer still running on a low speed, gradually pour in the melted unsalted butter. Once all the butter has been added, increase the mixer speed to medium. Continue to mix until the dough begins to pull away cleanly from the sides of the bowl. The dough will have a slightly flaky appearance, as shown in the image below, indicating it has reached the perfect consistency for rolling.
- **Rest the Dough:** Lightly flour a clean work surface. Gently shape the dough into a squarish ball and place it on the floured surface. Allow the dough to rest for 10 minutes. This brief resting period helps the gluten relax, making the dough easier to roll out evenly.
- **Roll Out the Dough:** Using a floured rolling pin, roll the rested dough out into a large, even rectangle. Aim for a thickness of about ¼ to ⅓ inch. The larger and more even your rectangle, the more consistent your cinnamon rolls will be.
- **Spread the Filling:** In a separate small bowl, prepare your cinnamon sugar filling by mixing together the brown sugar, granulated sugar, ground cinnamon, and melted salted butter until well combined. Using a rubber spatula, gently and evenly spread this delicious filling over the entire surface of the rolled-out dough, leaving about a 1-inch border along the edges. This border will help seal the roll later.
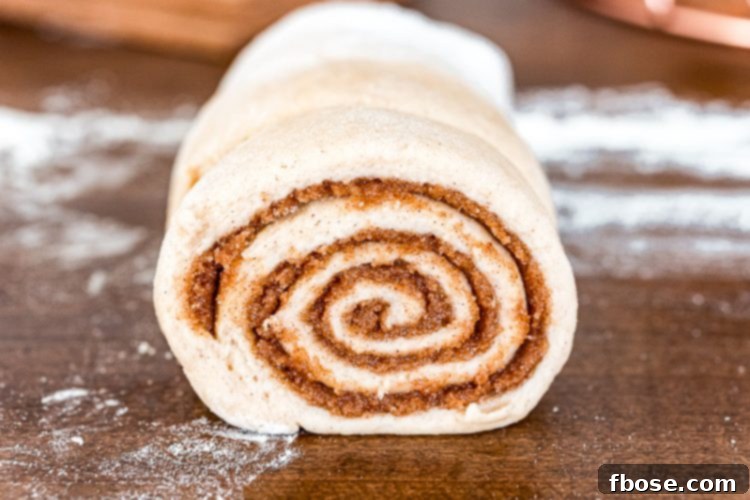
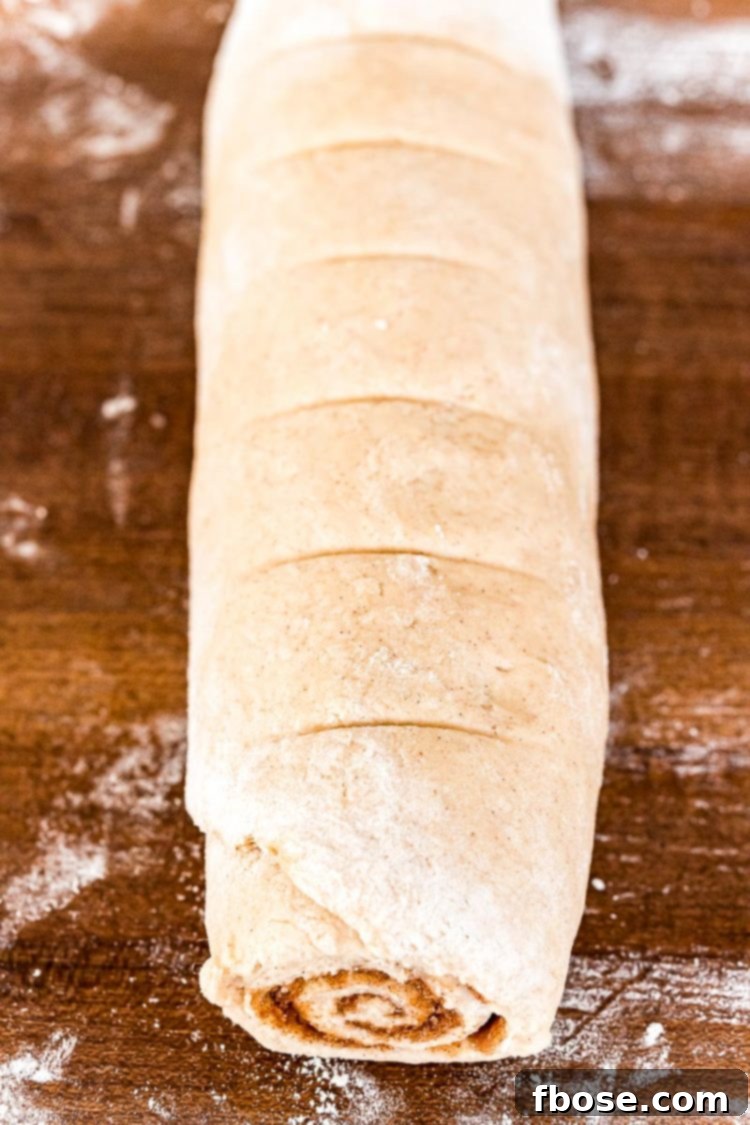
- **Roll and Mark the Dough:** Starting from one of the shorter ends of the rectangle, carefully and tightly roll up the dough. Keep the roll as snug as possible to ensure beautiful, defined swirls in your baked rolls. Once rolled, use a piece of unflavored dental floss (about 12-18 inches long) to mark where your cuts will be for 8 evenly sized buns. This technique helps achieve perfectly uniform rolls.
- **Slice the Rolls:** To make clean cuts without flattening your beautifully rolled dough, slide the unflavored dental floss underneath the rolled log at each marked portion. Wrap the floss over the top, cross the ends, and pull firmly to slice through the dough. Repeat this process until all 8 rolls are perfectly sliced.
- **Bake the Cinnamon Rolls:** Arrange the sliced cinnamon rolls in a greased baking dish, leaving a little space between each one to allow for expansion. Preheat your oven to 350°F (175°C). Bake for 30 to 35 minutes, or until the tops of the rolls are a beautiful golden brown and the filling is bubbling. The color indicates they are cooked through and perfectly caramelized.
- **Prepare and Apply the Icing:** While the cinnamon rolls are still warm from the oven, prepare your decadent icing. In a bowl, whisk together the powdered sugar, heavy cream, and vanilla bean paste or extract until you achieve a smooth, pourable consistency. Generously spread this creamy icing over the tops of the warm, baked rolls. The warmth of the rolls will allow the icing to slightly melt and seep into every delicious crevice.






The Magic Behind Our No-Yeast Cinnamon Rolls: Baking Powder!
You might be wondering, “How can you get chewy, pillowy cinnamon rolls without yeast?” The secret weapon in this recipe is a common kitchen staple: **baking powder!**
Baking powder is a leavening agent that reacts when moistened and heated, producing carbon dioxide bubbles that cause doughs and batters to rise. Unlike yeast, which relies on fermentation and takes time to activate, baking powder works almost instantly. This means our cinnamon roll dough only needs a brief 10-minute rest period—just enough time for the gluten to relax and make rolling easier—instead of the hours required for traditional yeast doughs to proof. This chemical leavening is precisely why these are often celebrated as “One Hour Cinnamon Rolls”—that’s the total time it typically takes from mixing bowl to delicious, frosted treat.
Another crucial element that ensures this recipe’s success is the use of standard all-purpose flour. While there are many types of flour, all-purpose provides the perfect balance of protein content, giving these buns the ideal consistency. They emerge from the oven neither too light and airy like a cake, nor overly dense and heavy. This precise flour choice contributes significantly to the chewy yet tender texture that we all adore in a good cinnamon roll.
I’ve experimented with self-rising flour, and while the taste was certainly pleasant, the resulting texture didn’t quite achieve the desirable chewiness and fluffiness that all-purpose flour provides. For truly exceptional results, sticking to all-purpose flour is key.
While these rolls might not replicate the exact characteristics of a traditional, long-proofed bakery-style cinnamon bun, I can confidently promise that they taste just as incredibly good, if not better, especially when considering how wonderfully easy and quick they are to make! They offer that same comforting indulgence with unparalleled convenience.
Storing and Freezing Your Easy Cinnamon Rolls
Making these Easy Cinnamon Rolls is already a breeze, but having a pre-made batch ready to pop into the oven for an even quicker treat is an absolute dream! Freezing cinnamon rolls is a fantastic way to enjoy them later, ensuring you always have a delightful homemade breakfast or dessert on hand. Here are a few ways you can freeze them effectively:
Freezing Fully Baked Cinnamon Rolls:
You can freeze these cinnamon rolls after they have been completely baked. Whether you prefer them frosted or unfrosted, just ensure they have cooled completely to room temperature before freezing. Wrap each individual roll tightly in plastic wrap, then place them in a freezer-safe bag or an airtight container. For extra protection against freezer burn, you can even use two layers of plastic wrap. This method helps maintain their fresh flavor and soft texture. When you’re ready to enjoy, simply thaw them in the refrigerator overnight or on the counter for a few hours, then warm them gently in the oven or microwave.
Freezing Par-Baked Cinnamon Rolls:
For the ultimate “fresh from the oven” experience with minimal fuss, try par-baking them. Bake your rolls for about 15 minutes—they should be set but still pale. Let them cool completely, then wrap them individually in plastic wrap and freeze. When that craving strikes, simply thaw the par-baked rolls in the refrigerator, then bake them for the remaining 15-20 minutes until golden brown and fully cooked. Frost them while warm, and you’ll have wonderfully fresh-baked Sticky Buns on your table in no time!
Storage Tips: How Long Do They Last?
If you somehow manage to have any leftover Cinnamon Rolls (and that’s often a big “if” given how delicious they are!), proper storage will ensure they remain fresh and enjoyable for as long as possible. Fortunately, these rolls are quite forgiving:
You don’t need to rush them into the refrigerator immediately after baking. They can be stored at room temperature for up to two days. Simply place them in an airtight container or a large plastic bag to prevent them from drying out. This keeps them soft and ready for a quick grab-and-go snack.
Beyond two days, it’s best to move them to the refrigerator. When properly sealed in an airtight container, refrigerated cinnamon rolls will keep well for about a week. To reheat, a quick zap in the microwave for 15-30 seconds or a few minutes in a warm oven will bring back their tender texture and gooey filling.

Exciting Variations to Customize Your Cinnamon Rolls:
These homemade Cinnamon Rolls are utterly delicious on their own, but the best part is how easily you can customize them to suit your taste or occasion with a few simple variations!
- **Add Chopped Pecans:** For an added layer of texture and a rich, nutty flavor, finely chop some pecans and mix them directly into your cinnamon-sugar filling before spreading it onto the dough. The pecans toast beautifully during baking, adding a delightful crunch. For a dedicated nutty experience, you might also love this Easy Pecan Cinnamon Rolls recipe!
- **Try a Tangy Cream Cheese Topping:** While our vanilla icing is a classic for a reason, a luscious cream cheese frosting offers a wonderfully tangy counterpoint to the sweet rolls. It’s a popular choice for breakfast pastries, after all! A rich cream cheese icing or cream cheese frosting complements the cinnamon perfectly and adds a delightful richness.
- **Embrace More Cinnamon with Cinnamon Frosting:** If you can’t get enough of that warm, inviting spice, consider a cinnamon-infused frosting! Instead of plain vanilla, use this Cinnamon Frosting as your icing alternative for an extra burst of cinnamon flavor that enhances the overall experience.
- **Fruitful Additions:** For a touch of fruity sweetness, consider finely dicing apples or pears and gently folding them into the cinnamon sugar filling. The fruit will soften and sweeten during baking, adding a new dimension of flavor and moisture.
- **Chocolate Lovers’ Dream:** Sprinkle a handful of mini chocolate chips over the cinnamon filling before rolling the dough. The chocolate will melt into gooey pockets of deliciousness, creating a truly decadent treat.
More Indulgent Brunch Recipes You’ll Love:
If you’re a fan of indulgent breakfasts and brunches, you’re in for a treat! Explore these other fantastic recipes from our collection that are perfect for a special morning meal or a leisurely weekend spread:
- Apple Pie French Toast – This recipe transforms the beloved flavors of classic apple pie into an incredible breakfast dish, offering a taste of all-American dessert in French toast form!
- Cinnamon Roll Casserole – For the ultimate cinnamon roll lovers who truly appreciate convenience, this slow cooker recipe offers an effortless way to enjoy warm, gooey cinnamon rolls with minimal fuss.
- Vanilla Pumpkin Coffee Cake – A delightful seasonal favorite for all pumpkin enthusiasts, combining the comforting flavors of vanilla and pumpkin in a moist, tender coffee cake perfect for breakfast or dessert.
- 5-Ingredient Snickerdoodle Sweet Rolls – Discover how a couple of ingenious ingredient hacks make this sweet roll recipe incredibly simple, yet bursting with the classic, comforting flavor of snickerdoodle cookies.
Save This 1-Hour Cinnamon Rolls Recipe!
Pin It For Later
Click the button above to save this delicious, quick, and easy recipe to your Pinterest board for future baking inspiration!
Let’s Connect and Share Your Creations!
We absolutely love hearing from you! If you’ve tried this delightful Easy Cinnamon Rolls recipe, please take a moment to let us know how much you enjoyed it by leaving a comment and a review below. Your feedback is invaluable and helps other bakers discover this wonderful treat!
Don’t forget to tag us – @sugarandsoulco – on Instagram and Pinterest with your beautiful photos of these homemade cinnamon buns. You can also join our vibrant Sugar & Soul Show-offs Community on Facebook and share your culinary successes there, where you can also participate in our exciting recipe challenges! Happy baking!
Recipe: Quick & Easy Cinnamon Rolls (No Yeast)
These delightful cinnamon rolls are prepared in just 1 hour, without the need for yeast or extensive rising time. Perfect for a quick breakfast or brunch!
- Author: Rebecca Hubbell
- Course: Breakfast, Dessert
- Cuisine: American, Danish, Swedish
- Prep Time: 15 minutes
- Cook Time: 35 minutes
- Resting Time: 10 minutes
- Total Time: 1 hour
- Servings: 8 people
- Rating: 5 out of 5 stars (based on 14 votes)
Ingredients
Dough
- 2⅔ cups all-purpose flour
- 1½ tablespoons baking powder
- 1 teaspoon kosher salt
- ¼ cup granulated sugar
- 1 teaspoon ground cinnamon
- 1 cup whole milk (room temperature)
- 1 teaspoon vanilla extract
- 1 large egg yolk (room temperature)
- ½ cup unsalted butter (melted)
Filling
- ¾ cup light brown sugar
- ⅓ cup granulated sugar
- 1 tablespoon ground cinnamon
- 6 tablespoons salted butter (melted)
Icing
- 2 cups powdered sugar
- ½ cup heavy cream
- 1 teaspoon vanilla bean paste or extract
Instructions
- Preheat oven to 350°F (175°C). Spray a medium casserole dish with cooking spray and set aside.
- In a large mixing bowl or stand mixer bowl, combine the flour, baking powder, salt, sugar, and cinnamon. Mix until well combined.
- Add the milk, vanilla, and egg yolk to the dry ingredients and mix just until combined.
- While the mixer is running on low speed, gradually pour in the melted butter. Increase the speed to medium and beat until the butter is fully incorporated and the dough begins to pull away from the sides of the bowl.
- Flour a large work surface. Shape the dough into a squarish ball and let it rest for 10 minutes.
- Using a floured rolling pin, roll out the dough into a large rectangle.
- In a separate bowl, mix together all the filling ingredients until well combined. Gently spread this mixture evenly over the top of the rolled dough, leaving about a 1-inch border around the edges.
- Tightly roll the dough from one of the shorter ends until fully rolled up into a log.
- Use unflavored dental floss to mark the dough into 8 even portions. To cut, slide the floss under the dough at each mark, cross the floss with your hands, and pull to slice cleanly through the dough.
- Place the sliced cinnamon rolls into the prepared baking dish. Bake for 30 to 35 minutes, or until the tops are golden brown.
- While the rolls are still warm, whisk together the icing ingredients (powdered sugar, heavy cream, vanilla) until smooth. Generously spread the icing over the top of the warm rolls.
Notes
- To Freeze Cooked Rolls: Allow completely cooled rolls (frosted or unfrosted) to be wrapped individually in plastic wrap, then placed in a freezer-safe bag or container. They can be stored for up to 2-3 months. Thaw in the refrigerator or at room temperature, then reheat.
- To Freeze Par-Baked Rolls: Bake for 15 minutes until set but not browned. Cool completely, wrap tightly, and freeze. To finish, thaw in the refrigerator, then bake for another 15-20 minutes until golden. Frost while warm.
- Shelf Life: Leftover cinnamon rolls can be stored in a covered container or plastic bag at room temperature for up to two days. For longer storage, move them to the refrigerator where they will keep for approximately one week.
- Recipe Variations:
- Nutty Crunch: Incorporate chopped pecans (or walnuts) into the filling for added texture and flavor.
- Cream Cheese Bliss: Swap the vanilla icing for a tangy cream cheese frosting for a classic bakery-style finish.
- Cinnamon Lover’s Delight: Enhance the spice by using a cinnamon-flavored frosting instead of traditional vanilla.
- Fruity Twist: Add finely diced apples or berries to the filling for a fresh, seasonal variation.
- Chocolate Indulgence: Sprinkle mini chocolate chips over the filling before rolling for a rich, melty chocolatey addition.
Nutrition Information
(Per serving, based on 8 servings)
- Calories: 666 kcal
- Carbohydrates: 101g
- Protein: 6g
- Fat: 28g
- Saturated Fat: 17g
- Cholesterol: 102mg
- Sodium: 397mg
- Potassium: 351mg
- Fiber: 2g
- Sugar: 66g
- Vitamin A: 927 IU
- Calcium: 186mg
- Iron: 2mg
Did You Make This Recipe?
Don’t forget to share it with me on Instagram @sugarandsoulco and follow on Tiktok @sugarandsoulco and Pinterest @sugarandsoulco for more delicious recipes and baking inspiration!
Rate this Recipe
Pin Recipe
Share Recipe