

Kool-Aid Pie is an unbelievably quick, easy, and vibrant no-bake dessert that promises pure joy with every spoonful. Crafted from just 4 simple ingredients, this delightful pie requires only about 15 minutes of hands-on preparation, making it the ultimate stress-free treat for any occasion. Bursting with fun, fruity flavors and eye-catching colors, it’s a summertime staple that brings smiles to faces of all ages. Whether you’re hosting a backyard barbecue, a kids’ birthday party, or simply craving a refreshing sweet bite, this Kool-Aid Pie is sure to be a crowd-pleaser and a nostalgic favorite!
For those looking to expand their repertoire of effortless and delicious warm-weather desserts, explore other fantastic options. You might love my Strawberries Romanoff, a sophisticated twist on classic strawberries and cream, or these playful Ice Cream Cone Cupcakes that are incredibly simple to whip up using a boxed cake mix. These desserts, much like our Kool-Aid Pie, are designed for maximum flavor with minimal effort, allowing you more time to enjoy the summer sunshine.

Imagine a dessert that’s not only incredibly creamy and satisfyingly sweet but also dazzling to look at. That’s exactly what you get with Kool-Aid Pie! Its cheerful colors instantly elevate any dessert spread, making it a feast for both the eyes and the palate. I particularly enjoy preparing these in mini handheld pie crusts, which are perfect for summer gatherings. They offer a delightful individual serving that’s easy to grab and enjoy, ensuring that every guest at your party can indulge in this delightful, fuss-free treat without any mess.
Why You’ll Adore This No-Bake Kool-Aid Pie Recipe!
This Kool-Aid Pie isn’t just a dessert; it’s a testament to how simple ingredients can create something truly spectacular. Here are five compelling reasons why this recipe has become a beloved favorite in kitchens everywhere:
- Budget-Friendly Delight: Utilizing readily available, everyday ingredients from your local grocery store, this recipe ensures an affordable dessert without compromising on taste. It’s a fantastic way to create a memorable treat without breaking the bank, making it ideal for large gatherings or when you’re looking for a cost-effective sweet solution.
- Effortlessly Simple: Say goodbye to complicated baking techniques and lengthy kitchen sessions. This pie is a true no-bake wonder. The entire process involves merely combining a few ingredients, spooning the luscious filling into a pre-made crust, and letting it chill. It’s so easy, even beginner cooks or young aspiring chefs can achieve perfect results every time.
- Endless Flavor Adventures: The world of Kool-Aid offers a spectacular array of flavors, opening up a universe of possibilities for your pie. From classic cherry and refreshing lemon-lime to exotic tropical punch, you can experiment with a different flavor profile every time you make this dessert. This versatility keeps the recipe exciting and ensures there’s a perfect Kool-Aid Pie for every palate and occasion.
- Perfect for Planning Ahead: Hosting a party or busy with holiday preparations? This pie is your secret weapon. It can be easily prepared a day or two in advance and stored in the refrigerator. This “make-ahead” convenience means less stress on the day of your family get-together, birthday party, or cookout, allowing you more time to socialize and relax.
- Customize Your Serving Size: Whether you need individual portions for a crowd or a single, impressive centerpiece dessert, this recipe adapts beautifully. You have the flexibility to fill a dozen mini pie crusts for charming handheld treats or opt for one large 9-inch pie to serve a family or small gathering. This adaptability makes it suitable for any event size or preference.

Essential Ingredients for Your Perfect Kool-Aid Pie
One of the most appealing aspects of this Kool-Aid Pie recipe is its simplicity, relying on just a handful of straightforward ingredients that deliver maximum flavor and texture. To create these delightful pies, you’ll need:
- Kool-Aid Powder Mix: This is the star ingredient that gives the pie its signature flavor and vibrant color. You only need one standard packet of unsweetened Kool-Aid mix for this recipe. While any flavor works, popular choices include Cherry, Strawberry, Lemonade, Grape, or even the classic Tropical Punch. Ensure you select the unsweetened variety, as the sweetened condensed milk provides ample sweetness. Using a sweetened mix might result in an overly sweet pie.
- Sweetened Condensed Milk: This thick, sweet, and creamy ingredient is crucial for both flavor and texture. It acts as a binder, helping to thicken the pie filling to the perfect consistency without any baking, and contributes significantly to the overall sweetness and rich mouthfeel of the dessert. Be sure not to confuse it with evaporated milk, as they are very different!
- Cool Whip (Thawed): A tub of thawed whipped topping, like Cool Whip, provides the airy, light, and fluffy base for the pie. It helps to create that signature creamy texture and lightens the richness of the sweetened condensed milk. Remember to thaw it completely in the refrigerator before mixing, but keep it chilled to maintain its structure. For a more homemade touch, you can also use freshly made whipped cream, though it may result in a slightly less stable pie that needs to be eaten sooner.
- Graham Cracker Crust: The perfect foundation for our no-bake pie! While I often use 12 individual store-bought graham cracker crusts for easy serving, you can just as easily use one large 9-inch pie crust. Store-bought crusts are a fantastic time-saver, but if you prefer a homemade touch and an extra layer of flavor, consider making your own. My Best Graham Cracker Pie Crust recipe is ideal for a 9-inch pie and adds a wonderful depth of flavor. Other exciting crust options include crushed Oreo cookies for a chocolatey base or vanilla wafers for a milder, buttery flavor.
Once your pies are set, the fun continues with toppings! Elevate your Kool-Aid Pie with an extra dollop of Cool Whip, a cloud of Perfect Homemade Whipped Cream, or a generous scattering of fresh fruit that complements your chosen Kool-Aid flavor. Imagine juicy cherries atop a cherry Kool-Aid pie, vibrant strawberries for a strawberry pie, or bright lime zest for a zesty lime flavor. The possibilities are truly endless, allowing for both creative expression and delicious customization!

Effortless Steps: How To Make Kool-Aid Pies
Creating these delightful Kool-Aid pies is incredibly straightforward, requiring minimal effort and no baking whatsoever. Follow these simple steps to bring your vibrant, creamy dessert to life:
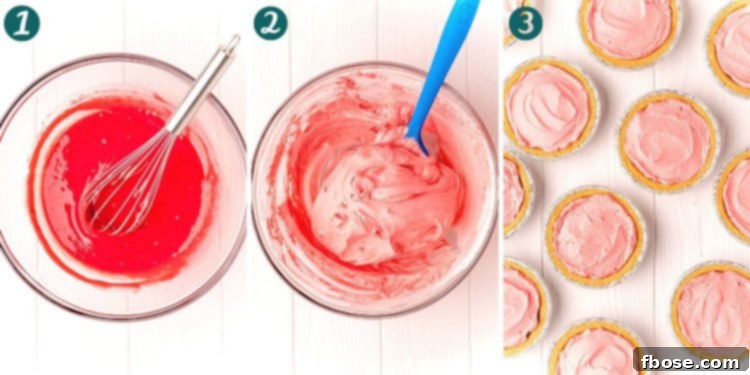
- Prepare the Filling: In a generously sized mixing bowl, combine the entire packet of Kool-Aid drink mix powder (ensure it’s unsweetened), the full can of sweetened condensed milk, and the thawed Cool Whip. Use a whisk to thoroughly blend these ingredients until the mixture is completely smooth and uniform in color. Make sure there are no lumps of dry Kool-Aid powder remaining.
- Fill the Crusts: Once your filling is perfectly blended, carefully scoop it into your chosen graham cracker crusts. If you are using 12 individual mini crusts, an ice cream scoop or large cookie scoop works wonderfully for portioning out the filling evenly. For a single 9-inch pie crust, simply pour all the filling into the crust.
- Smooth and Perfect: After distributing the filling, use an offset spatula or the back of a spoon to gently smooth out the top surface of the pie. Aim for an even layer that fills the crust edge-to-edge for a professional and appealing finish.
- Chill to Perfection: This is a crucial step for setting the pie. Place the filled pie crusts in the refrigerator and allow them to chill for at least one hour. For the best, firmest texture, chilling for 2-3 hours or even overnight is highly recommended. This ensures the pie holds its shape beautifully when sliced and served.
- Serve and Garnish: Once thoroughly chilled, remove the pies from the refrigerator. Now comes the fun part: topping them! Add an extra dollop of Cool Whip or fresh whipped cream, sprinkle with a few matching fresh fruit pieces (like raspberries for a cherry pie, or lime slices for a lime pie), or add a touch of color with sprinkles. Slice (if using a large pie) and serve immediately to enjoy this refreshing treat!
Frequently Asked Questions About Kool-Aid Pie
How To Store Kool-Aid Pie
To keep your Kool-Aid Pie fresh and delicious, it’s essential to store it properly. Place the pie, covered tightly with plastic wrap or aluminum foil, in the refrigerator. This airtight seal prevents it from absorbing odors from other foods and keeps it from drying out. When stored correctly, your Kool-Aid Pie will remain fresh and enjoyable for up to one week. For individual mini pies, storing them in an airtight container is ideal.
Can I Freeze Kool-Aid Pie?
Absolutely, Kool-Aid Pie freezes exceptionally well, transforming into a delightful frozen treat similar to an ice cream pie! To freeze, ensure the pie is completely set after its initial chilling period. Wrap each pie (or the entire large pie) tightly in at least two layers of plastic wrap, followed by a layer of aluminum foil. This double-layer protection helps prevent freezer burn. Place the well-wrapped pies into a freezer-safe bag or an airtight container, and they can be stored in the freezer for up to 3 months. When you’re ready to enjoy a frozen pie, simply take it out of the freezer and let it thaw in the refrigerator for an hour or two until it reaches your desired consistency. You can also enjoy it semi-frozen for a firmer, ice cream-like experience.
Can I Mix Fruit Into The Filling?
Yes, adding fresh fruit directly into the filling is a fantastic idea that can enhance both the flavor and texture of your Kool-Aid Pie! I highly recommend it for an extra burst of freshness. For best results, use chopped fresh fruits such as raspberries, strawberries, or blueberries. Gently fold the prepared fruit into the Kool-Aid mixture just before you’re ready to scoop the filling into the pie crusts. This timing helps to maintain the fruit’s texture and prevents it from sinking to the bottom. Avoid fruits with very high water content or those that brown quickly, unless you plan to serve the pie very soon after making it.
Can I Use Homemade Whipped Cream Instead of Cool Whip?
While Cool Whip provides a very stable and consistent texture, you can certainly use homemade whipped cream for a richer, less processed flavor. If you opt for homemade whipped cream, ensure it’s whipped to stiff peaks and is very cold before folding it into the mixture. Keep in mind that homemade whipped cream tends to be less stable than Cool Whip, so your pie might be slightly softer and will need to be consumed more quickly, ideally within 2-3 days.
What if My Pie Doesn’t Set Firmly?
If your pie isn’t setting as firmly as you’d like, there are a few potential reasons. First, ensure your Cool Whip was properly thawed but still very cold when mixed – if it’s too warm, it won’t hold its structure as well. Second, the chilling time is crucial; make sure it gets at least the recommended hour, and preferably longer. Lastly, always use sweetened condensed milk (not evaporated milk), as its thickness is key to the no-bake setting process.

Kool-Aid Pies continue to be one of my top choices for summer desserts, especially when I need a quick, easy, and undeniably delicious treat. Their vibrant colors and refreshing flavors make them an instant hit at any gathering. Why stop at one amazing summer dessert? Explore these other delightful options to bring to your next get-together!
- Blueberry Hand Pies – A charming and simple pie recipe featuring sweet blueberry pie filling encased in a flaky refrigerated pie crust, brushed with butter and sprinkled with coarse sugar for a perfect bite.
- Chocolate Cream Pie – Indulge in an incredibly creamy and rich chocolate filling nestled in a delicate, flaky pie crust, all crowned with a generous layer of homemade whipped cream.
- Peanut Butter Pie – This irresistible no-bake dessert combines a salty-sweet pretzel crust with a velvety peanut butter filling, generously topped with chopped peanut butter cups for ultimate decadence.
- Meyer Lemon Meringue Slab Pie – Enjoy a large-format pie that’s perfectly sweet and subtly tart, made easy with a prepackaged pie crust and ready in under an hour, ideal for feeding a crowd.
- Chocolate Toll House Pie – A comforting classic featuring a gooey chocolate chip cookie filling baked into a buttery pie crust, loaded with rich chocolate chips and crunchy walnuts.

Let’s Connect and Share Your Creations!
We love seeing your culinary triumphs! If you’ve tried this delightful Kool-Aid Pie recipe, please take a moment to share your experience and let us know how much you enjoyed it by leaving a comment and review below. Your feedback means the world to us!
Don’t forget to tag us – @sugarandsoulco – on Instagram and Pinterest with your beautiful photos of this pie. You can also join our vibrant Sugar & Soul Show-offs Community on Facebook and share your creations there, where you can also participate in our fun recipe challenges! We can’t wait to see your colorful Kool-Aid Pies!

Kool-Aid Pies
Ingredients
- 1 package Kool-Aid unprepared powder mix
- 12 ounces sweetened condensed milk
- 8 ounces cool whip, thawed
- 12 premade individual graham cracker crusts (or one large 9-inch graham cracker crust)
Instructions
- In a large bowl, whisk together the Kool-Aid mix, sweetened condensed milk, and cool whip until combined and smooth.
- Use a large cookie scoop to evenly distribute the filling into 12 individual graham cracker crusts or pour into one large 9-inch graham cracker crust.
- Use an offset spatula or the back of a spoon to gently smooth the filling out in the crust for an even top.
- Chill in the refrigerator for at least one hour, or preferably 2-3 hours for a firmer set.
- Remove from the refrigerator and top with more cool whip, homemade whipped cream, or fresh fruit if desired before serving.
Notes
- This recipe can also be made in a single 9-inch pie crust.
- We used fruit punch flavor for these specific pies, but you can experiment with any Kool-Aid flavor you desire for a different taste and color!
Nutrition Information
Did You Make This Recipe?
Don’t forget to share it with me on Instagram @sugarandsoulco and follow on Tiktok @sugarandsoulco and Pinterest @sugarandsoulco for more delightful recipes!
Pin Recipe
Share Recipe