
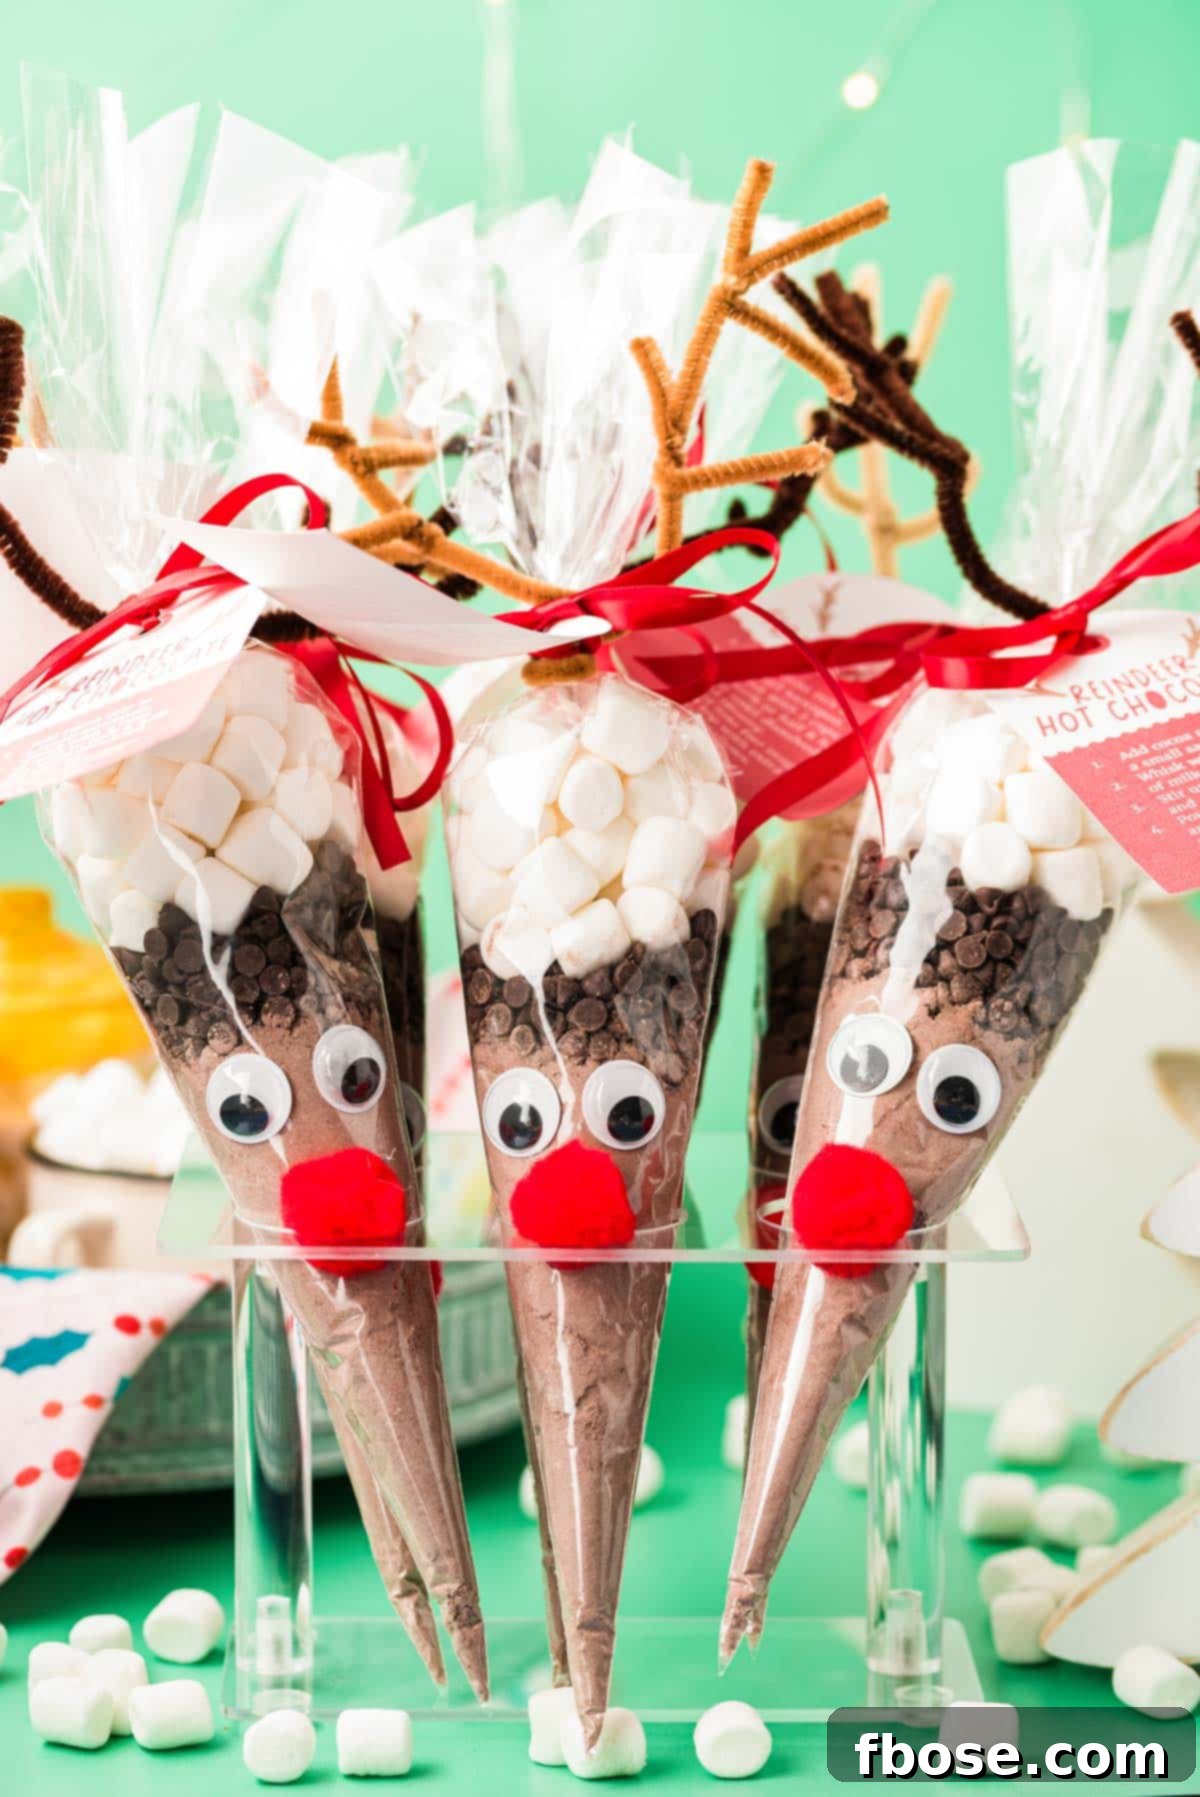
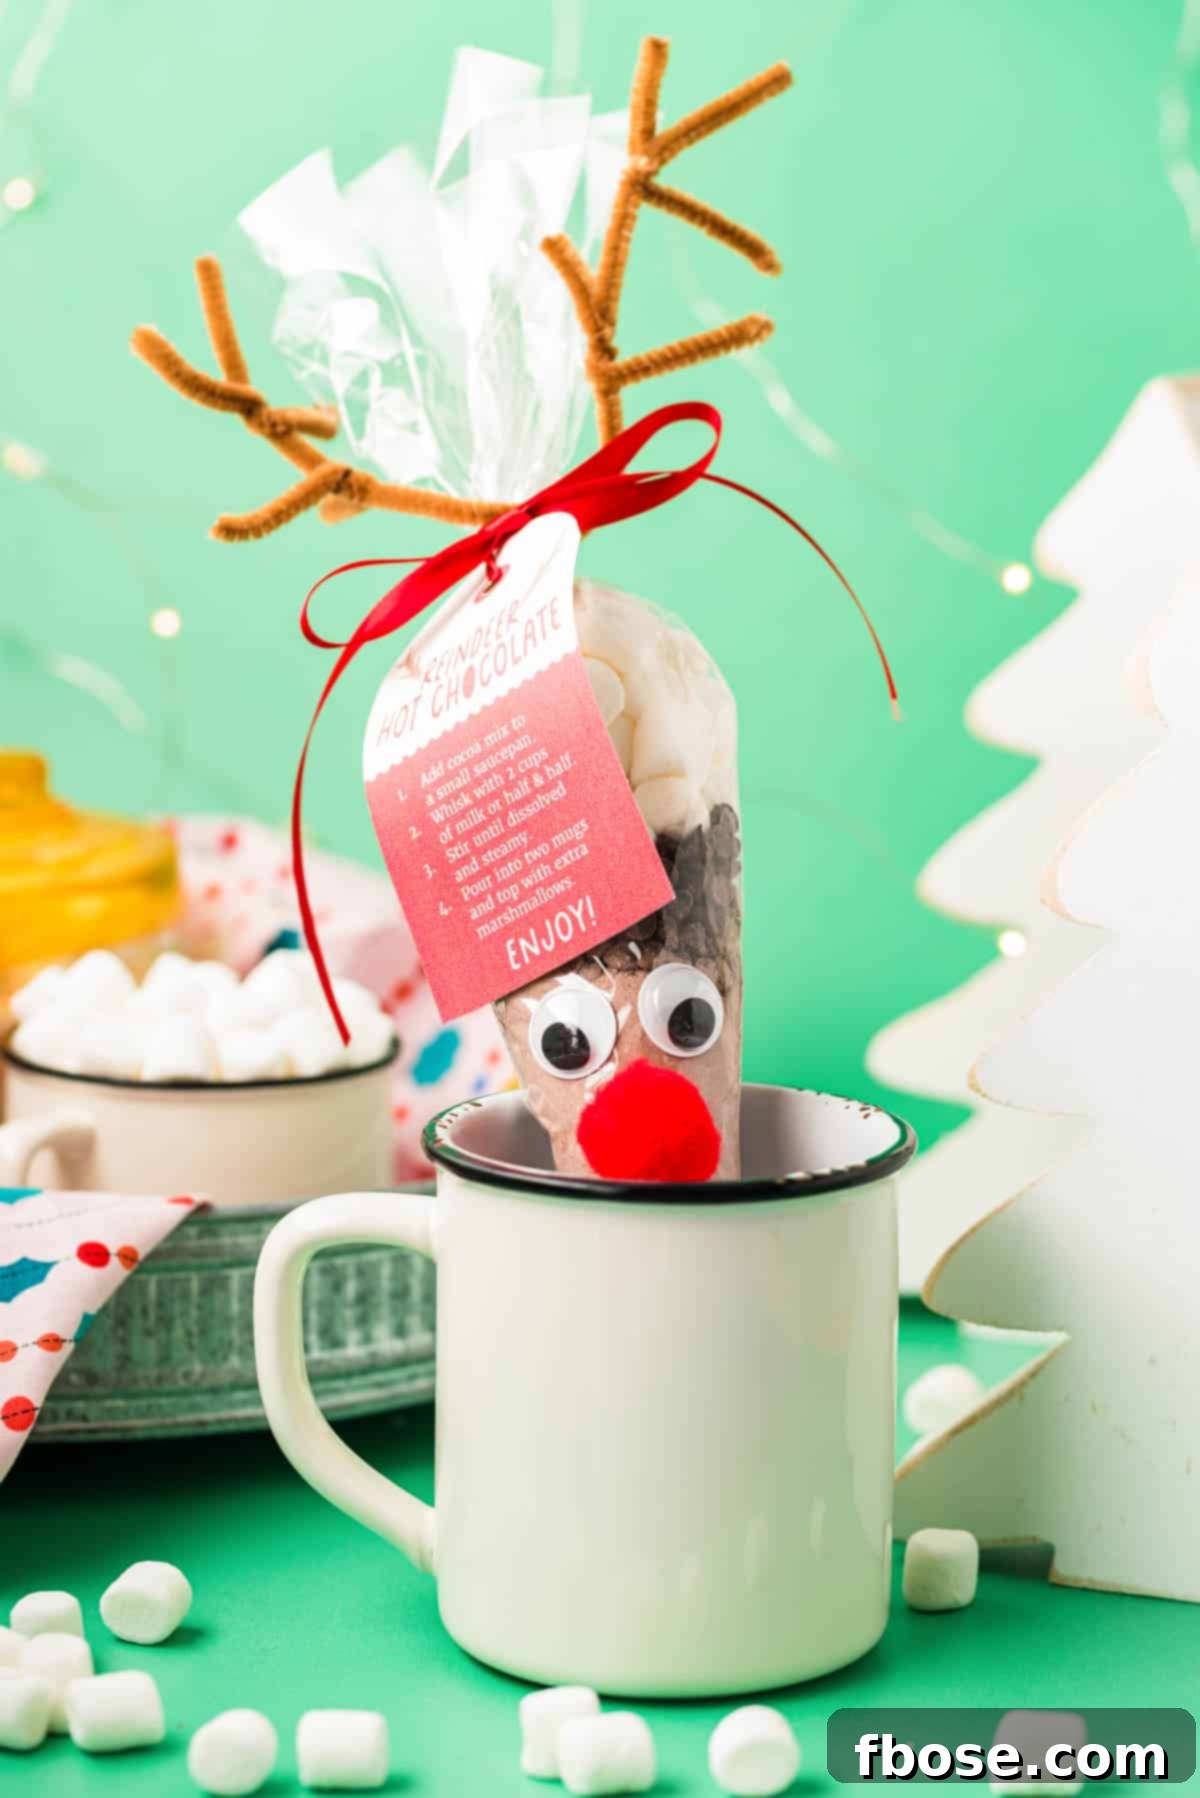
Reindeer Hot Chocolate Cones are a delightful holiday treat, lovingly filled with rich, homemade hot chocolate mix and fluffy mini marshmallows. Each cone is beautifully finished with a charming, free printable tag, making them an ideal festive gift!
Beyond these adorable hot chocolate cones, another cherished Christmas kitchen craft is making Magic Reindeer Food. This enchanting activity also comes with a free printable tag and brings just as much excitement and festive cheer to children and families!
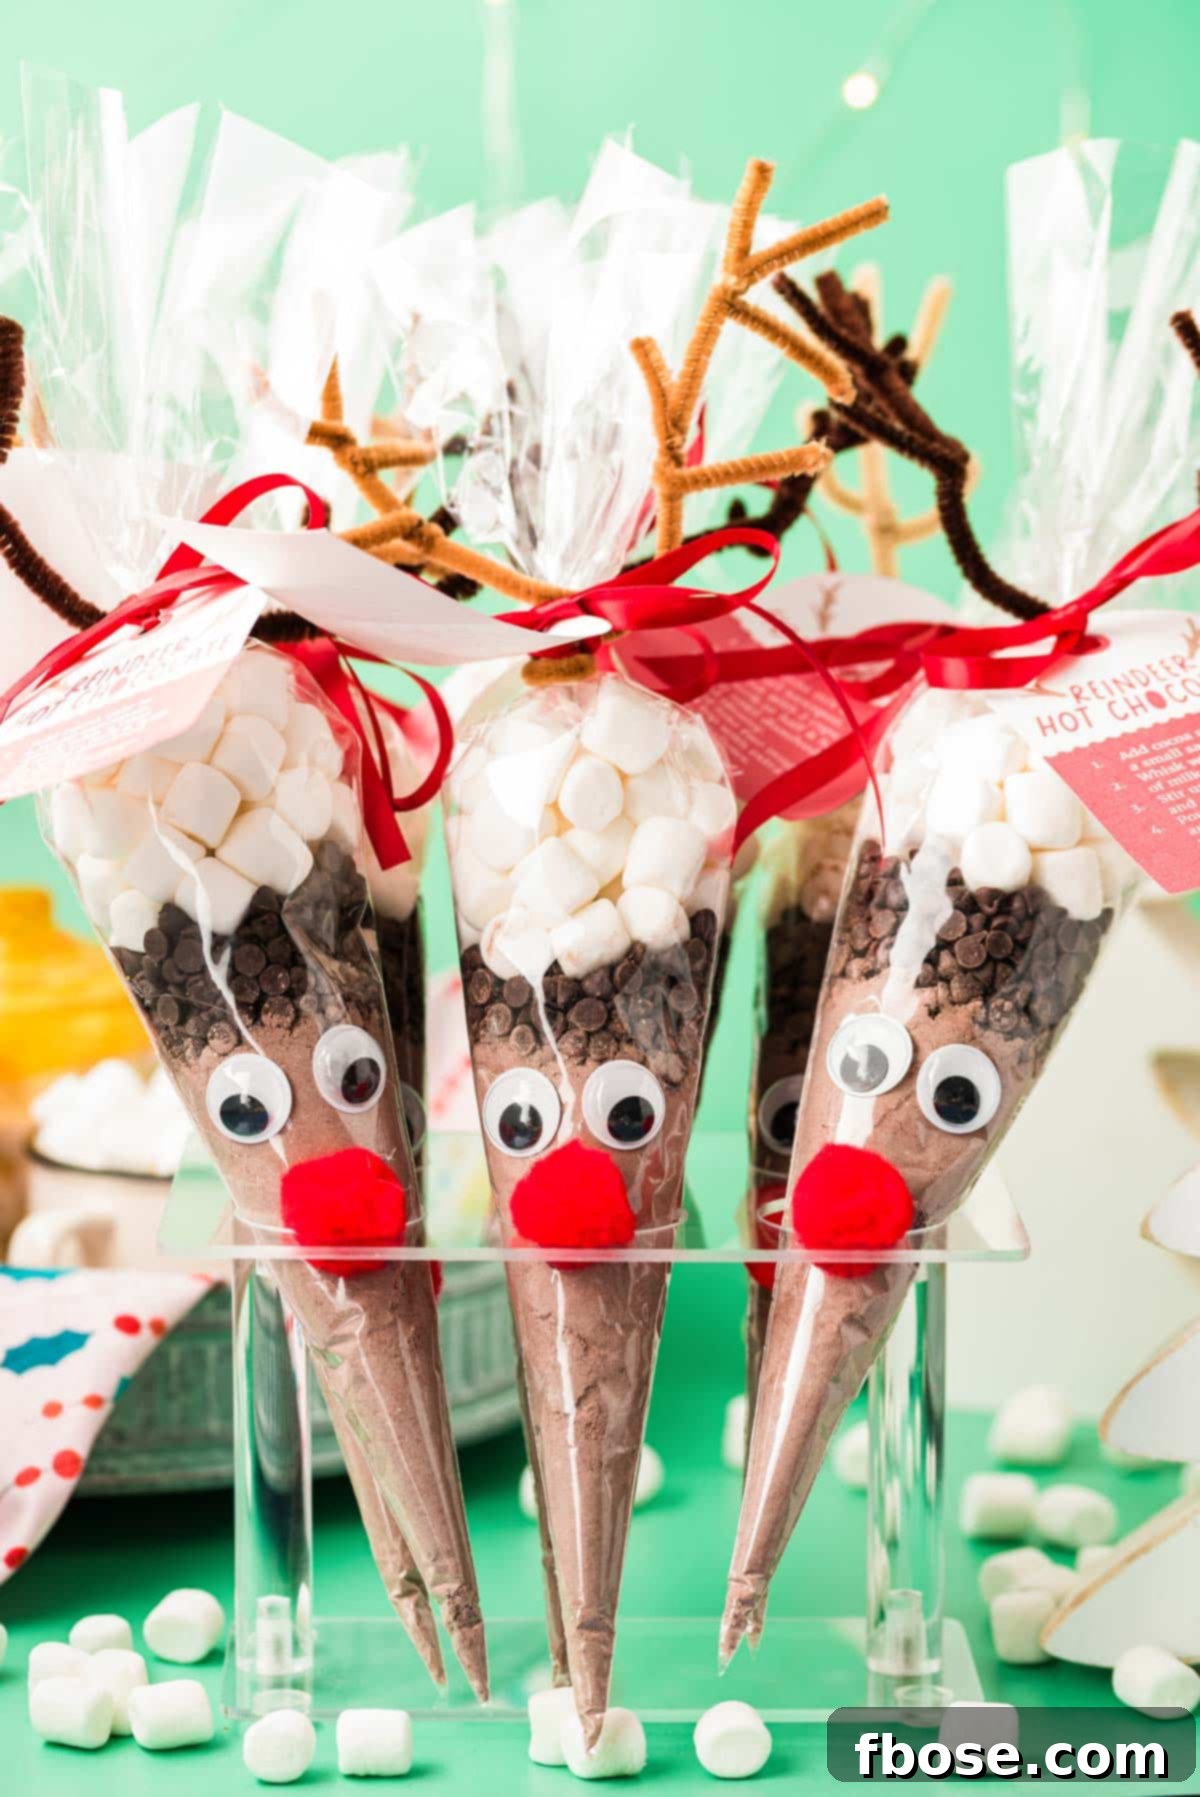
Reindeer Hot Chocolate Cones: The Ultimate Guide to Festive DIY Gifting
Embrace the spirit of the holiday season with these enchanting Reindeer Hot Chocolate Cones! This fun DIY project transforms simple ingredients into an extraordinary, budget-friendly gift that radiates warmth and thoughtfulness. Imagine the smiles when your child’s classmates, teachers, friends, or family members receive these whimsical, handcrafted treats. They’re not just a beverage; they’re a memorable experience waiting to be brewed.
Why Choose Homemade Hot Chocolate Cones for Your Holiday Gifting?
In a world of mass-produced gifts, a homemade present stands out. These Reindeer Hot Chocolate Cones offer a uniquely personal touch that store-bought options simply can’t match. Not only are they incredibly charming, but they also provide a delicious, customizable hot chocolate experience far superior to instant packets.
Opting for a DIY gift like this allows for significant cost savings, especially when you need to prepare multiple gifts for a larger group. By purchasing ingredients in bulk and assembling them yourself, you can create numerous thoughtful presents without breaking the bank. This makes them perfect for school exchanges, holiday parties, or as a delightful surprise for anyone on your list.
Beyond the practical benefits, crafting these cones is a wonderful activity to share with family. Children will adore helping to assemble the reindeer, adding googly eyes and pom-pom noses, fostering creativity and festive joy. It’s an opportunity to make lasting holiday memories together, transforming a simple craft into a cherished family tradition.
Crafting the Perfect Homemade Hot Chocolate Mix
The secret to these sensational Reindeer Hot Chocolate Cones lies in their truly homemade cocoa mix. Forget the bland, overly sweet store-bought powders; this recipe delivers a rich, creamy, and deeply satisfying hot chocolate that will impress everyone fortunate enough to receive it. Each bag is generously filled with a meticulously crafted blend of ingredients designed to create an unparalleled flavor.
Our delectable mix features a harmonious combination of powdered milk, fine powdered sugar, and unsweetened cocoa powder, forming the foundation of its luxurious taste. What truly elevates this hot chocolate is the inclusion of finely grated chocolate bars. We recommend using high-quality chocolate, such as Ghirardelli, which offers both bars and cocoa powder within the same brand, ensuring consistency and superior flavor. The mix can be customized to personal preferences; for instance, milk chocolate adds a sweet, classic comfort, while dark chocolate provides a more intense, sophisticated cocoa experience. You can even combine them for a perfectly balanced blend.
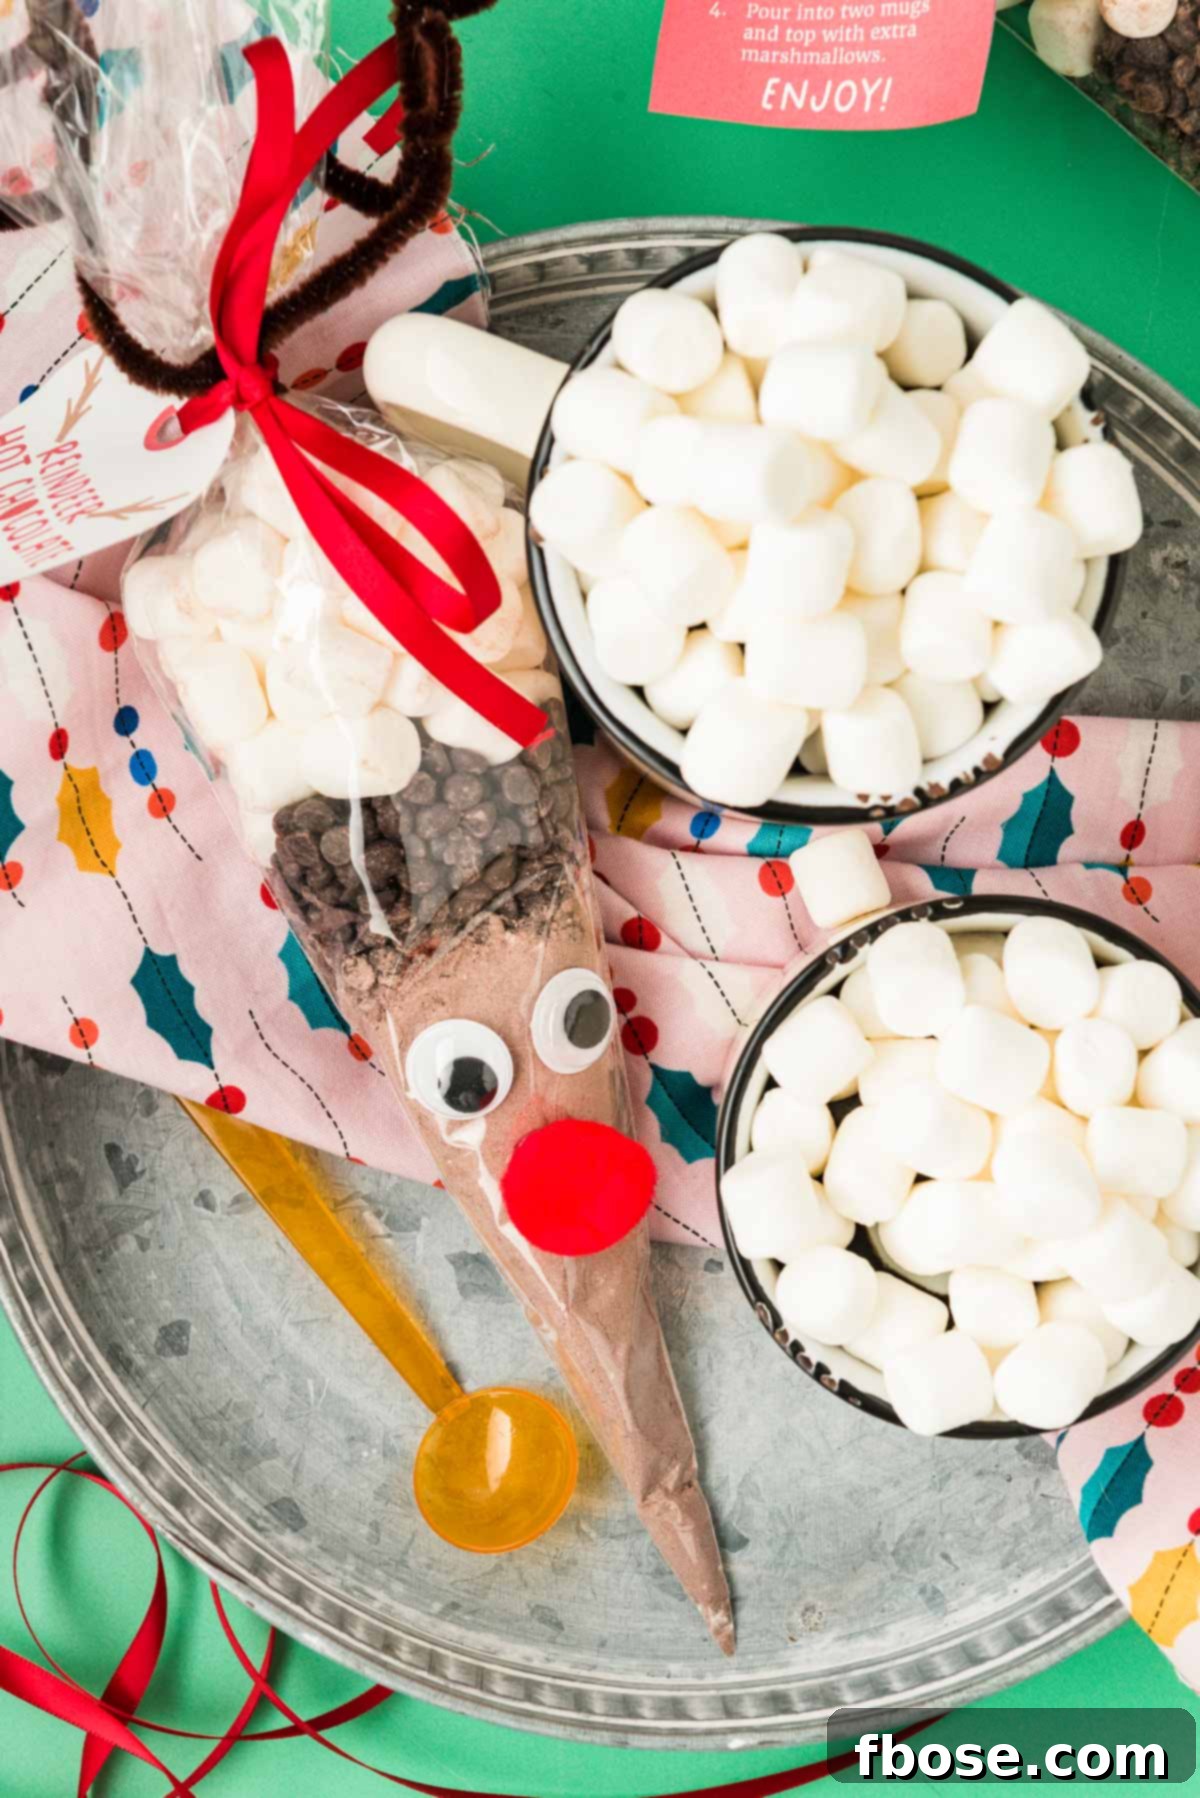
To complete this indulgent treat, the hot chocolate mix is then topped with a generous layer of mini chocolate chips, adding bursts of molten chocolate to every sip, and a cascade of fluffy mini marshmallows, which melt into a creamy, sweet cloud on top of the warm beverage. These thoughtfully layered ingredients guarantee a delicious and memorable hot chocolate experience, making each cone a miniature delight ready to be enjoyed.
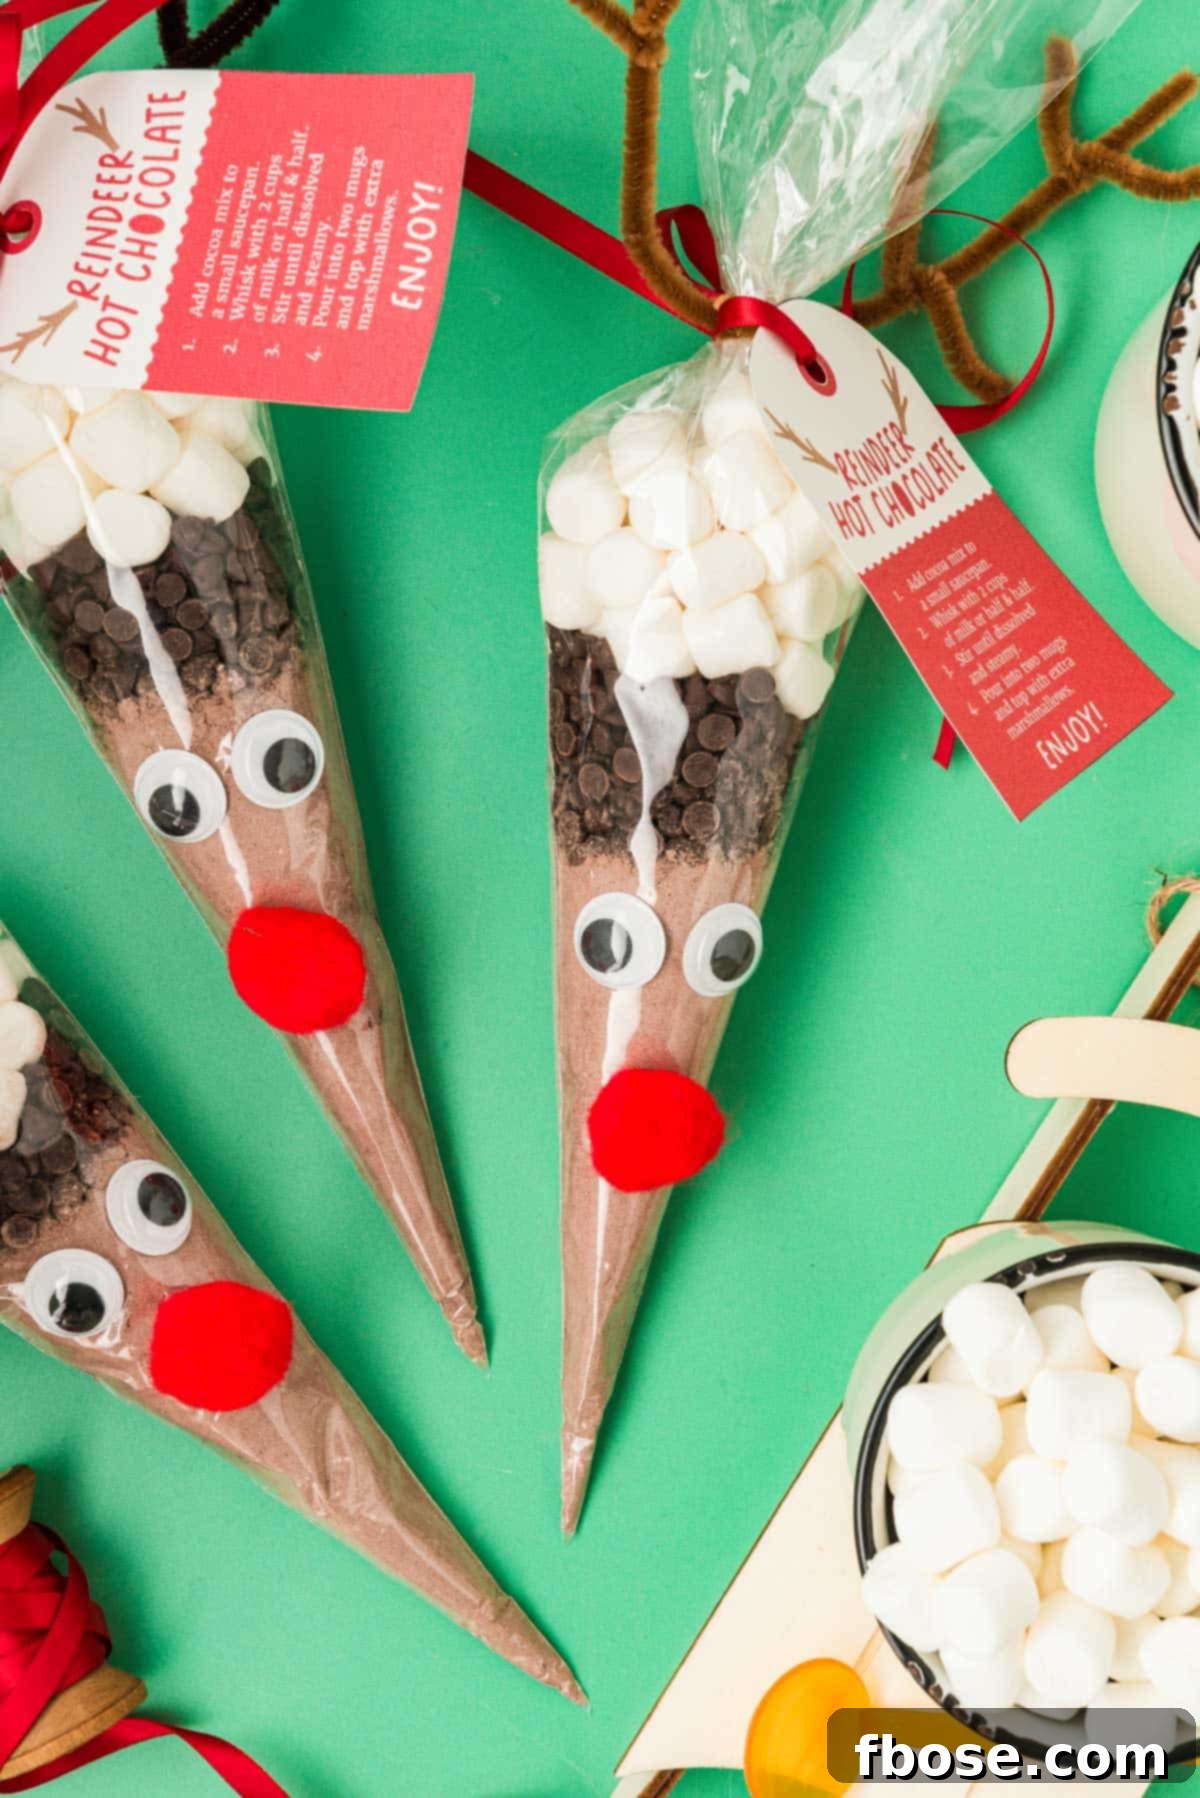
Assembling Your Festive Reindeer Hot Chocolate Cones: A Step-by-Step Guide
Creating these charming Reindeer Hot Chocolate Cones is a delightful holiday activity that’s as enjoyable to make as they are to give. Follow these detailed steps to assemble your herd of adorable, delicious reindeer, ready to bring cheer to friends and family.
What You’ll Need: Essential Supplies
- Cone Cello Treat Bags: These clear, conical bags are perfect for showcasing the layers of your hot chocolate mix. If cone bags are unavailable, gallon-sized Ziploc bags can be used by carefully arranging the contents into one corner to achieve a similar conical effect.
- Funnel: While not strictly necessary, a kitchen funnel significantly simplifies the process of getting the hot cocoa mix into the bags cleanly and efficiently. A piece of paper rolled into a cone shape can also serve as a makeshift funnel.
- Decorations: To bring your reindeer to life, you’ll need a selection of craft supplies: vibrant red pom-poms for their noses, playful googly eyes, bendable brown pipe cleaners for antlers, and elegant holiday ribbons to add a festive flourish.
- Free Printable Tags: Don’t overlook this crucial step! Download and print the complimentary tags provided. These tags are not just decorative; they include the essential instructions for preparing the hot chocolate, ensuring your recipients know exactly how to enjoy their delicious gift. For best results and durability, print these tags on cardstock.
- Hot Chocolate Mix Preparation Tools: To achieve a fine, consistent texture for the grated chocolate bars in your mix, a food processor or a fine grater is highly recommended.
- Adhesive: A low-temperature hot glue gun with glue sticks is ideal for securely attaching the reindeer’s features. As an alternative, small, strong glue dots work just as effectively and offer a mess-free option.
- Other Tools: A single-hole punch for the printable tags and a sharp pair of scissors will also be needed for the assembly process.
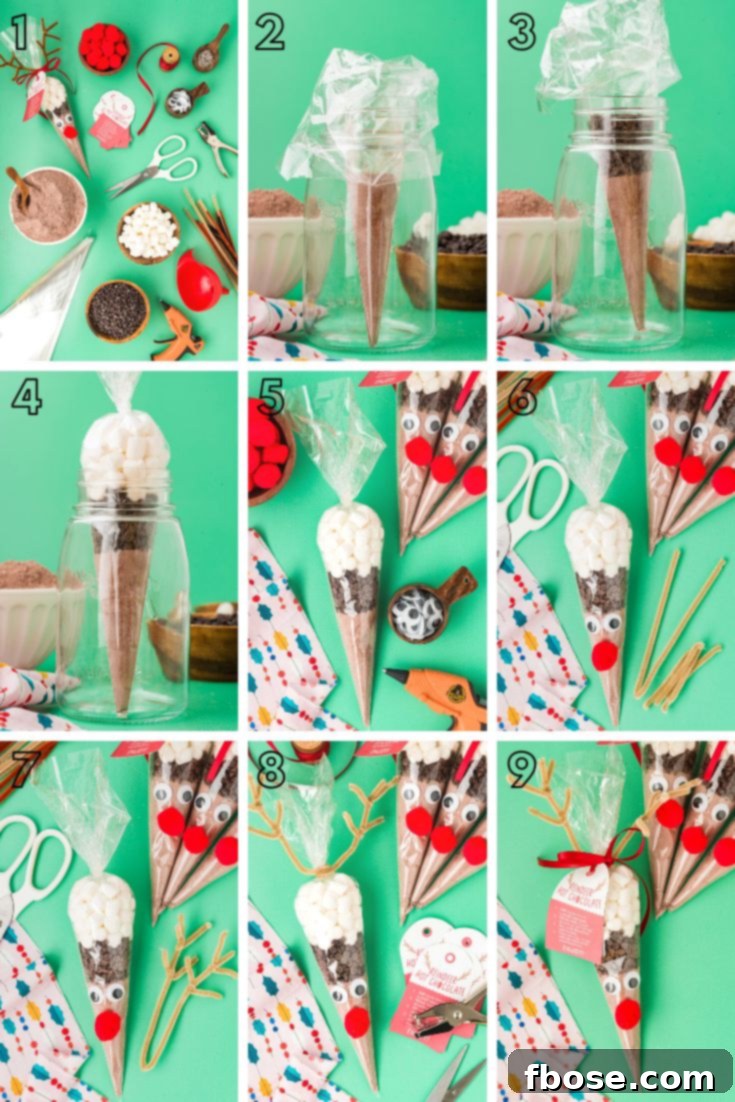
Step-by-Step Assembly Instructions:
- Prepare the Hot Chocolate Mix: In a medium mixing bowl, combine the powdered milk, powdered sugar, unsweetened cocoa powder, finely grated white chocolate, finely grated milk chocolate, and powdered coffee creamer. Whisk all these ingredients together thoroughly until they are well combined and the mixture is smooth. This ensures an even flavor distribution in every serving.
- Set Up Your Bags: To make the filling process easier and more stable, place a cone cello treat bag into a tall drinking glass or a mason jar. This will hold the bag open and upright, allowing you to add ingredients without spills.
- Fill with Hot Cocoa Mix: Carefully spoon ¼ cup of the homemade hot cocoa mix into the bottom of each treat bag. Using a funnel at this stage is highly recommended, as it prevents the fine powder from sticking to the sides of the bag and ensures a clean layered look.
- Add Chocolate Chips: Next, layer ¼ cup of mini chocolate chips directly on top of the hot cocoa mix. Gently pat them down with your fingers or the back of a spoon to create a distinct and visually appealing layer within the cone.
- Top with Marshmallows: Add ⅔ cup of mini marshmallows on top of the mini chocolate chips. These soft, sweet marshmallows will form the delightful “hat” of your reindeer, ready to melt into a creamy topping.
- Seal the Bag: Twist the top portion of the treat bag tightly closed, just above the layer of mini marshmallows. Secure this twisted section firmly with a small elastic band to keep all the contents perfectly sealed.
- Add the Eyes: Using a low-temperature hot glue gun or convenient glue dots, carefully attach two googly eyes to the front of the cone, positioning them just below the layer of mini chocolate chips.
- Place the Nose: Glue a vibrant red pom-pom onto the cone, approximately two inches below the eyes. This will create the iconic red nose of your reindeer, adding a festive pop of color.
- Craft the Antlers: Take one brown pipe cleaner and bend it precisely in half to form the main arch of the antlers. Then, cut another pipe cleaner into four equal smaller lengths. These smaller pieces will be used for the antler branches.
- Assemble the Antlers: Take two of the smaller pipe cleaner lengths and wrap and bend them onto each side of the main bent pipe cleaner. This will create the distinctive branched look of reindeer antlers. Repeat this step for each cone.
- Attach the Antlers: Position the crafted antlers above the secured elastic band at the top of the treat bag. Wrap the middle section of the antlers twice around this twisted top, ensuring they are securely fastened and stand upright.
- Prepare the Tags: Carefully cut out each of your printed labels. Using a single-hole punch, create a neat hole in the designated circular area at the top of each tag.
- Final Touch: Ribbon and Tag: Thread a 20-inch strip of festive holiday ribbon through the punched hole in the label. Then, tie the ribbon securely around the top of the treat bag, just below the antlers, forming an attractive bow. Repeat this process for all remaining hot chocolate cones until all your mix has been transformed into charming reindeer.
- Serving Instructions: When you’re ready to enjoy, simply empty the entire contents of one Reindeer Hot Chocolate Cone into a small saucepan. Add 2 cups of milk (or half & half for an extra creamy indulgence) and whisk continuously over medium heat until the mixture is smooth, warm, and steaming. Serve immediately and savor the cozy flavor!
Beyond the Basics: Creative Customization and Gifting Ideas
While the classic Reindeer Hot Chocolate Cone is undeniably charming, don’t hesitate to infuse your unique style and personal touch. The beauty of DIY gifts lies in their adaptability, allowing you to tailor them to individual tastes and preferences. Consider these exciting customization options:
- Chocolate Variations: Experiment with different types of chocolate for your mix to create diverse flavor profiles. A darker chocolate can offer a more intense, less sweet experience, while white chocolate can add a creamy, vanilla-infused twist. Peppermint-flavored chocolate is also a fantastic festive option for a minty kick.
- Topping Adventures: Beyond the traditional mini marshmallows and chocolate chips, unleash your creativity with additional toppings. Crushed peppermints offer a refreshing crunch, a sprinkle of cinnamon can add warmth, or a pinch of chili powder can transform your cocoa into a Mexican hot chocolate flair. Tiny sprinkles in holiday colors or even edible glitter can add extra sparkle.
- Antler Alternatives: If pipe cleaners aren’t your preferred material, consider edible alternatives. Small pretzel twists can make delicious, crunchy antlers, or you could cut out brown craft foam shapes for a different textured look.
- Personalized Tags: While our free printable tags are wonderfully convenient, you might enjoy designing your own to include personalized messages, recipients’ names, or special holiday greetings. This adds an extra layer of thoughtfulness to your gift.
These versatile cones aren’t just for kids; they make wonderful gifts for a wide array of recipients and occasions:
- Teachers and School Staff: A thoughtful and much-appreciated gesture to show gratitude during the busy holiday season.
- Coworkers and Colleagues: A delightful desk treat to brighten their day and spread holiday cheer in the workplace.
- Friends and Neighbors: A warm and inviting way to share holiday joy and connect with those around you.
- Secret Santa Exchanges: An imaginative, budget-friendly, and universally loved option for gift exchanges.
- Stocking Stuffers: Perfect for adding a homemade touch to Christmas stockings, ensuring a delightful surprise on Christmas morning.
Storage Tips and Shelf Life
One of the many benefits of creating these DIY hot chocolate cones is their impressive shelf life, which makes them perfect for preparing well in advance of the holiday rush. When stored correctly, your homemade hot cocoa mix will maintain its freshness and delicious flavor for up to 3 months when kept at room temperature. To ensure optimal preservation and prevent any moisture absorption or flavor degradation, it is crucial to store the mix in an airtight container or a tightly sealed mason jar. This protection will keep your cocoa blend as delightful as the day you made it, ready to be gifted or enjoyed whenever the craving strikes.
Frequently Asked Questions (FAQ)
- How do I finely chop the chocolate bar for the cocoa mix? For the best consistency and to ensure the chocolate melts smoothly into your hot beverage, we recommend using a food processor to finely chop the chocolate bar. If you don’t have a food processor, a fine grater can also achieve a similar texture, though it might require a bit more effort.
- What if I don’t have cone cello treat bags? No problem at all! If cone cello treat bags are unavailable, gallon-sized Ziploc bags can serve as an excellent substitute. Simply arrange the hot cocoa mix into one corner of the bag to mimic the conical shape, then proceed with the decorations as usual.
- Can I use something other than a low-temperature hot glue gun? Absolutely! If you don’t own a hot glue gun, or prefer a less hands-on approach, glue dots are a fantastic alternative. They are clean, easy to use, and provide a strong enough hold to keep all your reindeer’s features securely in place.
- Where can I find cone cello treat bags? These specialty bags are typically available at most craft stores, especially as the holiday season approaches. You can also find a wide selection of cone cello treat bags readily available for purchase online through various e-commerce retailers.
- Can I make a large batch of the hot chocolate mix ahead of time? Yes, preparing a large batch of the dry hot chocolate mix in advance is a smart strategy, particularly if you plan on assembling many cones. Simply store the bulk mix in a large airtight container, and it will be ready for quick assembly whenever you need to create a gift or a festive treat.
- Are these suitable for people with dietary restrictions? The basic recipe for these hot chocolate cones contains dairy (from powdered milk and chocolate). However, you can explore dairy-free powdered milk alternatives and dairy-free chocolate options to accommodate those with specific dietary needs. Always ensure to check all ingredient labels carefully.
Other Festive Hot Chocolate Recipes to Explore
If you love hot chocolate as much as we do, you’re in for a treat! As the temperatures drop and the holiday spirit takes over, there’s nothing quite like a warm, comforting mug of cocoa. While these Reindeer Hot Chocolate Cones are a fantastic gifting option and a delightful treat, don’t forget to explore other incredible hot chocolate recipes that can add warmth to your winter season:
- Crockpot Hot Chocolate: The perfect solution for serving a large crowd at holiday gatherings, keeping your cocoa warm and ready.
- Nutella Hot Chocolate: A truly decadent, nutty, and rich twist on the classic, offering an irresistible flavor for chocolate-hazelnut lovers.
- Hot Chocolate Coffee: The best of both worlds for those who adore both coffee and chocolate, providing a delightful energizing warmth.
- Kahlua Hot Chocolate: A sophisticated and delightful adults-only version, perfect for festive parties and cozy evenings.
- Black Cherry Bourbon Hot Chocolate: An adventurous and exquisitely flavored option for those seeking a unique and indulgent beverage on chilly evenings.
Join the Holiday Crafting Fun!
We hope you’ve thoroughly enjoyed this comprehensive guide to creating adorable Reindeer Hot Chocolate Cones. They are more than just a delicious treat; they are a charming way to spread joy, ignite creativity, and forge cherished holiday memories that will last a lifetime. Whether you’re making them with your children for a fun family activity, crafting them as heartfelt gifts, or simply preparing a batch to savor at home, these festive cones are guaranteed to bring smiles and warmth to everyone.
If you’ve tried this delightful recipe, please let us know your thoughts by leaving a comment and a review below. We absolutely love hearing from you and seeing your wonderful creations!
Don’t forget to tag us – @sugarandsoulco – on Instagram and Pinterest with your beautiful photos! You can also join our vibrant Sugar & Soul Show-offs Community on Facebook, where you can share your culinary successes and participate in our fun recipe challenges!
Reindeer Hot Chocolate Cones
Author: Rebecca Hubbell
Course: Beverage
Cuisine: American
Prep Time: 5 minutes
Total Time: 5 minutes
Reindeer Hot Chocolate Cones are filled with delicious homemade hot chocolate and mini marshmallows that are finished off with a fun printable tag!
8 bags
Pin Recipe
Rate This Recipe
Equipment
- 8 Cone cello treat bags
- Funnel (optional)
- 8 red pom poms
- 16 googly eyes
- 8 rubber bands
- 16 brown pipe cleaners
- Low-temperature hot glue gun
- Hot glue sticks
- 8 20″ strips holiday ribbon
- Printable tags (print on cardstock if possible)
- Hole punch
- Scissors
Ingredients
Hot Chocolate Mix
- ½ cup powdered milk
- ½ cup powdered sugar
- ¼ cup unsweetened cocoa powder
- 2 tablespoons grated white chocolate bar
- 2 tablespoons grated milk chocolate bar
- 1 tablespoon powdered coffee creamer
Reindeer Cones
- 2 cups mini chocolate chips
- 5⅓ cups mini marshmallows
Instructions
- In a medium mixing bowl, whisk together powdered milk, powdered sugar, unsweetened cocoa powder, white chocolate, milk chocolate, and powdered coffee creamer.
- Place a treat bag into a drinking glass or mason jar to hold it in place.
- Spoon in ¼ cup of hot cocoa mix into the bag. Use a funnel to avoid having it stick to the sides of the bag.
- Layer in ¼ cup of mini chocolate chips on top of the hot cocoa mix, gently patting them down with your fingers or the back of a spoon.
- Add ⅔ cup of mini marshmallows on top of the mini chocolate chips.
- Twist the treat bag closed and secure it with an elastic band right above the mini marshmallows.
- Glue googly eyes just below the layer of mini chocolate chips.
- Glue the pom pom nose approximately two inches below the eyes.
- Bend one pipe cleaner in half and cut the other pipe cleaner into 4 equal lengths.
- Wrap and bend the two smaller length pipe cleaners on either side of the main bent pipe cleaner “antlers.”
- Wrap the middle of the antlers twice around the top where the elastic band is twice.
- Cut out the printable label and using a single-hole punch, punch a hole in the top, through the circle.
- Thread the cut ribbon through the punched hole and tie it around the top of the treat bag. Repeat with the remaining cones until hot chocolate mix is gone.
- When ready to make, add the contents of the bag to a small saucepan with 2 cups of milk or half & half and whisk together until smooth and warm.
Notes
- Store in an air-tight container or even a mason jar. This will be good for 3 months.
- How do you get the chocolate bar so finely chopped? You can use a food processor or even a fine grater.
- Gallon sized Ziploc bags work in a pinch if you arrange the hot cocoa mix into a corner of the bag.
- You can use glue dots in place of a low-temperature hot glue gun.
Nutrition
Calories: 577kcal | Carbohydrates: 88g | Protein: 16g | Fat: 22g | Saturated Fat: 14g | Polyunsaturated Fat: 1g | Monounsaturated Fat: 6g | Trans Fat: 1g | Cholesterol: 46mg | Sodium: 209mg | Potassium: 854mg | Fiber: 5g | Sugar: 77g | Vitamin A: 425IU | Vitamin C: 4mg | Calcium: 460mg | Iron: 2mg
Did You Make This Recipe?
Don’t forget to share it with me on Instagram @sugarandsoulco and follow on Tiktok @sugarandsoulco and Pinterest @sugarandsoulco for more!
Pin Recipe
Share Recipe